Creating gears in Fusion 360 is easier than most think.
Each copy of Fusion 360 includes a few sample add-ins. Fortunately, one of the sample add-ins is a Spur Gear generator.
Accessing the Spur Gear Add-in
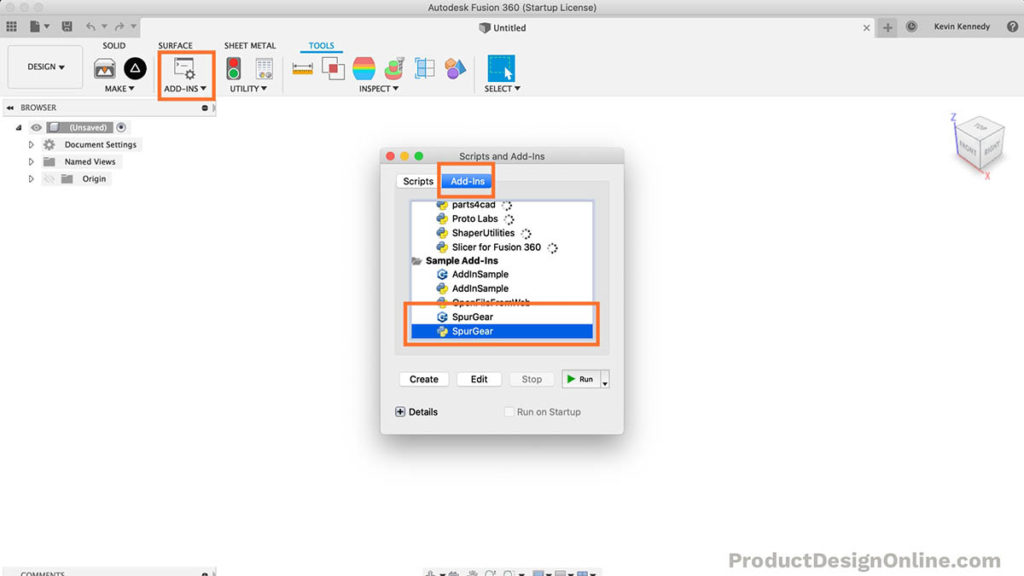
Select the Tools tab > Scripts & Add-ins > Add-ins Tab > Scroll down until you can see the “Spur Gear” generator. Note: There are two samples. One written in C++ and one written in Python. Both work the same, so it doesn’t matter which one you choose.
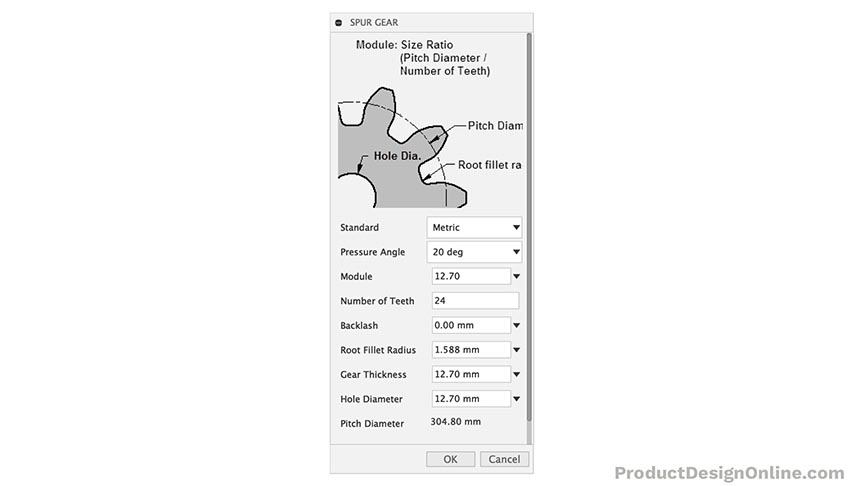
Simply fill out the gear details and the add-in will automatically generate your gear.
You should be familiar with the gear terminology before 3D printing any gears. This will help you avoid common mistakes and errors that prevent the gears from working.
The following gear details are options that can be altered in Fusion 360 (Spur Gear plugin)
- Gear Standard
- Gear Pressure Angle
- Gear Module
- Diametral Pitch
- Number of Teeth
- Backlash
- Root Fillet Radius
- Gear Thickness
- Hole Diameter
- Pitch Diameter
- Avoiding Undercut
Gear Standard
The standard option lets you choose from English or Metric units. This is a personal preference, but note that it will also change one of the options (as noted below).
Gear Pressure Angle
The pressure angle of a gear tooth is the angle between the tooth face and the tangent gear wheel.
It is more precisely the angle at a pitch point between the line of pressure (which is normal to the tooth surface) and the plane tangent to the pitch surface.
Gear Module
The gear module is the unit of size or ratio of the gear’s pitch diameter divided by the number of gear teeth.
The module is only available when the Standard is set to Metric.
Diametral Pitch
The diametral pitch is, by definition, the number of teeth divided by the pitch diameter.
This option will only show up when the Standard is set to English.
Number of Teeth
The number of teeth option lets you define how many teeth are placed around the gear.
Backlash
The Backlash option lets you define a clearance between teeth of the mating gear. This is critical to let the gears mesh without binding the gears.
The clearance prevents overheating and tooth damage. It also provides space or lubricating oil or grease to be applied between the teeth.
You will want to use a backlash if you’re planning on 3D printing the gears. I’ve found that .15mm works well, as that gives a total clearance of .3mm (when applied to both gears).
Root Fillet Radius
The root fillet radius is the curvature between the tooth surface and the tooth root.
Your root fillet radius must not surpass the maximum value. You will get a warning message at the bottom of the dialog if your value is higher than allowed.
You will have to be cautious even when your root fillet radius does not surpass the maximum. Too large of a radius will produce an undercut.
An undercut will prevent the gear teeth from correctly meshing with each other.
Gear Thickness
The gear thickness represents the extruded height of the gear.
Thankfully, the height can still be altered after using the Spur Gear generator. Simply select the top face of the gear > right-click > select “press pull” > drag or type out the desired dimensions.
Hole Diameter
The hole diameter is also straightforward. The value entered will determine the diameter of the hole.
It’s important to note, the hole size can be set to zero. This will omit the creation of the hole when the gear is generated. You can then create a hole with the hole command, which provides more options and makes it easier to alter later on.
Pitch Diameter
The pitch diameter, which is read-only, is the diameter of the gear used for spacing the gears. This can be seen in the diagram within the Spur Gear dialog.
It’s important to note, this is not the same as the outside diameter of the gear.
Avoiding Undercut in Gear Teeth
Undercutting is removing some material from the base of the gear tooth to avoid interference.
Interference in gears causes material wear and removal during operation, so you can intentionally remove material by undercutting before the gear is used.
Always make sure you have enough gear teeth. For gears with a 20-degree pressure angle, the minimum amount of recommended teeth is 13. For gears with a 25-degree pressure angle, the minimum amount of recommended teeth is 9.
Fewer teeth are not recommended because it would produce undercut, which weakens the teeth. This will also make it harder to 3D Print gears that mesh without problems.
To avoid undercutting you can increase the number of gear teeth or (sometimes) increase the thickness of the tooth.
I recommend checking out the Machinery’s Handbook if you have a lot of gear projects (or movable 3D Printing parts). The book has been dubbed the “holy grail” for Engineers and Machinist. There is so much valuable info that applies to not only gears, but clearances, threads, and more.
3 Rules When Creating Gears for 3D Printing

- Never have fewer than 13 teeth on your smallest gear, or you’ll likely end up with an undercut on the gear teeth that will prevent proper rotation.
- Always include a backlash or tolerance, based on your 3D printers’ setup. You’ll likely need to print a few test gears to dial in the optimal tolerance.
- Always consider the thickness and width of your gears, which greatly impacts the strength of the gear. When possible, consider adding a backing to strengthen the gear teeth.
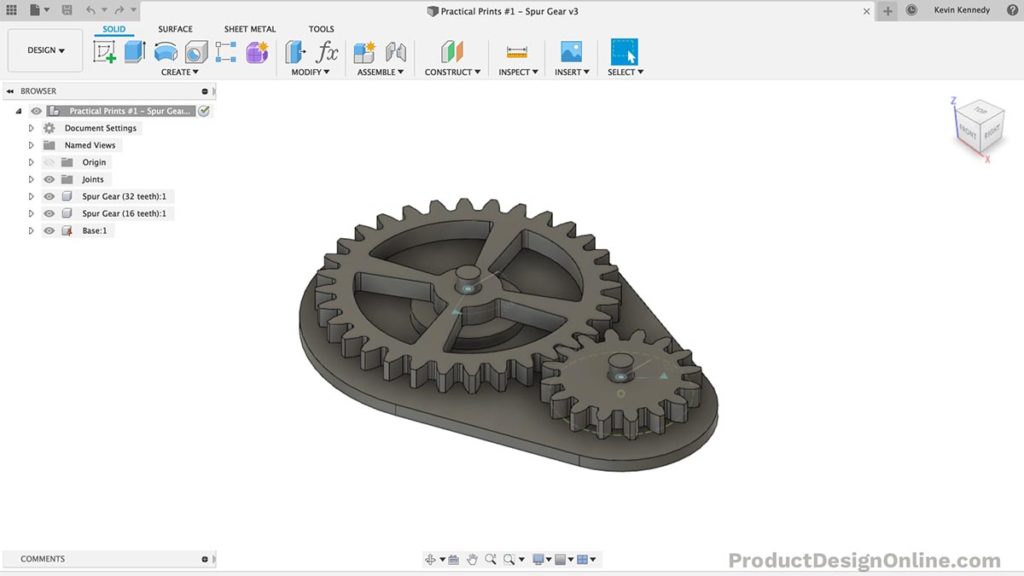
Learn how to create custom 3D Printable spur gears in Fusion 360. By the end of this video, you’ll know two ways to create gears in Fusion 360. You’ll also be able to add joints and motion to test your gears before 3D Printing them.
This is episode #1 of Practical Prints, a Youtube series were Kevin Kennedy demos all things related to designing for 3D printing in Fusion 360.
Transcript
Hey there, it’s Kevin Kennedy and welcome to episode number 1 of Practical Prints, a new 3D printing series where I demo designing for 3D printing in Fusion 360.
By the end of this video, you’ll know how to create custom spur gears. I’ll show you how to create the gears, including setting the number of gear teeth, the gear thickness, adding joints and motion and more!
When it comes to creating spur gears in Fusion 360, you could technically create a gear tooth and circular pattern the sketch. However, there’s a better way that will save you a lot of time!
When you downloaded and installed Fusion 360 there were a couple of add-in samples installed along with it. Fortunately, one of those pre-installed add-ins is a gear creator.
While in the design workspace you will need to select the “tools” tab. You will then find the Scripts and Add-ins option in the toolbar.
You can also hit the keyboard shortcut letter “S,” as in Sierra, for the shortcuts box. Where you can simply search for scripts and add-ins.
Within the Scripts and Add-ins dialog, you will want to select the “Add-ins” tab and scroll down until you see the SpurGear option. Because this is a sample script, you’ll see they’ve included one written in C++ and a second written in Python.
You can use either one of these add-ins, as they work exactly the same. For the sake of following along, I’m going to select the one with the blue and yellow Python logo. Once selected, you can click the “Run” button to start the add-in. However, you’ll notice that it says the add-in is now added to the “create” dropdown list of the design workspace.
Back in the solid tab, you’ll see it appears at the bottom of the list.
The best part about this is the fact that it will now show in the shortcuts box. I frequently use the shortcuts menu, and I prefer that over having to activate the scripts and add-ins dialog each time.
Let’s now take a look at all the details that we can specify to create a spur gear. I want to save time to show you how to test the gear with joints and motion, so I won’t be discussing all of these options with great detail. To learn more about the terminology of each option you can check out this tutorial’s resource page at productdesignonline.com/p1…that’s productdesignonline.com/[p for printer] and the number 1.
Just a quick side note, all the new tutorials for this practical prints series will have a URL that corresponds to the episode number after the slash and letter p.
The first option in the dialog is the ability to select English or Metric units. For this tutorial, I’ll be using the default of metric.
Next, is the pressure angle, or the angle in relation to the gear teeth. Again, to keep the focus of this tutorial on using Fusion 360, you can read more about the pressure angle on my website. Just note that the default of 20 degrees is the most common pressure angle for spur gears. You can also use the standard 14.5 degrees or 25 degrees. You also have the ability to specify a custom pressure angle, but I wouldn’t recommend that unless you know what you’re doing.
To understand the next two settings, the module and the number of gear teeth, you should first note that these determine the pitch diameter at the bottom, which is read-only.
The pitch diameter is the diameter of the gear used for spacing the gears, as you can see in the diagram. It’s important to note, this is not the same as the outside diameter of the gear.
Notice with all the defaults that the pitch diameter is pretty large with a diameter of 304mm.
For this sample print, I want to create two gears, with a 2 to one ratio. We can set the first gear to have 32 teeth, but I want the pitch diameter to be closer to 60mm.
Therefore, we’ll have to adjust the module option, because the module is the ratio of the gear’s pitch diameter divided by the number of teeth.
If I drop the module down to 2, you’ll see that it leaves us with a pitch diameter of 64mm.
The Backlash option is the defined clearance between this gear and the mating gear, or the gears that it will touch. This is very important, as with a 3D print we need to built-in tolerances.
I’ve found that .15mm works well for this size of 3D printed gears. Remember that this will give us a total of .3mm since we’ll have the same tolerance on the second gear. This does also depend on your printer settings, you may need to increase this to .2 or .25mm based on your print results.
The next option is the “Root Fillet Radius,” or as you can see in the diagram, the radius where the gear teeth meet the root or the base of the gear.
If you type a large number in here you’ll see a warning message at the bottom of the dialog stating that the radius is too large. We need this to be less than 1.1mm, so I’ll type out 0.9mm.
Generally, you want to make the root radius as large as possible as it will make the gear teeth stronger. However, if you make it too large, per the warning message, then the teeth of the second gear won’t be able to fit within the opening.
The gear thickness is pretty straight forward. This defines the extrude depth or the total height of the gear. If you’re making a replacement gear for something that broke then you would want to make sure the gear is the same thickness so it fits within the required space. To save on printer filament for this example gear, I’ll set this to 5mm.
Lastly, we have the hole diameter, which is the hole in the middle of the gear. Also pretty straightforward, but one trick with this is that you can set this to 0, which will omit the hole creation. Sometimes I find it better to not create a hole with the add-in and to instead use the hole command. The hole command offers more options and makes it easier to adjust the size later on.
For now, I’ll set the hole to 6mm as we’re going to create a simple pin for this gear to revolve around.
We can then click “OK” and the SpurGear add-in will generate the gear. If you look at the timeline, you’ll see that the add-in essentially automates the process of creating the tooth and the pattern feature.
This last sketch also represents the pitch diameter, so we can reference this to align the second gear.
I’ll reactive the spur gear tool with the shortcuts box. As you can see it’s a little bit quicker than going back to the add-ins. If you prefer speed, you can also use the marking-menu to repeat the gear add-in.
You’ll first notice that all of our values are set to the gear that we just created. There are only two things you need to change if you’re creating gears with a 2 to 1 ratio. First, we need to lower the number of teeth. The first gear has 32 teeth so I’ll set this second gear to 16 teeth. We also want to drop the root fillet radius to half, to make sure we don’t end up with an undercut on our teeth.
I’ve put more info about undercuts on my website. In short, you want to avoid an undercut shape of the teeth or the gear teeth will not smoothly roll off each other.
After changing the root radius you can click “OK”.
The SpurGear add-in will always place the newly created gears at the origin point. We’ll need to move this second gear into place before we can create a base and add joints.
I’ll right-click the smaller gear in the Browser to select “Move/Copy”.
For the X distance, we’ll need to type out the larger gears pitch radius plus the smaller gear’s pitch radius.
If you remember our larger gear’s pitch diameter was 64mm, so I’ll type out the radius of 32mm, the plus symbol, and then the radius of 16mm for the smaller gear.
As you can see, if the gears are positioned correctly, the reference circle of the pitch diameters should line up with one another. Now, all we have to do is rotate the gear so the teeth are in the correct place.
In the dialog, I’ll select the rotate option for the move type. You’ll then need to select the inner cylinder of the gear for the axis of rotation. We can then type out 11.3 degrees to rotate the gear into place. The .3 comes from that tolerance that we set up earlier and the 11 came from guessing and checking. There are formulas you can use to figure this number out, however, there are many factors in play, so it’s often easier to simply guess and check.
Let’s now create a simple base and pin for these gears so we can add joints and motion.
I’ll first create a new component for the base and I’ll make sure the component is active before doing any work.
I’ll just draw two center-circles off the bottom of the gears, making sure their slightly larger than each gear.
I’ll then create two lines tangent to each circle. If the lines don’t snap into place where its tangent, then you can always add the tangent constraint.
I’ll then hide each of the gear components. This will allow me to click and drag over all the profiles so I don’t have to select them all one by one.
I’m going to hit the keyboard letter “E,”’ as in Echo, and then we’ll want to define an extrude distance of 3mm.
I’m also going to change the start option to “Offset,” with an offset distance of 3mm. This will give us a gap in between the gears and the base plate so there isn’t as much friction. We’ll also add a riser when we create the pin so the gear has a spot to rest on.
I’m going to turn the gear components back on for now, so I can use them to create the pin.
To reference our hole cutout in the middle of the gears we can project them to the top face of the base. I’ll hit the keyboard shortcut letter “P,” as in Papa, to activate the project command. Then, I’m going to select the top face of the base to create the sketch on. Select both of the gear holes and I’ll click OK.
I’ll hide the gear components again so that I can use the keyboard shortcut “O,” as in Oscar, to activate the offset command. I’m going to offset both of these projected circles -.2mm, so the pin has a tolerance, ensuring that we can slide the gears onto the pin after this is printed out.
I’ll then extrude the pins up to 10mm, making sure they join to the base. These are going to stick up well past the gears so gears don’t fly off while the gears are spinning with this sample part. Ideally, you could spend a bit more time to create a threaded cap to ensure they don’t fly off, and then you’d have a nice 3D printed gear toy.
To create the first riser, I’ll offset the base of the pin to 10mm for the larger gear.
I’ll then offset the pin of the smaller gear 5mm. I’ll extrude both of these up 3mm to create the riser that the gears can rest on. Depending on your project and gears, you may even find it beneficial to add the riser to the gears themselves.
I should state that this is not necessarily the best or most efficient way to place gears, but I wanted to make it simple for this first gear tutorial. I’ll likely do many more tutorials on gears or projects with gears incorporated.
If you’d like to see other types of gear tutorials or have other ideas for designing for 3D printing then let me know by commenting them below on this video!
We can now activate the top-level component to add some joints and motion to the gears. This is a great way to test out gears before you print them out, especially if you have a gear chain consisting of more than 2 gears.
I’m first going to right-click on the base component and I’ll select the “ground” option. This will ensure the base can’t be moved while we spin the gears around.
From the assemble dropdown, I’ll select the as-built joint. You’ll need to find the revolute option from the list. Select the large gear and the base component and then select the pin cylinder for the position of the joint.
Notice that gives us a nice animation preview and as long as it’s set to the Z-axis the gear should be spinning around the pin.
We now just need to apply the same joint to the smaller gear. I’ll use the marking-menu to repeat the as-built joint and I’ll apply the revolute joint in the same way.
Once both joints are applied, we’ll want to add a motion link. The motion link will tell the program that when one object is moved the other object should move accordingly.
I’ll activate the motion link from the assemble dropdown. To add a motion link you simply need to select the two joints that should be linked.
Now you can see that both gears are turning together at the same time. However, we need to alter the motion link so that the larger gear spins at a slower rate. To do this, we can type out an equation for the degree angle.
I’m going to pause the animation as well so it’s easier to focus on the dialog.
We need the 360 degrees as we want the gear to go all the way around, then we’ll multiply 360 by the number of teeth on the small gear divided by the number of teeth on the larger gear. So we have 16/32. We also need to place the 16/32 in parenthesis.
Now that we have the degree defined we can resume the animation and you’ll see that the gears are now properly linked. However, we also need to make sure that the reverse option is checked, as this will ensure that one gear is going counter-clockwise.
You can close out of the motion link and if you manually drag one of the gears they should now rotate accordingly.
Another thing you may consider when working with 3D printed gears, especially ones with a larger size, is reducing the amount of material on the inside.
I’m going to activate the larger gear component so that I can cut out some of the inner material.
There are several ways to do this and a lot of it is going to depend on your project and how strong you need the gears to be, or how the gears fit with the rest of the assembly.
You could even shell or hollow out part of the gear if you don’t need them to be as strong.
For now, I’m going to create an offset sketch, using the perimeter circle from the gear.
I’ll also offset this again to be a couple of millimeters away from the hole.
I’m essentially going to create four spokes, that connect the inner area to the outer area.
I’ll create a construction line down the middle. Then, I’ll create a regular line on the left side of it.
I’ll mirror the line over to the right, which will allow me to then use the circular pattern sketch feature to pattern this profile around 4 times.
From here, I’ll extrude this out to the top of the gear, using the “to object” extent type, while also making sure the operation is set to cut.
You may even want to consider adding a fillet radius to these inner edges, not only making them stronger but likely producing a better print.
Another quick tip if you’re looking to 3D Print gears for a project would be to check out the McMaster-Carr add-in.
From the insert dropdown, select “insert McMaster-Carr component.” Simply search gears and you’ll see there are hundreds of gear options.
I would recommend using the plastic gears section, as these gear designs have been optimized for plastic. You’ll see there are even gear railings and miter gears.
Once you find the optimal gear, you’ll need to view the product details, make sure the dropdown is set to “STEP-File” and save the file, which will place it in your design.
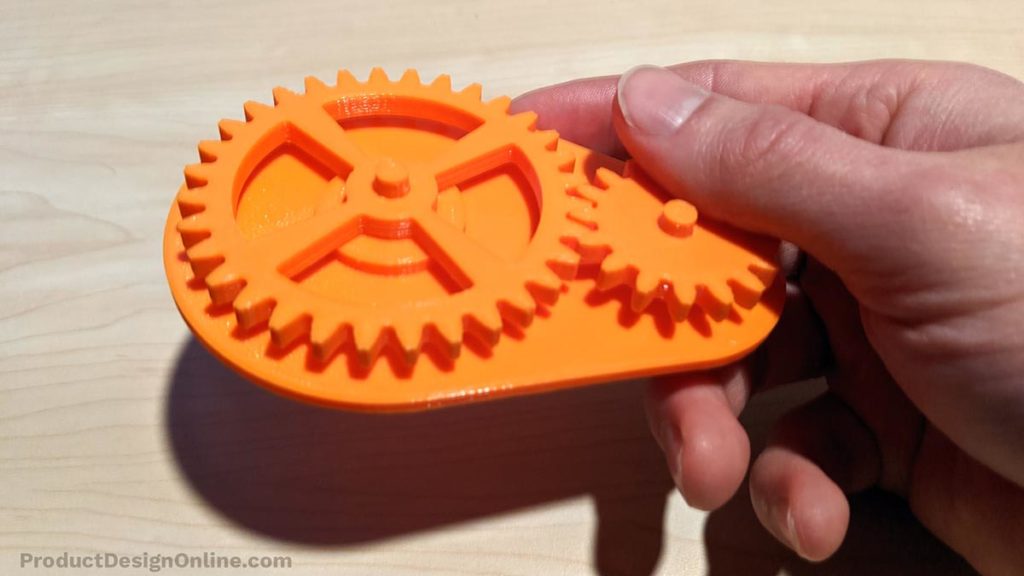
It took about 3.5 hours to print out these sample gears and the base that they rest on. As you can see, the final printed gears work well.
To summarize this video, here are three takeaways to consider when 3D printing gears.
#1 – Never have fewer than 13 teeth on your smallest gear, or you’ll likely end up with an undercut on the gear teeth that will prevent proper rotation.
#2 – Always include a backlash or tolerance, based on your 3D printers’ setup. You’ll likely need to print a few test gears to dial in the optimal tolerance.
#3 – Always consider the thickness and width of your gears, which greatly impacts the strength of the gear. When possible, consider adding a backing to strengthen the gear teeth.
Last but not least, I want to give a shoutout to those who supported the channel over the last few weeks by joining my Patreon or contributing to my Buy Me a Coffee page.
Special thanks to the new Patrons… Mark Smith, David Steeves, Brett Vitaz, Dave Outlaw, Terry Norton, Martin, Alex Parton, and Adam Whipple.
And thanks again to those who bought me coffee….
Highfly!, David Brim, Dennis Murphey, Heinz Somplatzki, Gary Hensley, and all of the anonymous contributions.
I hope you’ve enjoyed episode number 1 of practical prints! Be sure to subscribe if you’re not already, click the thumbs up icon if you learned something, and click on that playlist in the lower right-hand corner to keep track of the practical prints series.
“For gears with a 25-degree pressure angle, the minimum amount of recommended teeth is 0.” <— slight typo on https://productdesignonline.com/fusion-360-tutorials/create-custom-3d-printable-gears-in-fusion-360/
Thanks, Charles – good catch! I’ve updated the number.
Cheers,
Kevin 🙂
Hi, am I missing them or did you not include an example project to open? was having some difficulty around projecting the holes from the right surface, a worked complete example would have been useful 🙂
Hi Twobob,
The demo file from the tutorial was available to Patreon supporters.
If you can share your file I can take a look to see what’s going on!
Cheers,
Kevin
Hi! , I am having issues with the extruded holes too the extruded parts are not connected to the base. How can I fix this?
Hi Sithum,
Could you kindly share your file or share more details about it? This one is hard to troubleshoot without knowing more.
Regards,
Kevin
Hello,
Your explanations are very good!
Regarding the spur gear creation, i still don’t understand one thing:
Where do I put the total gear diameter?
Ther is no place to start from the gear diameter and then put the number of teeth?
Thanks
Hi Moshe,
Khkhgears.net is a great reference that list out all the equations to use when creating standard spur gears.
In terms of the Fusion 360 add-in, it would be your “Pitch” diameter plus the length of your teeth.
Cheers,
Kevin
Is there an upper limit on the number of teeth a gear can have with Fusion’s spur gear tool? I’m trying to do a 15:1 gear ratio without my drive gear only having like 10 teeth and it’s giving me a lot of grief. The larger gear keeps saying “drawGear Failed : 5 : Some input argument is invalid.” and it creates a circle with a sketch for one tooth that isn’t enclosed or complete.
Hi Nathanael,
I’m afraid I’m not aware of the limitations of this add-in. It may be something that you can get the Autodesk folks to comment on since they still support this add-in and it’s development. The official Fusion 360 forum can be found here, if you’d like to ask them directly – https://forums.autodesk.com/t5/fusion-360/ct-p/1234
Cheers,
Kevin
Hi Kevin,
Great tutorial! I’m a relative newby to F360 and your explanations are super clear and easy to follow.
This creates a gear with the teeth on the outside, how would I create a gear with the teeth on the inside?
Thanks, Darhl! I appreciate your support and kind words.
For teeth on the inside, you can manually create an individual tooth, then circular pattern it around the desired circle.
Alternatively, there are also several other gear add-ins that you can download (for free) from the Autodesk app store.
Cheers,
Kevin