I record all my tutorials with Fusion 360’s default settings. Doing so helps everyone follow along.
I will mention any custom settings during the tutorial.
With that said, Fusion 360 Engineers occasionally decides to add or remove a default setting. Changes confuse users trying to follow along with my tutorials.
This page will serve as a cross-reference to check your settings with the settings of my tutorials. I update this page regularly as default settings are changed.
I recommend bookmarking this page so you can reference it often.
- Restore Default Settings
- Visual Style Settings
- Auto Project Edges on Reference
- Layout Grid
- Sketch Palette Options
- Default Modeling Orientation
Fusion 360 Default Settings
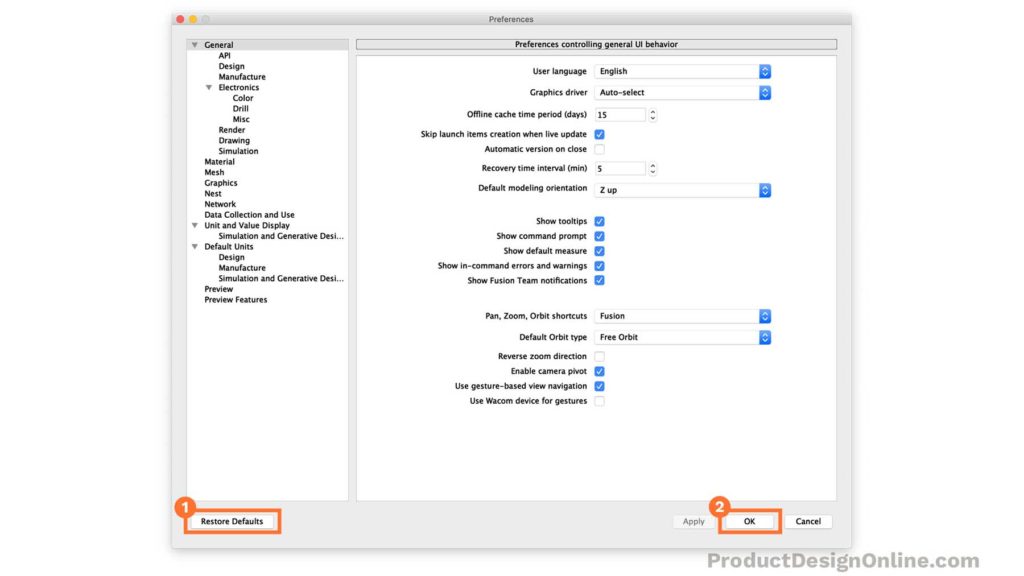
You may want to restore your settings to the defaults if you’ve been turning options on and off. Starting over will make it easier to check the settings outlined below.
Restoring the Default Settings
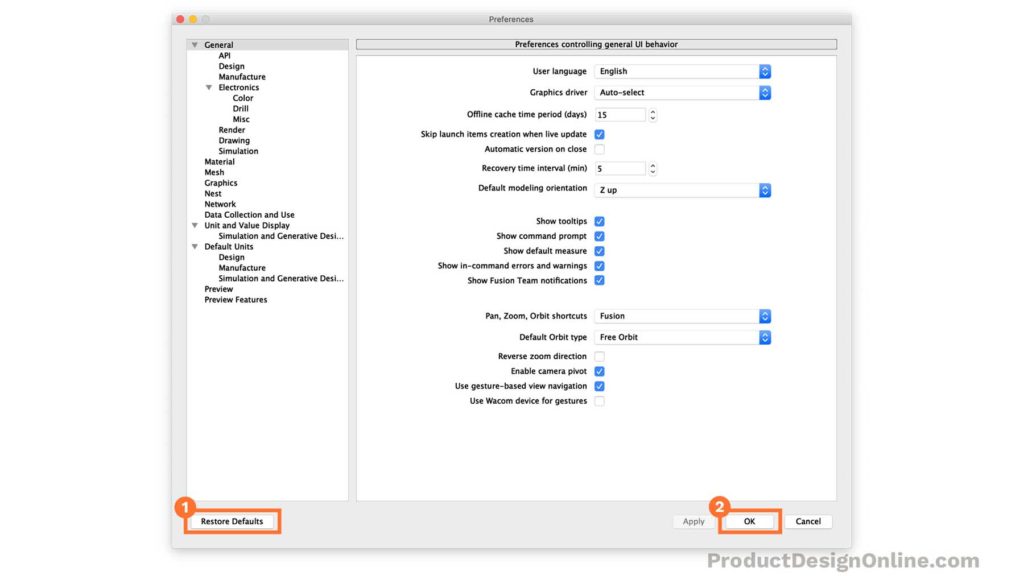
Open your Preferences dialog by selecting your Username (upper right-hand corner) > Preferences
- Select Restore Defaults in the lower-left of the dialog.
- Select OK to close the dialog box.
Visual Style Settings
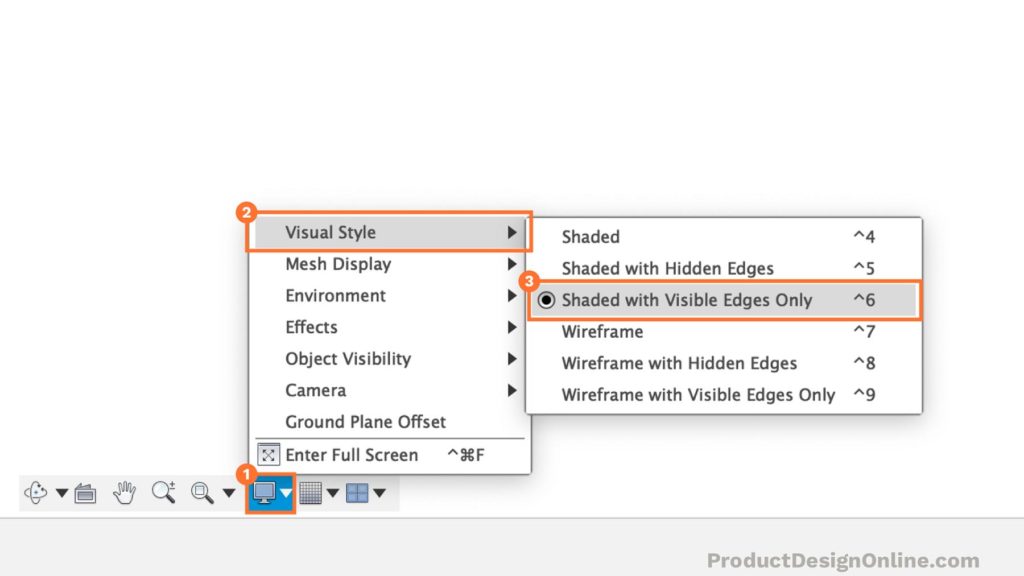
The majority of my tutorials are recorded with the “Shaded with Visible Edges Only” visual style setting. In some tutorials, I will mention changing the visual style to look at different parts of the model.
The “Shaded with Visible Edges Only” style is a great way to better understand the curvature and contour of your model, without seeing the hidden lines.
Changing the Visual Style
- Select Display Settings (desktop computer icon) at the bottom
- Hover over the Visual Style flyout folder
- Select Shaded with Visible Edges Only
Auto Project Edges on Reference
In my older tutorials, you may see edges of models used as reference geometry. The “Auto Project Edges on Reference” setting will do this automatically.
This setting is used in my popular series, “Learn Fusion 360 in 30 Days”.
This setting is a great way to work more efficiently while modeling. Unfortunately, the Fusion 360 Engineers decided to remove this as a default setting.
Turn this setting on if your geometry is not acting in the same manner as my tutorial.
Turning On Auto Project Edges on Reference
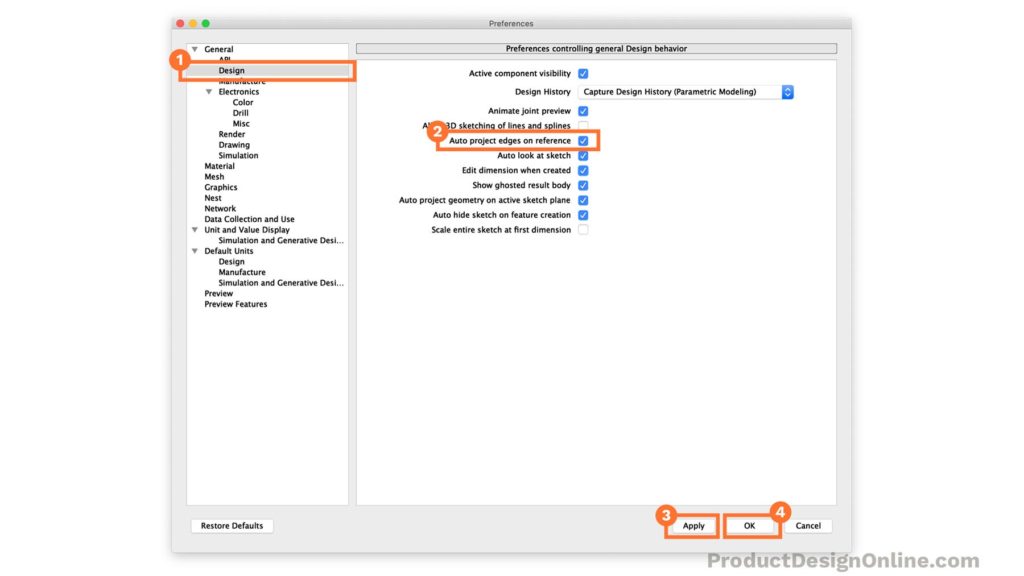
Open your Preferences dialog by selecting your Username (upper right-hand corner) > Preferences
- Select the Design tab of the dialog.
- Select Auto project edges on reference to turn it on
- Select Apply to activate the setting
- Select OK to close the dialog
Layout Grid
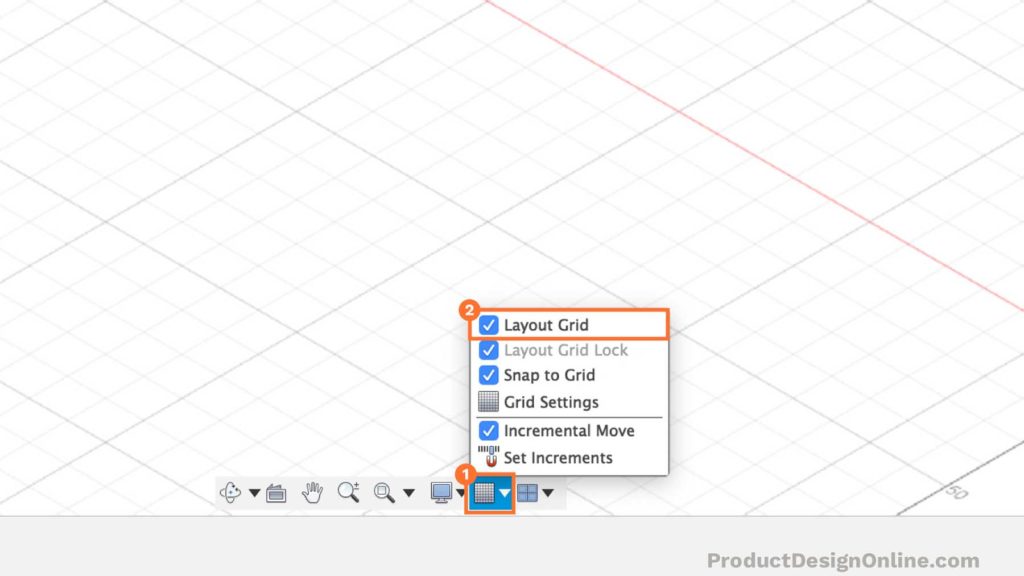
The Layout Grid is simply a visual grid that appears in your canvas window. This setting is on by default.
I often turn the Layout Grid off to make it easier for you to see what I’m doing in the tutorials. The grid makes it harder to see small things.
The Layout Grid setting will not affect the outcome of any of the tutorials. It’s up to you whether or not you want to leave it on or off.
Turning Layout Grid On or Off
- Select Grids and Snaps (grid icon) at the bottom
- Select or Deselect the Layout Grid option
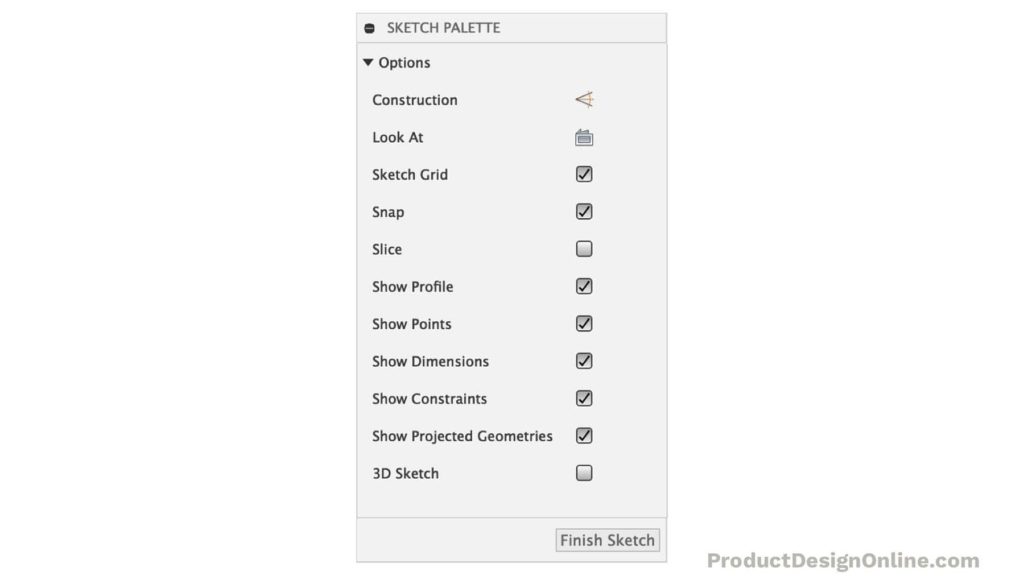
Sketch Palette (check your settings)
The Sketch Palette lets you quickly access the tools that assist you in creating 2D sketch geometry.
Below is an image of the default Sketch Palette settings. Make sure your settings match mine by restoring your default settings.
Default Modeling Orientation
The Default Modeling Orientation specifies what axis should be set as the “up” orientation.
The default used to be set to “Y up,” which is why some of my older tutorials have the Y-axis in the up orientation. Currently, the Fusion 360 default is to have “Z up”. Having the Z-axis in the up orientation better aligns with the use of CNC machines and 3D Printers.
Changing the Default Modeling Orientation
- Select your Username (upper right-hand corner) > Preferences
- Select the General dialog tab
- Find the Default modeling orientation option
- Change the option by selecting “Y up” or “Z up” from the dropdown list
- Select Apply > OK
Important: Changing the default modeling orientation only affects new design files. This does NOT affect the orientation of any design files that are open.
What’s Missing?
Notice a setting that is not on this list? Let me know by leaving a comment on this page.
Awesome service and after painfully finding out a setting might have been un ticked to have answered all my issues, yep it was. The Auto project edges on reference was unchecked. Idiots at Fusion360.
Hi James,
I’m not sure why they decided to remove this as one of the default settings. It’s probably one of the most useful settings in terms of making sketching easier. Glad that you found it.
I’ll be updating this page any time the Fusion 360 engineers decided to change any other default settings.
Cheers,
Kevin 🙂
I fougth for hours trying to succeede in making the tip of the screwdriver…frustrating indeed! I changed it to yours to this Auto proyect edges and it was a bliss! Thank you Kevin for your wonderful tutoríals.
Hi Juanr,
Glad you found the preference.
Cheers,
Kevin
hi, i started making the stamper…
had a few problems… my axis ended up on the back left corner? instead of the front left corner?? when i press tab to save measurements…it justs toggles back and forth between lenth and angle??
then i made a midpoint, that ended up in center.. but when i made the plate holder it didnt extrude in the middle?? it stuck out?? i also couldnt find your templates for stamp?
some shortcuts dont work for me?? how do i fix short cuts??
thank you, love ur work.. very helpfull
ps.. how do i watch videos in order?
Hi Melinda. Here are the answers to your questions in order.
Cheers, Kevin 🙂
ps. Any additional info you can provide will help me answer the outstanding questions.
I was doing a course from Warwick University aimed at 10 to 13 year olds. I struggled with the first couple of lessons then I started to make some progress and even drew a couple of my own things up. Then around lesson 6 they changed the UI and I’ve struggled ever since. I spent the whole afternoon and part of the evening on the mark one lego brick. I’m very happy to have found this revision and I’ll have another go tomorrow. As a 71 year old ex toolmaker I find all of these cad packages counter intuitive. There must be a simple set of general rules somewhere. Keep up the good work but I think it’s going to take you more than 30 days to get me up to speed if the last three days are anything to go by.
Kind regards, John.
Hi John,
I just checked out the Warwick tutorials. Those are quite old (for software tutorials) as they appear to be 2 major versions ago (Fusion 360 in 2016).
I understand that the difference in UI can be a challenge. Don’t hesitate to comment here on my website or my tutorials if you struggle to find something in the new UI. I think you’ll find that as you complete each day you will pick up some momentum and the difference in UI will start to become less of a challenge. Keep at it!
Cheers,
Kevin 🙂
>I find all of these cad packages counter intuitive
As a retired software engineer and occasional designer, I have the same issue with the 3D CAD programs…
Kevin – great tutorial once I found the comments regarding “Auto project edges.”
FWIW, I never found your “pinned” comment, did ultimately sort it out.
Hi Bob,
Glad you eventually found the setting. It’s unfortunate, but YouTube does not offer an easy or intuitive way to announce changes per tutorial videos.
Only a handful of my tutorials have been effected, but definitely keep an eye out for a pinned comment or important notice at the top of the description.
Cheers,
Kevin
How do I find the sketch palette? This one has me stumped.
Hi Mike,
Your sketch palette will appear any time that you’re in an active sketch environment. You’ll need to activate one of the sketch tools and select a plane or use the “create sketch” feature to enter the sketch environment.
Let me know if you have any additional questions.
Cheers,
Kevin 🙂
Kevin, I’m attempting to duplicate your new Logo tutorial. It appears the new UI has changed something and the tangent process isn’t working while trying to place the center pegs, on the bottom plane. My latest update was November 14, 2019. The topside process worked okay.
Any idea what I may have done wrong?
Thanks for all you do for us nubs, with your videos.
Hi Bob,
I’m assuming you mean the new “Lego” tutorial. Have you double-checked that “Auto Project Edges on Reference” is turned on? That will need to be turned on for the tangent edges to snap while working on the bottom of the Lego.
To turn the “Auto project edges on reference” click on your username in the upper-righthand corner > preferences > design (tab on the lefthand side) > check the Auto project edges on reference option. Be sure to click the “apply” button to apply the settings and the “OK” button to close the dialog box. Finally, you will have to restart Fusion 360 in order for the changes to take effect.
Let me know if this setting doesn’t fix it!
Cheers,
Kevin 🙂
Thanks for the reply, I did set that in preferences but I’m still not getting the tangent edges. Oops, yes this in reference to the new Lego tutorial. I drew the Lego from the first tutorial, with no issues.
I just read William’s comments and tried what he did but still not working for me. I’m going to view the tutorial again see if I missed a step.
Bob
Okay, I see what I was doing wrong and now it is working. While trying to draw the circle on the construction line I was pressing the left mouse button and that caused the issue. I exported the model as a STL and printed it, which turned out very nice.
Bob Miller
I have the same issue as Bob Miller above on the New Lego tutorial. I have Auto project edges on. When I sweep mouse pointer around the circles I see the projected top circle but when I draw a center circle they do not show when the circle is expanded, so no tangent. I reset all preferences and checked against yours and restarted F360.
I think I answered my own question. The x defining the diameter of the circle must be drawn on top of the construction line toward the circle desiring the tangent. I was simply dragging into space to expand the circle. But if I drag on top of the dashed line the circle displays.
Thanks for great work!
Hi, William. Glad to hear you got it working. I was just about to ask if you could provide a screencast or image so I could see what’s going on, as that setting should’ve done it.
Don’t hesitate to reach out if you run into any more roadblocks as you work through the series.
Cheers, Kevin 🙂
First off thank you for these wonderful lessons. I do have a problem everything is fine until I go to loft, then I get the Warning “the selected rail does not touch all of the profiles.”
The spline did snap to the line ok and I can move it up and down the line. All of the lines are snapped to the profiles and points cannot be pulled away. BTW I am using the new interface.
I have redrawn this at least 3 times and watched the video at least 5 times. I am sure it is something simple. But………
Hi, William. Can you please provide the link to your file so I can take a look? I also saw your comment and replied to it on the YouTube video. You can reply with your link there and I’ll take a look.
Cheers, Kevin 🙂
Thank you! I ended the Lego brick. I’m very excited about learning 3d design. For years I opened and closed applications. Now with Fusion 360 seeing how easy it is, is a dream come true. I think will be another skill added to my creations. Thank you for the lesson.
Hi Laurentiu,
I’m glad to hear you were able to finish the Lego! Don’t hesitate to comment on the YouTube videos or here on my website if you run into any more roadblocks. I look forward to helping you learn on your journey into 3D design.
Cheers, Kevin 🙂
Kevin, in watching other tutorials (yeah, sorry, I watch a lot of other channels), I notice the presenter is able to select some things with ease that I simply cannot duplicate ( (e.g., a whole face without something underneath, or a whole face without the selector wanting to grab segments of a face). I’m wondering if they are keyboard-toggling something in the selector tool on and off without thinking to mention it in the voiceover narration. Without citing a specific example, can you tell me if this is a “thing” (keyboard toggling of selector tool), or if the fact that I cannot select what they are selecting means I am probably doing something wrong along the way. I know that’s a vague question, but a vague answer might help anyway.
Hi Adam,
There are a few things that you can toggle between with hotkeys. Hotkeys 1, 2, and 3 switch the selection types. You can also hold CTRL with certain features (such as fillet and chamfer) which will let you select additional edges.
I’m afraid I can’t give you much better of an answer without having more context.
Cheers,
Kevin
Hello Kevin, thank you for the videos.
I am currently having an issue with the beer bottle.
Going back to the sketch Veiw and double clicking, hitting the d dimension key to adjust the top of the bottle to 9mm. When i enter the 9mm and hit enter, the 9mm line slants on an angle to the centre line of the bottle. I have changed the settings as directed and still have the same result. It doesn’t give me an option either to constrain when i right click as well.
Hi Darren,
You can try to apply the “Horizontal/Vertical” constraint to the line, to force it back to horizontal.
Select the line > select the “Horizontal/Vertical” in the toolbar. The line should then snap back to horizontal.
Let me know if that works for you. If not, I’ll need to take a look at your file.
Cheers,
Kevin
This may be a rather basic question but I’m new to your video series and have started the “Lego” exercise. It seems your work space setting is”Model” which gives you different options across that row such as sketch, create, modify, etc. I don’t seem to have that work space option. My default is “Design” and I see no option for “Model” when I click to change it. It makes following along more difficult.
Thanks for all the work on this. I have subscribed.
Mike
Hi Mike,
In August of 2019 they updated the user interface. That included changes to some terminology and placement of things. The “Model” workspace was renamed the “Design” workspace. I understand that it makes it a bit more challenging to follow the tutorials with the “old” UI. However, at the moment, my priority is on some new content and I won’t be re-making the 30-days series for a while.
I would recommend watching my tutorial that covers the new UI updates. I discuss the critical changes in terminology, placement, and iconography, that should help bridge the gap between the old UI and the new one. You can watch that here – https://youtu.be/tuZzHcmFtg4
You can also search for the desired feature by using the keyboard letter “S” to activate the shortcuts box > search for the desired feature. That should help when the placement of features has changed.
Cheers,
Kevin
The S shortcut is a gamechanger! Gonna love using that.
Hi Alan,
Glad you found that to be helpful. I use it ALL the time, only second to individual shortcuts 🙂
Cheers,
Kevin
Hi Kevin ,
I just started with your tutorials on youtube and find your videos really helpful,you’re doing a great job.
When i was making the lego model,I encountered this problem.
So I’m using the 2019 updated version and i find that my cursor does not snap to the centre of the circles while drawing construction lines for columns at the bottom plane.
Hi Abhishek,
Please check out the pinned comment on that Youtube video. There is a setting you will have to enable to get that to work.
Cheers,
Kevin
Hello, I am trying to draw the Lego. At 10:40 I cannot select the inner plane. The whole bottom plane of the Lego illuminates.
I work for a machine tool builder and purchased Fusion360 to setup demo’s and turn key’s.
Hi Jason,
It’s likely due to the initial rectangle sketch being in the way. Can you go to your Browser and make sure the first sketch is turned off? You should then be able to select the inside bottom of the lego > right-click > from the right-click menu select “Create Sketch”.
Cheers,
Kevin
Hi Kevin
Just found your videos and started learning .
Am on the Lego . When you get to the rectangular pattern box at 9.19 on the video it shows from the top of list Pattern type . My box does not have this and starts with Objects then Directions ?.
Is there any way around this as it is confusing me please ?.
Thanks .
Mike.
Hi Mike,
It sounds like you’re using the SKETCH rectangular pattern feature. There are two different rectangular patterns. One is for the sketch environment and the second works with 3D bodies, faces, features, and components. With the new UI (that’s not reflected in that tutorial) you will need to make sure you’re in the SOLID modeling tab. You’ll then find the modeling rectangular pattern in the toolbar or the create dropdown.
Cheers,
Kevin
Hi Kevin
Thanks for that it worked . but led to another problem .
Got as far as dragging mouse cursor tangent to circle on top of lego .
Mine does not snap into place , I can drag and the circle does not show the same as demo ?.
Sorry.
Mike
Did you turn on the “Auto Project Edges on Reference” setting per the instructions above? That setting used to be on by default (but no longer is). You’ll have to turn that on to get the tangent circle to appear.
Be sure to read the pinned or top comments if you’re following along on YouTube. I’ve answered any common problems that others have faced 🙂
Cheers,
Kevin
Excellent Kevin.
Thank you very much . Got through my first piece , the Lego .
Really chuffed .
Cheers for that .
Mike
Glad to hear that, Mike! Keep going 🙂
Hello Kevin! I started with the Lego brick design. I’m not able to create the reference sketch at the bottom surface. I checked the update in the pinned comment, turned on the “auto project edges on reference” option and restarted fusion but I’m still having this problem. Can you help?
Hi Rohan,
You may have to be careful with the placement of the mouse cursor once the feature is enabled. Try hovering your mouse around the area where the tangent circles should appear before you snap into the midpoint of the construction line.
If that doesn’t help then please share the link to your file.
Cheers,
Kevin
For the Lego tutorial, I can’t get the Y axis to orient the same as you have it when you click the house icon and my TOP/FRONT/RIGHT looks like you have it but my axes are not the same. Have tried Default modeling orientation Z up AND Y up. It doesn’t change.
Screenshots here: https://snipboard.io/9MkTQt.jpg
Hi Dave,
In the latest version of the Lego block tutorial, the Z-axis is up on my end (looks like your image). You’ll find the latest version here: https://youtu.be/d3qGQ2utl2A?si=qwy49-Gl_ri92OZk
With the 2023 version of the course, there should be minimal differences (no settings changes required as of now).
Best regards,
Kevin