Fusion 360’s surface tools offer several advantages. In this video, we’ll take a look at using core surface tools to surface model a spoon.
I’ll walk you through a common “skeleton” technique that we’ll use to reference the top profile shape. We’ll complete the surface model by surfacing the handle and trimming the excess material away.
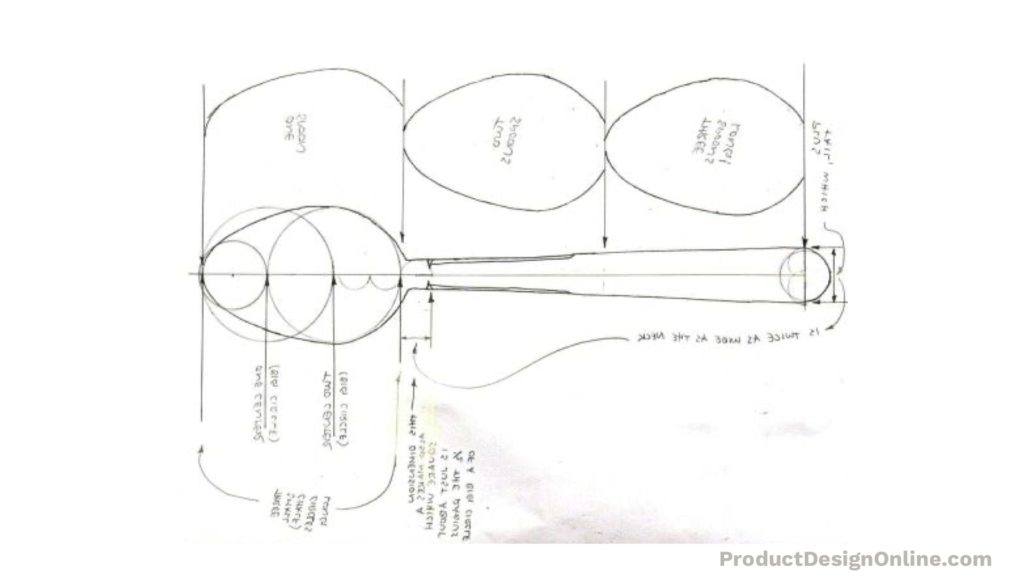
Spoon Anatomy Reference

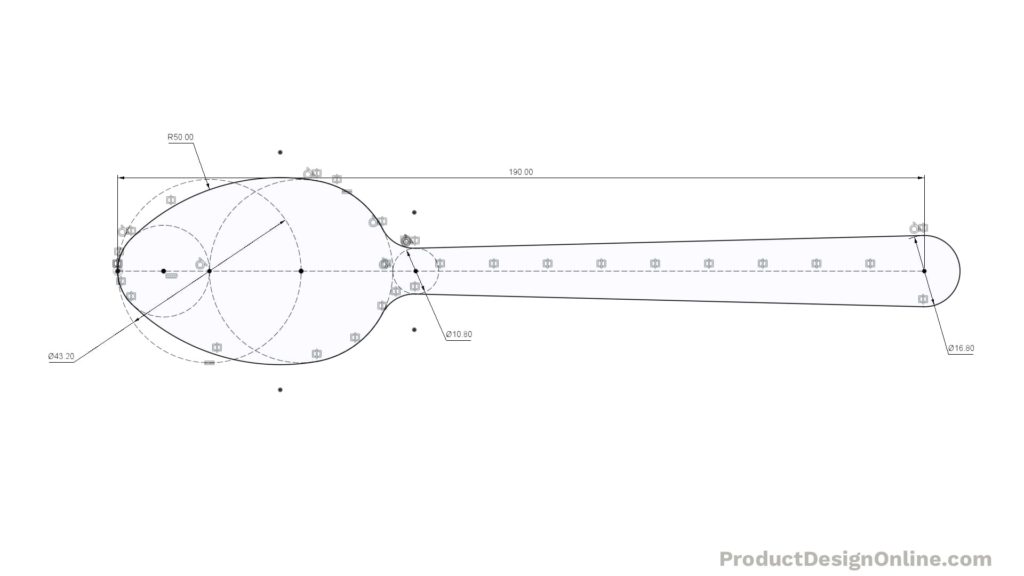
Top Profile Dimensions

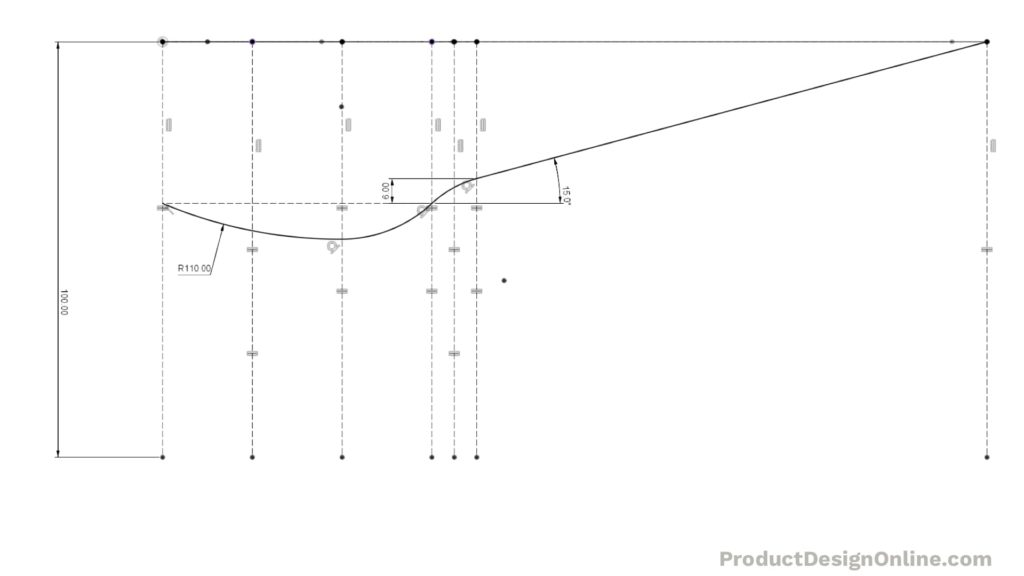
Side Profile Dimensions

Transcript
Let’s take a look at how to surface model a spoon in Fusion 360.
Hey there, it’s Kevin Kennedy and welcome to this intermediate surface modeling tutorial. Just a quick heads up, I won’t be spoon-feeding you with all the button clicks. For this tutorial, I expect you to have an understanding of the beginner concepts.
I’ve gone ahead and saved the file and created a component for the spoon.
To start, we’ll want to sketch out the top profile of a spoon. We’ll then use the top profile as a reference when creating the side profile and the other geometry required to surface the spoon.
I’ll first create a construction line 190mm in length. This line will serve as the spoons centerline, allowing us to mirror geometry.
You’ll then find that we can make up a standard spoon shape using a lot of circles as reference geometry. I’ll place this image on this tutorials resource page – which I’ve linked to in the description.
I’ll first draw a center circle on the centerline, making the diameter 43.2mm. For all of these dimensions, I’m referencing some different dimensions that I found online. I’ll also include a drawing on the resource page for you to reference.
We’ll also want to add a coincident constraint to the circle and the origin point.
I’m also going to toggle open the sketches folder so I can keep an eye on that fully-constrained lock icon.
Next, we need a second circle starting at the edge of the first circle. Since this circle will be the same size we can place the circle and add an equal constraint.
We’ll also create a 2-point circle within our first circle. This smaller circle will be our reference for the front contour of the spoon. Because we’re snapping it to each edge we won’t need to enter a dimension.
We’ll also need to draw a fourth circle that touches the large circle on the right. This center circle will have a diameter of 10.8mm. We’ll also need to select both of them to add a tangent constraint, making sure we’re still fully constrained.
Lastly, we’ll need one last center circle on the very end of our centerline, which will serve as the round over for the handle. This circle will be 16.8mm in diameter.
I’m then going to use the line tool to connect these last two circles, to make the handle shape. We’re not going to need any dimension, but we’ll want to make sure the line is tangent to each circle. We’ll utilize the tangent constraint to make sure and we’ll also want to make sure this is not a construction line since we’ll use these lines for our profile.
To finish off the spoon shape, we’ll use the tangent arc command. I’ll start where the straight line is for the handle, and I’m going to create four different tangent arcs, tracing the construction geometry that we set up.
Once that is complete, you’ll see we don’t yet have this fully constrained. However, you’ll notice the arcs have their center point in the middle. We need these to line up with our construction circles. To do this, we’ll force them to stay together with a coincident constraint.
The sketch should then be fully constrained again. If not, you’ll need to make sure you have tangent constraints on all four of the arc segments.
We now have half the spoon shape, so we can mirror the geometry over to the other side.
We’ll need to turn the back construction circle into regular geometry. From there, we can use the trim tool to cut away the inner part which we no longer need.
You’ll see that we also need to fully-constrain our sketch by defining the radius of these arcs.
I’ll apply a sketch dimension and type out a radius of 50mm, which should complete our sketch and ensure that everything is fully-constrained.
I’m also going to rename the sketch so I can better reference this later on.
At this point, we’re ready to create the side profile, and then we’ll loft these shapes with the surface tools, followed by trimming away the excess surfaces.
For the side profile, we can sketch on the XZ origin plane.
To better create our side profile we’ll want to reference the top profile. I’m going to project several of these points and then create construction lines that will serve as a skeleton that we can reference as we sketch out our shape.
We’ll want to project the first point of our line, the center point of both large circles, and the center point of the small circle.
We’ll then use the intersect tool to reference the end of the handle and the two edges of the small circle.
I’ll then draw seven vertical lines off of each one of these points. At the moment, we’ll just make sure they snap in vertically.
Once they’re all drawn we can select all of them and turn them into construction lines. I’ll also select the equal constraint in the toolbar, forcing them to be the same size. This will simply make it easier for us to full-constrain this sketch.
I’ll then add a dimension of 100mm to the front construction line. However, you’ll have to keep an eye on the construction lines. Sometimes their endpoints don’t get constrained, which keeps the sketch from being fully-constrained. If this happens we can try re-adding an equal constraint to the line itself or you can add a constraint to the endpoint.
I’ll now draw a straight line connecting the two construction lines on the right, making this line at an angle, which will serve as the spoon’s handle.
We’ll eventually define the angle.
To create the bent part of the handle I’ll use the tangent arc tool.
Starting with the straight line, I’ll head two lines over and we’ll just place the arc for now.
I’ll then draw a construction line straight over to the left, running to the front. This will represent the top lip of the spoon.
At this point, we have enough geometry to add the dimensions of our handle. I’ll first dimension the tangent arc, making it 6mm in height, from one point to another.
We can also add a sketch dimension from the construction line to our straight line for the handle. Dragging over to the right will let us define the angle. Most spoon handles are between 10 and 20 degrees. Let’s try somewhere right in the middle by using 15 degrees.
We can also add a coincident constraint to the top of our handle and the end of our first sketch, which will make all of this constrained.
We’ll need to use the tangent arc again to finish off our side profile.
I’ll start at the handle since we already have a tangent arc. This will help ensure each segment is tangent to one another. We’ll click one line over to create the first segment and then we can connect the second arc to the front of our spoon.
To make this fully-constrained again we’ll need to add a dimension to one of these arcs. I’ll add a dimension of 110 for the arc radius. Again, I’ve placed these dimensions on this tutorial resource page if you need to reference them.
We can now finish the sketch.
At this point, we’re ready to reference our top profile sketch, so we can define a little bit more of the spoon contour before we go to use the surface tools.
I want the front of our spoon profile shape to be placed at the appropriate location with the side profile. To do this, we can create a plane at an angle on this top construction line.
After creating a new sketch on the plane, we’ll be able to start projecting the sketch geometry using the project command. I’m only going to project the outer contour of the spoon, including the construction circle.
We want this to be a closed-profile shape, so we’ll instead delete the circle and we can close off the shape using the tangent arc tool.
We can then stop this sketch and rename it in the Browser.
We’re now ready to create a sketch on the second and third construction lines, so we can define the spoon’s concave shape.
Again we can use “Plane at an Angle” and we can type out 90 degrees to rotate the plane to the correct orientation.
After creating a sketch, we’ll want to intersect the point where the side profile meets this sketch plane… and we’ll also intersect the two points where the lip of the spoon intersects. This will allow us to reference that point with the three-point arc command.
Remember to keep an eye on your sketches in the Browser to make sure they’re getting fully-constrained….as well as renaming them.
Following the same procedures, I’ll complete the three-point arc for the next construction line.
Do me a favor and drop a comment below this video with one thing that you learned from this video.
We’ll now be able to use surface tools to finish off the shape.
Remember, all of the surface tools are in the SURFACE tab, and have an orange icon.
I’ll activate the patch command.
With the patch command, we’ll first need to select all the way around the lip profile.
For the interior rails, we can then select the two rails that we just sketched out, along with our side rail.
Once we click OK you’ll see that our sketches are hidden. We’ll need to turn them back on so we can reference them for the handle.
We’ll first need to create a straight line at the back of the handle, which will allow us to surface loft the handle.
I’ll create another plane at an angle on the handle construction line, again making it at 90 degrees. For this sketch, we’ll want to project the two points of the handle’s circle.
We’ll then connect the dots with the line tool. Once complete, we can finish the sketch and rename the sketch and construction plane.
Lastly, we’ll want to create one more plane at an angle on our construction line where the handle bend starts. This will help us loft the handle while keeping it flat.
After creating a sketch, we’ll want to project the handle’s straight line. The reason I’m projecting this is so we can reference it and keep this line the same width.
We can intersect the side profile, which will give us a point to snap the line to. However, I’m going to draw a line off in space, and then I’ll add a midpoint constraint.
I’ll then add an equal constraint to this line and the projected line above.
Again, I wanted to make this the same size as the back of the handle, which helps avoid any twists in the loft. We’ll then surface trim away the excess.
Activating the surface loft command, we can loft from the end of the handle to the front of the handle…and then to the upper lip of the spoon.
Notice how the loft is a little bit funky at the moment. We’ll want to switch our rails selector to the centerline option. This will let us choose our centerline, which should fix it.
After clicking OK, we’ll be able to hide our sketches.
You’ll also see that we have two surface bodies in the Browser. If the colors don’t match then you’ll need to use the reverse normal feture to flip them.
We’ll then want to stitch these together before we trim the rest of the shape.
After stitching both of the bodies, you’ll see we only have one surface body in the Browser.
At this point, we can turn the top profile sketch back on, as we’ll use that to trim the handle.
With the surface trim tool, we can select the sketch profile, and then the outer surfaces. Notice how they turn red, signifying they’ll be trimmed away.
One important note, if your top profile is not continuous, then you may need to use the trim feature on each side.
Lastly, we can select the body in the browser and use the thicken tool to turn this into a solid body.
To summarize this surfacing approach, you’ll find that creating a top profile of your object will help you create side profiles or other reference geometry.
With this additional reference geometry and our fully-constrained sketches, we’ll be able to control the spoon in a predictable manner.
For example, we could change the angle of the handle or the radius of the spoon, to make the spoon a bit deeper. You’ll see after finishing the sketch everything adapts and updates accordingly.
Another advantage of this approach is that we can now create additional contour on the top profile if you want to make a more unique handle. Simply add additional sketch geometry and trim away the excess surface.
Of course, you’ll also want to smooth the edges with a fillet.
Last but not least, I want to give a quick shoutout to those who supported the channel over the last week.
Special thanks to the new Patrons…
Eduardo, Simon, Robert, Josh, and Joel.
And thanks to those who supported my channel via my Buy Me a Coffee Page…
Cody, Ron, and the anonymous contributions.
Be sure to subscribe to the channel so you don’t miss out on future surfacing tutorials and click that playlists in the lower right-hand corner to watch more surface modeling tutorials.