Demo File
Join my Patreon to get this demo file.
User Parameters
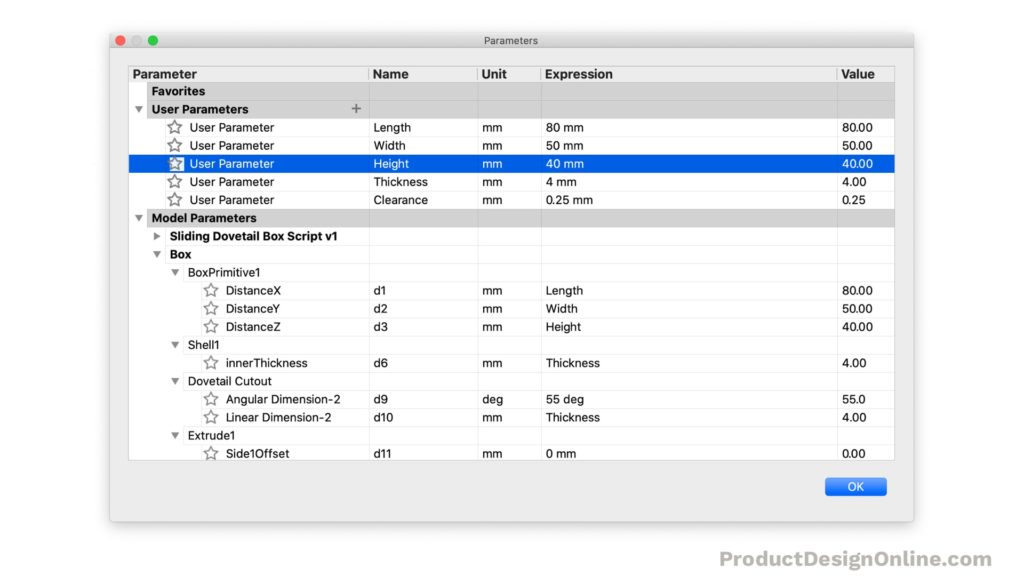
The following parameters are the values that I used for the demo box and test 3D print.

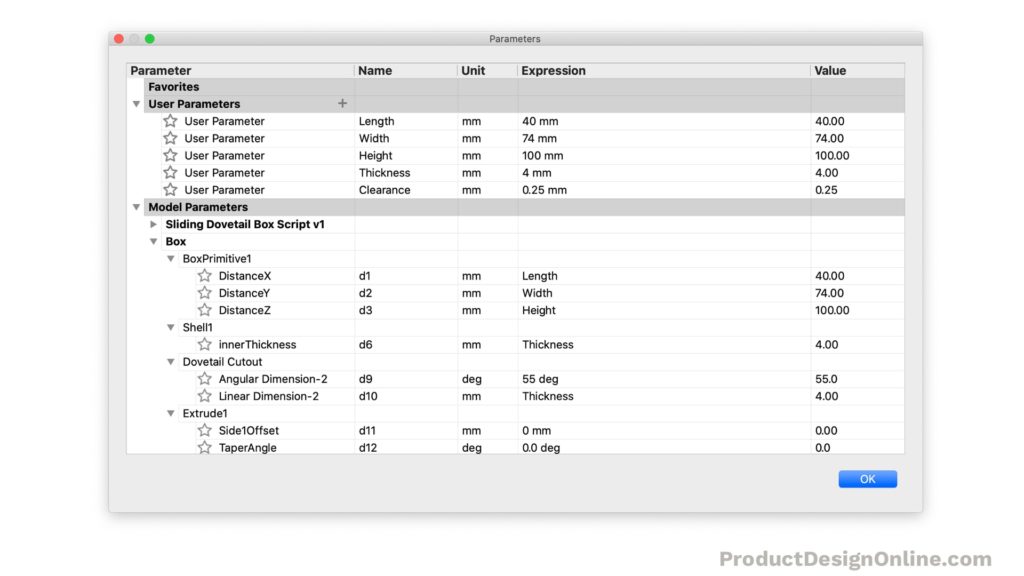
The following parameters where used at the end of the tutorial for the “deck of cards” box.

Save Time and Master Fusion 360 for Your Woodworking Projects
Quickly learn the correct techniques with our structured and easy-to-follow Fusion 360 courses for woodworking. Learn Fusion 360’s core workflows, best practices, and professional tricks with our Masterclass: Fusion 360 for Professional and Hobbyist Woodworkers.

Transcript
Sliding Dovetail Lid for 3D Printed Box | Fusion 360 Tutorial
Let’s take a look at how to create this 3D printable box with a sliding dovetail lid.
Hey there, it’s Kevin Kennedy, and welcome to episode number 7 of Practical Prints. A YouTube series where I show you how to design 3D printable objects in Fusion 360.
This box with a simple dovetail lid can serve as the perfect storage container for a variety of objects. With user parameters, we can set up the box so you can easily change the dimensions to fit a deck of cards, SD cards, or really any other objects that you want to stow.
To get started, let’s create a new component for the box. Remember, the use of components will group all the relevant sketches and bodies. We’ll eventually create a second component for the lid and apply a sliding joint, so components are required.
To create the box we can start with the primitive box shape. While in the solid modeling tab, we’ll find the Box command in the create dropdown.
We’ll select our XY origin plane as the plane to sketch on, and then we’ll follow the best practice of starting our sketch from the origin point. That will ensure we have a fully-constrained sketch.
Let’s make the width of the box 50mm and the length 80mm.
After clicking, we’ll set the height to 40mm and we’ll click OK.
Now that we have a solid box, we’ll want to make the box hollow. We’ll then cut away the top portion where the lid goes, and consider clearance for the lid as we make it a 3D body. Afterward, we’ll take a look at creating parameters so the model can adapt to your needs.
To make the box hollow we’ll use the Shell command. We’ll need to select the top face of our body and type out a thickness. Again, we’ll make this thickness a parameter as well, but for now, I’ll use 4mm. These initial dimensions are what I used for the test prints you saw at the beginning of the video.
Notice how the shell command will hollow out all the inner material of our solid body, leaving only the 4mm thickness as the walls.
We’re now ready to create a slot on the front face, which will allow the lid to slide back and forth.
Right-click on the front-face and select “Create Sketch”.
Because we want this model to be dynamic, we’re going to project the outer edges. This will make it easier for us to fully-constrain our sketches, ensuring our model is truly adaptable.
We can find the project command under the create dropdown, and then the project/include folder. Otherwise, you’ll see we can activate it with the keyboard shortcut letter “P,” as in Papa.
We can click in the middle of the rectangle, which will project all four edge lines to our current sketch. You’ll see that projected geometry is defined with the color purple.
We’ll also want to project the inside edge lines. Notice how their points are projected, based on where I’m selecting. This will help us define the dovetail angles so they adapt based on the thickness of our shell command.
Let’s use the line command to start a line from the projected point on the right. We’ll draw a line at a 55-degree angle. Remember, you can always hit the tab key to toggle between input fields.
For the length, we’ll use 4mm, which is the thickness of our box. And we’ll eventually change it to a Thickness parameter.
To make things easier, I’m going to make half of the dovetail shape and mirror it over to the left. Thus, we’ll want to make sure we have this half fully-constrained before we mirror it.
Looking at our sketch in the Browser, we don’t have that fully-constrained lock icon.
You’ll notice we have a point in the upper right that is not constrained, which was caused by our angled dimension. We can select the point and the corner point and add a coincident constraint, which should take care of this.
Let’s now create a line running directly down the middle.
We’ll make sure to start the line where it snaps at the midpoint constraint, ensuring it’s always in the middle of our box. We also want to make the length match the length of our angled line, so we’ll utilize constraints after we click to place the line.
Hit the escape key to clear all commands. I’ll then shift-click the endpoints of each line, and select the horizontal constraint in the toolbar, which will force them to stay at the same height.
Because this middle line is just for the mirror command, we’ll select it and turn it into a construction line.
Lastly, we’ll use the line command to connect the two endpoints, which finishes off half of our dovetail lid.
Using the sketch mirror command from the toolbar, we can select the two lines as the objects to mirror, and for the mirror line, we’ll select our construction line.
To cut away this slot we’ll use the Extrude command.
We’ll want to select the trapezoid as the profile.
We’ll also want to set the Extent Type as “To Object”. This will allow us to select the back inside face of the box, ensuring that our cutout always runs the length of the box.
When we click OK, you’ll see that we have a nice ledge for the lid to rest on. We’ve also created this dovetail at 55 degrees, which means we won’t need to use support material, as each print layer will step out a little bit more.
Our dovetail cutout sketch is still fully-constrained, so in theory, this should adapt to our box if the dimensions change. Before we create the lid let’s just check that it’s working as expected.
Double-clicking on the box feature, we can simply drag the width directional arrow to the right, followed by the OK button.
Notice how everything adapts as we expected.
We can undo this change for now.
We’re now ready to create another new component that we’ll name “Lid”.
Remember that we have the box component active. That means if we click OK this lid component will be nested underneath the box component.
We’ll need to click the X to clear out the parent selection. We can then select the top-level assembly in the Browser.
The lid component will now be placed on the same level as our box component when we click OK.
To keep this model dynamic, we’ll want to project our current cutout shape to a sketch on the front plane. We’ll then offset that projection to factor in our clearance, so the lid can slide in the actual 3D print.
Let’s create a new sketch on the front plane of the box.
I’ll activate the project command with the shortcut letter “P,” as in Papa. We’ll then select all four of the lines that make up the trapezoid.
We’ll now use the Offset sketch command in the toolbar. This offset will serve as the clearance between the box and the lid. After a few test prints, I found that 0.25mm worked well with my printer. However, you’ll have to test yours and adjust things according to your printer’s nozzle size and how calibrated your printer is.
We’ll want to select only the bottom projection, which will select as one object with the Chain selection option checked. We don’t want this top line offset as we want our lid to sit flush with the top of our box.
One quick thing to point out – you’ll see that any time you use the offset sketch feature, it will place that offset icon next to the sketch lines. If you double-click on the icon or right-click on the icon and select “Edit Offset,” you’ll find that at any time we can go back and edit the offset.
You’ll also want to make sure your offset is on the inside of the box. If not, you’ll want to flip it.
If we zoom in closely, you’ll see one issue is that our offset angled lines don’t touch the top. This is an issue as we want to connect these lines. If we extend the lines it will break our offset relationship. To get around this let’s go ahead and include the top two edges of the model to our offset geometry.
The diagonal lines now extend past the top of the box.
With the line tool, we can connect the two angled lines by running a line straight across. You’ll just want to make sure that they snap into place where the projected line and offset lines intersect.
Once the line is complete we should still have a fully constrained sketch.
With the solid extrude command we can run this profile to the back inside wall of the box, just as we did with the cutout.
Remember, the “Extent Type” needs to be set to the “To Object” option before we can select the back wall.
We also want to consider our clearance here as well, so we can add .25mm to the offset. We can then click OK.
I printed the lid and the box separately, so one thing that I didn’t include in this initial design is a way to keep the lid from sliding completely out of the box. I’m interested to hear from you guys. If you have any ideas of how to make the lid printable as a separate part, but to where the lid could be stopped at the end of the box, then let me know by commenting your ideas down below!
Now that our box is near complete, let’s set up user parameters. In some of my tutorials, I start by creating the parameters first; however, I wanted to show you that you can create user parameters at any time by referencing the model parameters.
Let’s first activate the top-level assembly so the entire model is visible.
You’ll need to activate the Parameters dialog from the Modify dropdown.
In the dialog, you’ll see that we have a section called “Model Parameters”. This represents any dimension values that we currently have in our model.
The great thing about this dialog is that we can create new user parameter names, and we can then replace the dimension values, all right here without leaving the dialog.
I’ll create a new parameter named “Length” and I’ll set it to 80mm.
We can then click on the 80mm Box expression and we can change it to the Length parameter.
I’ll follow this same process for the width and height as well.
After our Length, width, and height are complete, we’ll want to set up a parameter for the thickness.
The thickness parameter will be set to 4mm.
Remember our thickness parameter was not only used for the Shell feature, but we also used that same 4mm value for the angled line in our dovetail sketch. You’ll want to replace that expression as well.
I also want to point out that our extrude’s values are set to 00mm since we used the “To object” extent type. You can change this to the Length parameter minus the thickness parameter, but note that you’ll have to then go back to change the Extent type in the Extrude feature.
Lastly, let’s create a user parameter for the clearance that we set to .25mm.
We can then take that parameter and replace the two clearance expressions that we defined in our Lid.
Let’s now test our parameters by changing the box dimensions to better suit a deck of cards.
In the parameters dialog, I’ll change the length to 40mm, the width to 74mm, and the height to 100mm.
You should find that everything adapts correctly, as long as your sketches were fully-constrained and as long as you updated each expression value with the correct parameters.
Let’s now add a small divot in the lid, which will make it easier to slide open.
I’ll make sure the lid component is active and then we’ll create a new sketch on the front of the lid. There are several ways you can create a divot on the top, and I encourage you to explore them, but for my demo box I simply sketched out an ellipse.
From the midpoint, I’ll set the width to 15mm. For the height, I set mine to 2mm. However, you could also use the thickness parameter / 2 or some other expression value to make it dependent on the thickness of your box.
We’ll then use the Extrude command to cut this away.
In the extrude dialog, we’ll need to change the Start option to the Offset Plane. This will let us start this extrude cut a specified offset distance away from our sketch.
We’ll set the offset distance to -10mm.
Making sure the operation is set to “Cut” we’ll also want to define the distance of 5mm in length. This could also be changed to whatever suits your needs… I just found this was a nice little slot that made it easier to slide the lid open.
Lastly, we can add a sliding joint to the model to animate the lid.
First, activate the top-level component.
Because our lid was built in place we’ll want to use the As-Built Joint feature.
Change the motion type to the slider option and then select both the lid and the box.
For the position, we can hide the lid component and select the top edge that the lid slides on. We’ll also want to set the slide to the Y-axis, which corresponds to the direction in the ViewCube.
You’ll see that the joint animation shows the lid running through the box. To fix this we can add joint limits.
After clicking OK, we can right-click on the sliding joint icon, where you’ll see the Edit Joint Limits option.
We can turn on the minimum and maximum, and then drag out the first slider icon.
You’ll see it adds value to the maximum input. We can have the max set to anything over 40mm, which will ensure the lid comes completely off.
We’ll want the minimum input to be set to 0, so the joint stops when the lid is back in the original position.
Lastly, we can hit the animate button to check out the joint limits in action.
I hope you’ve enjoyed episode number 7 of practical prints. This demo file from this tutorial is only available to all of my Patreon supporters.
Special thanks to Yuval, Geoff, Dave, John, David, and Sam who joined my Patreon in the last week.
And thanks to Loek and the anonymous supporters who bought me coffee.
If you’ve learned something and enjoyed this tutorial then hit that like button.
If you’re not subscribed yet, well then subscribe or don’t subscribe, it’s your decision if you want to miss out on the new content. And of course, you can click that playlist in the lower right-hand corner to view the other tutorials from this series.
I would like to join your patreon, but have a question first. I would like to learn more about CAM in fusion 360. Are you able to help me learn about it?.
Tony
Hi Tony,
Please contact me through the form on my website. I’d love to hear more about what you’re trying to do in the CAM environment.
Cheers,
Kevin