Making CAD education accessible to anyone, anywhere.
We hope you’ve been enjoying the wealth of free Fusion training provided by Product Design Online. Our commitment to empowering individuals like you with valuable skills is at the core of what we do.
If you’ve found our free content beneficial in your learning journey, we kindly ask for your support through a donation. Your contribution will not only help sustain the availability of free materials but also enable us to expand our offerings and reach even more learners globally.
Please select a donation method
Render Demo File
Use the Day #14 screwdriver file OR use the pre-made Fusion file if you have not completed Day #14: https://a360.co/3XWPzBO
Select the Fusion ‘share link‘ above > select the ‘Open in Fusion’ button > select ‘Open’ when prompted. This will open the demo file in your Autodesk Fusion application. Everything is set up and ready to use with the tutorial.
Decal for Screwdriver
I encourage you to experiment and use the decal of your choice!
If you’d like to follow along you may use the following PDO wordmark for the decal, as seen in the video.

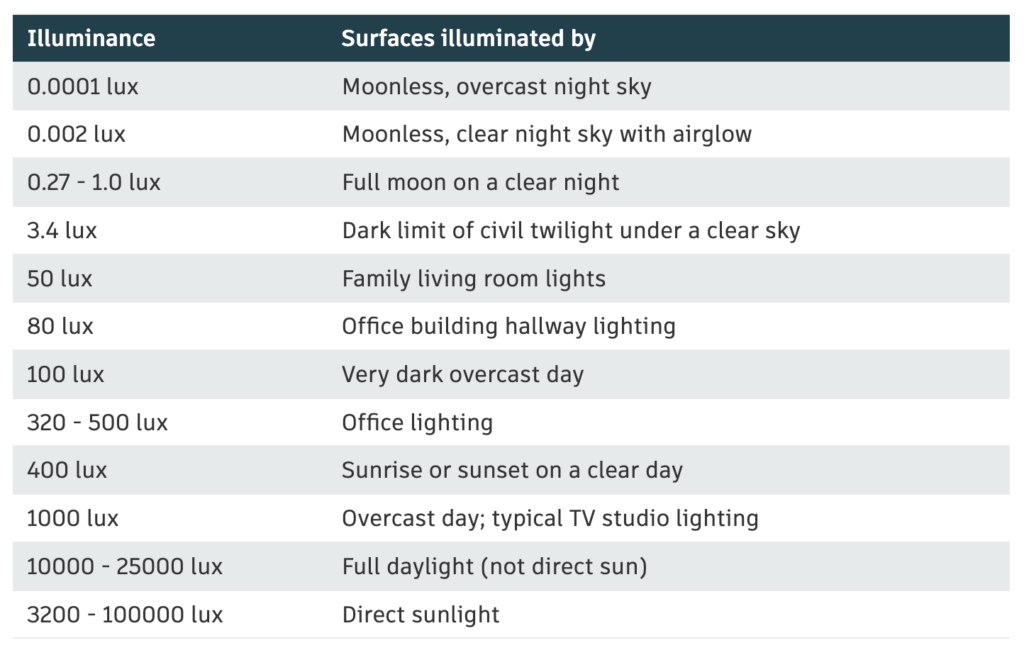
Brightness/Illumination Settings
Use the following illumination settings as a starting point. Many variables go into creating a good product rendering and settings may need to be adjusted for your specific use case.

Key Terminology for Rendering in Autodesk Fusion
- Environment: 3D space where your model is placed, including background, lighting, and reflections.
- Scene: setup of your model, camera, and environment for rendering.
- Appearance: materials and textures applied to the surfaces of your model.
- Decals: 2D images applied to the surfaces of your 3D model.
- Lighting: Various sources of light that illuminate the model, including environment lighting, point lights, and directional lights.
- Camera: The perspective from which the scene is viewed and rendered, including settings like focal length and depth of field.
- Render Settings: Options that control the quality and resolution of the final rendered image or animation.
- Ray Tracing: A rendering technique that simulates how light interacts with surfaces for more realistic images.
- Rendering Queue: The list of render jobs waiting to be processed.
- In-Canvas Render: A quick, interactive render preview that occurs directly within the Render Workspace.
- Cloud Rendering: Utilizing Autodesk’s cloud services to render scenes, freeing up local resources.
- Ground Plane: A horizontal surface that acts as the floor of the scene, often used to anchor the model visually and add shadows/reflections.
- HDRI (High Dynamic Range Imaging): Images used to create realistic lighting by providing a wide range of luminance levels.
- Exposure: Controls the brightness of the rendered image.
- Depth of Field: The range of distance within a scene that appears acceptably sharp in the render.
- Reflections: Mirrored images of the model or environment on shiny surfaces.
- Refractions: The bending of light as it passes through transparent materials, like glass.
- Textures: Images or procedural patterns that define the surface details of a material, such as bumps or color variations.
Transcript
Welcome to Day #28 of Learn Fusion 360 in 30 days!
This quick start guide will help you generate your first rendering in less than 10 minutes. We’ll use the screwdriver design from day #14.
A lot goes into creating photo-realistic renderings, so this short lesson will focus mostly on the setup and settings specific to Fusion’s Render workspace.
With the screwdriver file open, select “Render” from the workspace dropdown list to switch to the Render Workspace.
Notice Fusion’s Render workspace immediately adds realistic lighting and shadows.
Let’s start by adding some visual appearances. Appearances can be activated with the shortcut letter “A,” or from the toolbar.
In Fusion, an appearance is a property that defines the visual characteristics of a component or body. Appearances control how surfaces look in terms of color, texture, reflectivity, and transparency. By applying different appearances, you can create realistic visual representations of your designs.
Take a minute to browse the available appearances that come with Fusion. Notice they’re sorted by categories, such as plastic, wood, metals, and more.
Choose a material that you want to apply to the handle of the screwdriver.
I’ll choose one of the available transparent plastics.
You’ll need to download the appearance to your local computer whenever using it for the first time. Select the download icon to the right of the appearance name.
We can then drag and drop the appearance onto the desired body or component, in the Canvas.
You can also drag and drop appearances onto bodies or components in the Browser. Using the Browser is helpful when parts overlap.
If you change your mind about the appearance or simply want to experiment with others, you can drop a new one right on top to override the existing appearance.
This includes releasing an appearance on top of any currently used appearances in the dialog. This will replace every instance of the appearance throughout the model, saving you a lot of time on multi-part designs.
You can also narrow down and find appearances by searching. Let’s find the “Stainless Steel…Brushed… Linear… Short” appearance. We’ll download this and drag it to the shank.
A screwdriver tip is often treated or hardened to resist wear. Let’s duplicate our Steel appearance by right-clicking and selecting the duplicate option.
This creates a new copy of the appearance, allowing us to Edit the appearance. Here, we can adjust the color and many other advanced settings. I’ll make this slightly darker and drag it to the tip.
As you apply appearances, you’ll want to get a better understanding of how they’ll appear when the render processes all the settings. We can do this by using the “In-Canvas Render” feature in the toolbar.
This will use a technique called “ray tracing” to simulate the lighting and render settings on your local computer, providing a realistic view of the render. It typically takes 10 to 60 seconds for the quality to improve.
Notice how different the handle looks! This is why it’s important to check your render using “In-Canvas Render” before processing the final rendering.
It’s important to note that any time you change the orientation, appearance, or other settings, the in-canvas render will start over.
If you plan to make many changes, you’ll want to turn off “In-canvas render” by selecting it again. Otherwise, it’s likely to take up too much of your computer’s processing power.
After choosing appearances, you’ll want to set the Scene Settings.
The Scene Settings include environment, ground, and camera settings, helping you improve the render quality.
I encourage you to spend time experimenting with these settings. Any time you need to start over, you can select the “Restore Defaults” icon at the bottom of the dialog.
The brightness should be set to match the desired time of day. See the video notes for a reference chart.
Let’s start by changing our background color. We can get rid of the gray and find a color that is a closer match to the handle.
Ground Plane displays a plane in the canvas, allowing shadows. This also allows reflections, when enabled.
You’ll also find that enabling some settings provides additional settings for further control.
The Camera settings allow you to change the perspective, focal length, exposure, and depth of field. You can also set the aspect ratio if the render needs a specified size.
Remember to turn the In-Canvas Render back on, to test what this will look like before adjusting too many items.
Most importantly, you will find the Scene Settings dialog includes an Environment Library tab.
We can drag and drop these included scenes to mimic real lighting conditions and reflections, which can help in creating realistic renders. The library includes different types of environments such as studio setups, outdoor scenes, and indoor lighting scenarios. In general, choose the one that matches the effect you’re going for.
Let’s use the Warm Light option.
One tip that can help your renders improve is to create a simple extrusion in the design workspace to serve as a table or floor.
I’ll apply the Bamboo appearance to help this mimic a workbench top. Because the screwdriver is sitting on a surface, the shadows and other lighting effects will now appear more realistic.
Fusion’s Render workspace also allows you to place decals on the model. This is a great way to include graphics, logos, or other design elements. Sometimes decals can be used to simulate appearances that are not available in Fusion’s appearance library.
Once Decal is active, select the Image from your local computer, followed by defining the face to place the image on.
Once the image is inserted, you can adjust the placement of the decal.
Note that selecting “Chain Faces” will allow the image to wrap on tangent faces.
After selecting OK, a Decals folder is added to the Browser, allowing you to turn it on and off. This makes it easy to hide it from some of your renders if desired.
The Texture Map Controls feature allows you to set the orientation of the texture. This isn’t needed in our case, but can be helpful if you need to rotate the direction of wood grain or adjust other elements of the texture.
Let’s now select the Render button and generate our first Render!
You’ll first want to set your final aspect ratio from any of the defined presets or by setting a custom one.
Using the custom option with a minimum width of 2,000 pixels gives you a lot of flexibility to post-process the image. This is helpful if you plan to use it on your website or other digital media.
We can then choose whether to render with the cloud or locally. Cloud renders will run on Autodesk servers instead of your local computer, so they require the use of Flex Tokens. Some Fusion licenses, such as the Education license, do provide free use of Cloud renderings.
It’s important to note that these options do not provide you with different results, simply where the render will process.
Let’s proceed with the local option which will run on your local computer.
Notice we can now choose the file type, including if we want a transparent background.
We can also set the Render quality. For ‘final’ rendering you’ll want this to be set to Final or Excellent. However, setting it to Draft quality will process faster and is helpful if you just want to test the overall render, or need a sample to check on the aspect ratio.
Selecting Render will start the rendering, which is performed in the background. That means you can continue to work on your design or set up additional renderings.
Note that the rendering time will depend on the chosen quality, size, and other factors. Hover over the thumbnail to get an estimate of the time.
You can also queue additional renderings by submitting them. Each render will automatically process after the previous one is completed.
When the rendering is finished, it will appear in the Rendering Gallery where you can preview the render, re-render, or save it.
The results didn’t end up with a strong shadow under the shank. In our scene settings, I’ll change the Environment Library to the Photobooth option.
I’m also going to change the shank and tip to a Chrome appearance and adjust the perspective of the Render.
Here are the results.
Notice how different these two appear with the strong shadow. Don’t be afraid to experiment with different environments and settings.
You’ve successfully created a product render in Autodesk Fusion!
[Upbeat Music]
I’ll see you on Day #29 where we’ll take an introductory look at Autodesk Fusion’s Drawing Workspace.
[End Upbeat Music]