Turn your face into a 3D Printable cookie cutter! I’ll show you how to turn a jpg or png image into a stencil. We’ll then take the SVG of the stencil and insert it into Fusion 360, where we’ll create a 3D file.
Project Supplies
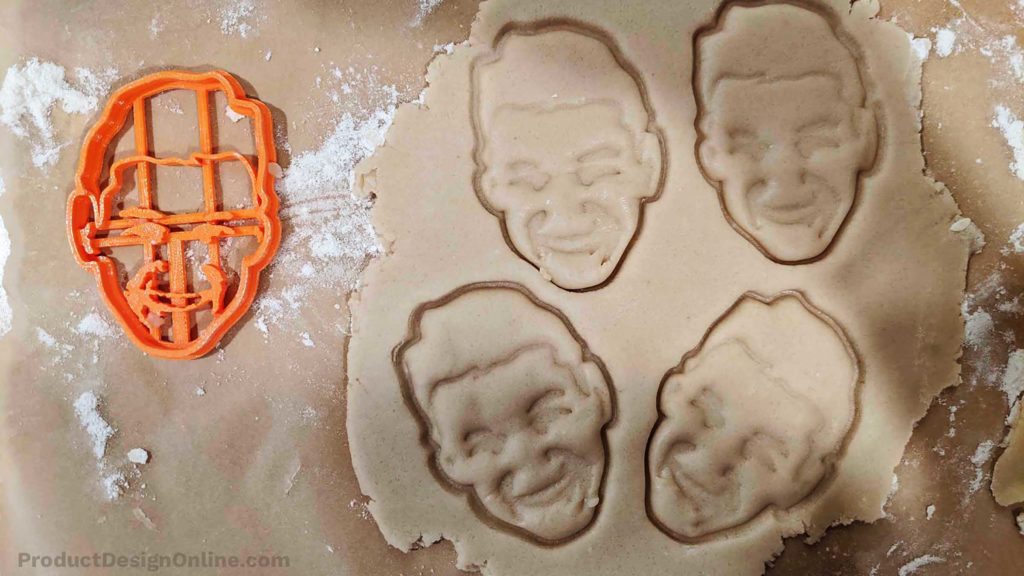
My Example Image

Converting Photos to SVG Files
You’ll first have to convert your photo if you’re starting with a JPG or PNG photo. There are several online converters that can be used – many of which are free.
Regardless of which route you choose, you’ll need to be able to export the file as an SVG file. SVG stands for Scalable Vector Graphics. In short, it’s a file type that does not get distorted when it’s scaled.
SVG files can also be used in Fusion 360 as a way to save time from sketching everything by hand.
Free Online Photo Converter
For this demo, I used Photo2Stencil.com. However, there are literally hundreds of online converters that can be used – both free and paid. Some converters may even let you fine-tune the details of your image.
Using Adobe Photoshop
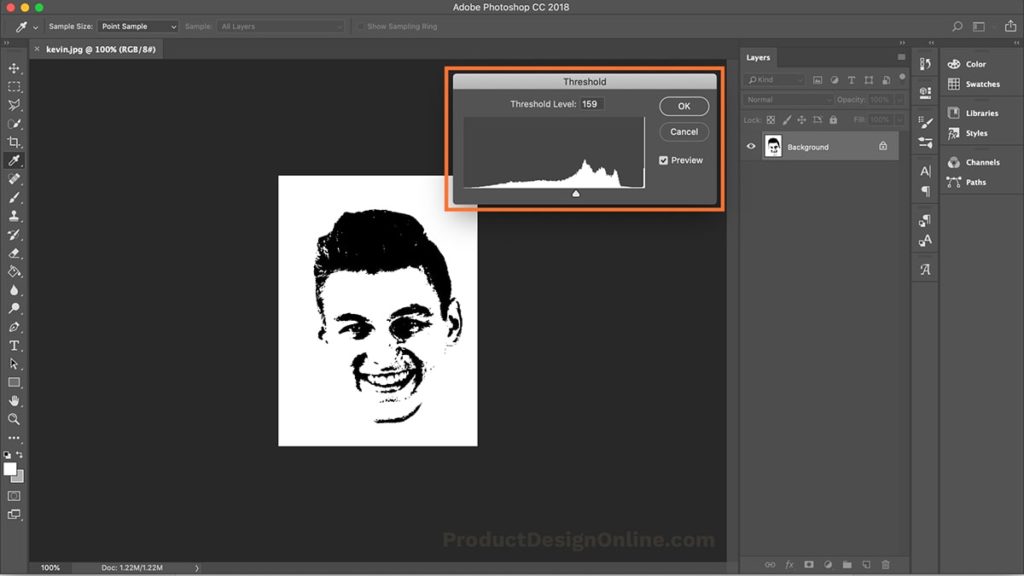
- Open your photo in Adobe Photoshop
- Select Image > Adjustments > Threshold
- Adjust the Threshold slider until you find the desired results. To achieve the best results, you can duplicate layers and use different portions.
- Save your newly “stenciled” image as a JPG or PNG.
- Convert your file to an SVG file using Adobe Illustrator or a free online converter, such as pngtosvg.com
Using Adobe Illustrator
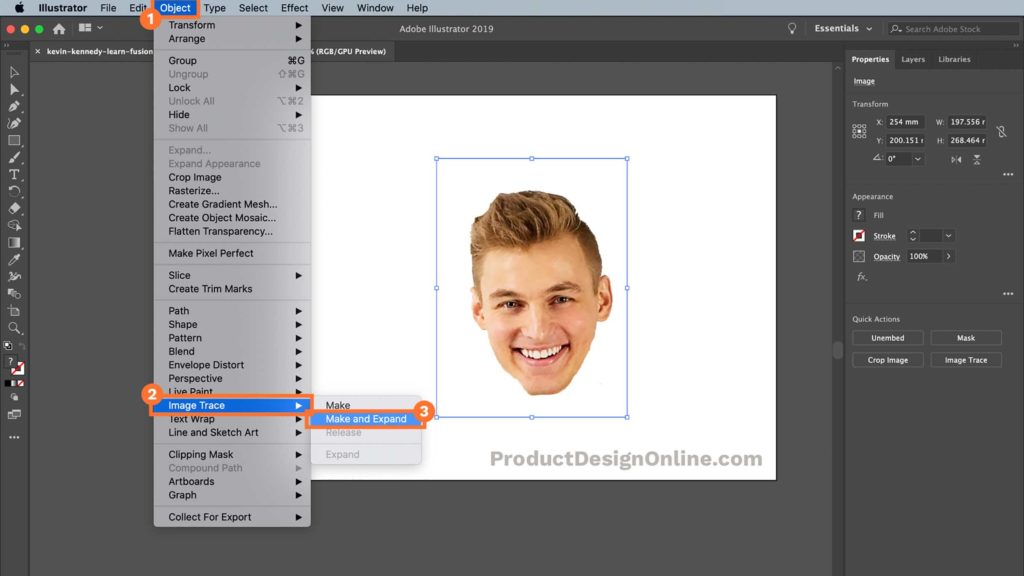
Adobe Illustrator has a fancy tool (called Image Trace) that will automatically trace an image and turn it into an SVG. This is my preferred method of making a stencil and I highly recommend it if you have access to Adobe Illustrator.
- Place your image in Adobe Illustrator
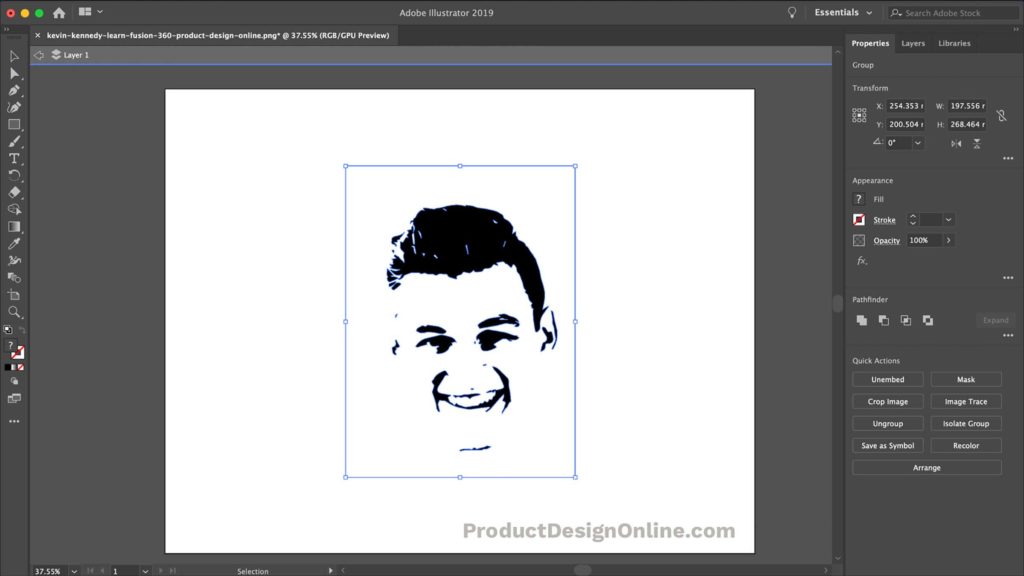
- Object > Image Trace > Make and Expand
- This will automatically trace the image and turn it into a black and white stencil. Notice how it turns the photo into a vector object.
Cleaning Up Spline Points
One challenge when working with SVG files in Fusion 360 is the amount of spline points that may be generated. Detailed SVG files can contain upwards of thousands spline points. Consequently, Fusion 360 may crash as it tries to process each point when used in conjunction with a feature – such as the offset command.
To avoid this, you can remove spline points with Adobe Illustrator.
- Select the Pen tool
- Click on existing points to remove them (notice the minus symbol)
- Remove as many points as possible without distorting the shape
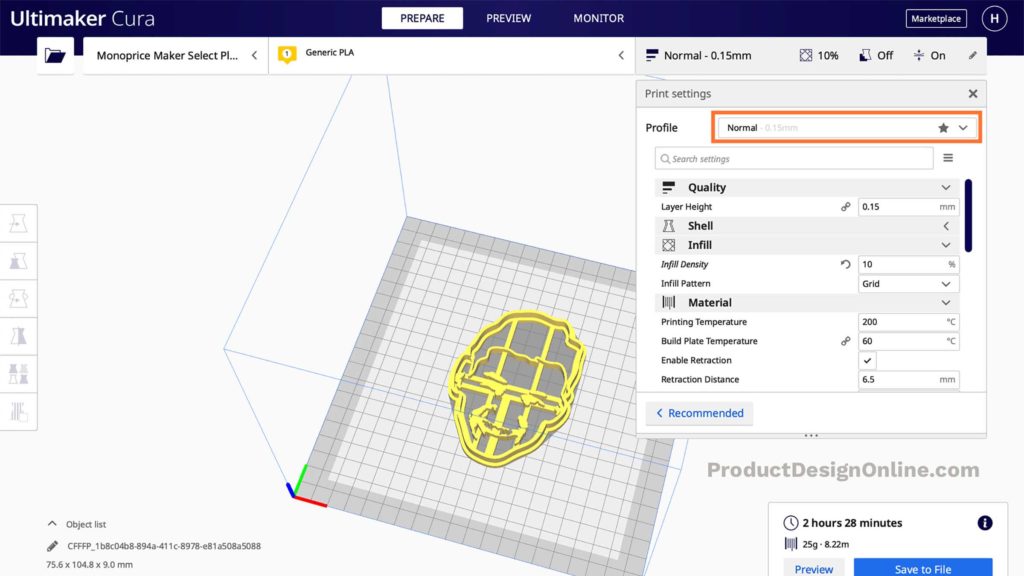
Cura Print Settings
My go-to slicer is Ultimaker’s Cura. It’s free and highly configurable.
For simple prints, such as this cookie cutter, I often use the “Normal” selection, which populates the print settings with a standard to use for FDM printers.
Select the Profile dropdown and select Normal.
Transcript
By the end of this video, you’ll know how to create a 3D printed cookie cutter from a photo of your face…or really any photo. We’ll first take the photo and convert it into a black and white stencil that can be exported as an SVG file. Then, we’ll insert the SVG file into Fusion 360, where we’ll turn it into a 3D model that can be exported as an STL file for 3D printing.
Hey there, it’s Kevin Kennedy and welcome to episode number 4 of Practical Prints.
To start, you’ll want to get a photo of yourself, or whatever you’d like to turn into a cookie-cutter. This will work best if the subject is looking directly at the camera. You’ll also want to try to have a solid background, which will help the conversion work better.
There are several ways that you can convert the photo into a black and white stencil. Normally, I would use the Image Threshold feature of Adobe Photoshop. However, because many of you don’t have access to Adobe products, I’m going to show you how to do this with a free online converter.
I’ve placed the link to the online converter on this tutorials resource page, as well as instructions on how to use Photoshop or Illustrator if you do have access. You can check them out at productdesignonline.com/p4…that’s productdesignonline.com/p as in printer and the number 4.
There are several free online converters, but I’ve found that photo2stencil.com works well for this workflow. We need a converter that will take a photo and turn it into a stencil, as well as the ability to download as an SVG file type.
If you’re not familiar, SVG stands for scalable vector graphics, and it’s a file type that can be scaled without losing quality as jpg photos do. We can insert SVG files into Fusion 360 and the lines will be converted to sketch geometry that we can turn into 3D objects.
Upon landing on the website we’ll first need to upload our photo. I’m going to select the jpg photo of my head. It’s important to point out their note at the bottom that says the photo quality does not matter as they’re going to shrink it anyway…so you don’t need a super-high-resolution photo.
Notice after uploading the photo we’re given several stencil options to choose from. Each version also lets you choose from a single stencil or a three-layer stencil.
In this tutorial, we’re going to use two different stencil downloads. First, I’m going to download the very bottom option, and I’ll select the single stencil option. We’ll use this one as the outline of the cookie-cutter. In other words, it will represent the final shape of the cookie.
Once downloaded, you’ll want to unzip the zip folder and I suggest renaming this SVG file as “outline”.
We can also delete the other file types as we won’t need them.
Back in the online converter, we’ll also want to download a second stencil that includes the details of the face or object you’ve chosen.
Looking at the different options, I prefer the third one, as it shows my smile better than the ones before it, and the ones after it start to lose detail.
Ultimately, you’ll have to decide based on what details you want to appear on the cookie.
I’m also going to download the three-layered stencil for this one, by choosing the corresponding Download SVG.
I’ll unzip this folder and I’ll rename the SVG file “detail” before deleting the other downloads.
We’re now ready to turn these SVG files into 3D models using Fusion 360.
First, we’ll create a new component for the outline. This component is going to group the sketches and bodies for the outline of the cookie cutter. The other reason I’m having you create this as its own component is so you can print the outside cutter as an individual 3D print, should you choose to do so. Some prefer to have the cookie-cutter one print and the cookie-embosser as a separate print. This takes away the need for having a very specific dough thickness.
However, you can always print them together, by exporting the top-level component, which is what I ended up doing. We’ll discuss the dough thickness when we create the details, in case you want to print them as one piece.
I’m going to create a reference line before we insert the SVG. I’ll hit the keyboard shortcut letter “L,” as in Lima, to activate the line tool. Select the XY origin plane as the plane to sketch on, and I’ll hit the construction option in the sketch palette.
We’re going to create a construction line from the origin point running straight up. For the distance, you’ll want to make this the height of your desired cookie cutter. For my cookie cutter, I’m going to make the height 9cm and then I’ll hit the escape key to clear all commands.
We can now insert our SVG outline file. From the Insert dropdown menu, select “Insert SVG”.
Select the “outline” SVG file from your computer and select OPEN.
You’ll want to click and drag the freeform square in the middle to align the top of the head with the top of our reference line. This way, we can drag the scaling corner to shrink the image to the approximate size.
If you have access to a graphics program then I would suggest sizing your photo to the desired size ahead of time. This will omit the need to scale it in Fusion 360.
Once it’s set at the desired size we can click OK.
At this point, we want to offset the outline so we can create the thickness for the cookie cutter. However, one issue that you’ll often face with this workflow is that imported SVG files often contain a large number of spline points. Consequently, too many spline points can cause Fusion 360 to crash.
You can try to use the offset command, with the keyboard shortcut letter “O,” as in Oscar. However, if you’re photo conversion is like mine, and you see hundreds of spline points, then you’ll likely crash Fusion 360. If you can use Photoshop or Illustrator then you can avoid this issue, by cleaning up the file beforehand. I’ll have more notes about that on my website.
Instead, we’ll need to use the Fit Point Spline tool to recreate the outer shape using Fusion 360’s native geometry. Activate the Fit Point Spline tool amd simply click and place spline points at each change of direction and follow the path around your model.
You may also find it helpful to turn off your sketch grid so it’s not wanting to snap to the grid points. Make sure you also have the construction option turned off.
I’m going to create spline points all the way around, and I’m going to speed up the video so you don’t have to watch me do this as it’ll take about 2 or 3 minutes.
Once you get around you’ll want to make sure you click at the starting point, ensuring we have a closed profile. Then, you can hit the escape key to clear the spline command.
I’ll now reactivate the offset command with the keyboard shortcut letter “O” and I’ll select the spline. I’ll use an offset distance of 2mm, which will be the width of the cutter.
Once we click OK we’ll have our closed profile shape that we can extrude. I’ll activate the extrude command and select the profile. I’ll extrude this up .9cm. Generally, you’ll find cookie cutters are between .8 and 1.2cm in height. Ultimately, depending on their shape and how they were manufactured.
Now that we have out outline complete we’ll need to create a second component for the details of the embosser.
I’ll right-click on the top-level component and select “new component”. I’ll also rename this one Embosser.
We’re now ready to insert our SVG file named “details”, which will help us create the facial features.
Once again, select the insert dropdown, find insert SVG, and select the folder to choose the SVG file.
After clicking OPEN you’ll see that we also need to define the plane to sketch on. The embosser needs to be raised from the surface, so we’ll select the top surface of our outline so we can extrude towards the table surface.
You’ll also notice that because I chose the three-layered stencil I have all three layers in this file. What I’m going to do is use the eyes of the one on the far-right and then I’ll re-insert the SVG to use the second layer for the mouth. It’s important to note, that this is really up to you – I’m simply choosing the parts that include the best details.
Once you scale and place the SVG file in the correct location you can click OK.
Another important thing to note – you may have noticed that after we insert SVG files the sketch geometry turned green. This is because Fusion 360 automatically locks the SVG file – assuming that you moved it into position before placing it. Should you ever need to move it you’ll have to select the geometry and click the “fix/unfix” constraint in the toolbar.
However, even fixed profiles can be extruded. We can hit the keyboard shortcut letter “E,” as in Echo, to activate the extrude command.
I’ll select my eyes and eyebrows for the Profiles.
For the extrude distance, this is where the dough thickness comes into play if you’re going to print this as one piece.
I decided that I’m printing this in once piece and I’m going to roll out my dough at roughly a 1/4” or 6mm in thickness. If you remember, I set the height of the cookie cutter to .9mm. Therefore, I’ll extrude this approximately -6mm, which ensures the embosser is pressed far enough into the dough.
As I mentioned earlier, I’m going to insert the detail SVG one more time, so that I can use the second layer of the stencil.
After positioning this layer, I’ll use it to create my hairline, the ear details, and my mouth.
Remember, if you’re not happy with any of the details, or have issues with the SVG being too complex, then you can always recreate them using Fusion 360’s native sketch geometry.
For now, I’m going to extrude the details that make up my mouth and my right ear, and then I’ll recreate the hairline and left ear with the spline command.
After activating extrude and selecting all the profiles I’ll extrude them to the same distance of -6.35mm.
I’m going to create a new sketch on the top surface, so I don’t have to worry about selecting the SVG when I go to extrude. However, I do still want to reference the SVG so I’ll have to turn the second sketch back on in the Browser.
With the Fit-point spline tool, I’ll re-create the general shape of my hairline. I’m also going to make sure to start and end where it intersects with the outline body since I am printing this as one piece.
After drawing out the spline I’m going to use the offset command to offset this 1.5mm. Remember, you can always use the flip command if you want the offset on the other side.
After offsetting, you’ll want to adjust your endpoints if they’re sticking out past the outline. I’ll also use the line command to close them off, making sure we have a closed profile that we can extrude.
First, however, I’ll do the same to the details of my left ear. This time, I’m going to rely solely on the spline command, by connecting the end point with the starting point.
Now that both shapes are complete, I’ll hide the second sketch so I don’t select anything from that, and I’ll extrude these profiles -6.35mm.
Last but not least, before we can 3D print this, we’ll need to connect all of the details so they’re not floating on their own.
The easiest way to do this is to create 2-point rectangles running from edge to edge, making sure to overlap all the parts.
I’ll hit the keyboard shortcut letter “R”, as in Romeo, to activate the 2-point rectangle. Then, I’m going to select the top surface as the plane to sketch on.
I’ve found that creating 3mm wide rectangles that stretch from edge to edge will work well in holding all the details together.
I’ll first create two rectangles horizontally, making sure they overlap with my eye details.
I’m going to create two long ones that run vertical and overlap not only the mouth but the eye details as well, by connecting them to the hairline.
Lastly, I’ll also add a fifth connection that’s a bit wider than 3mm, which holds together the middle details of my mouth.
This is something that you’ll want to take a minute to think about, as this will greatly influence the outcome of the 3D print and how durable the cookie cutter is.
You’ll want to reinforce any areas that have small details. Keep in mind that you’ll be pressing on the cutter to ensure it debosses the dough.
Before extruding these rectangles, we can use the trim tool to trim away all the intersecting lines. This will just help clean up the sketch profile and will make it so we have fewer profiles to select.
After trimming the lines away, I’ll activate the extrude command and I’ll extrude this down 3mm, ensuring these shapes don’t affect the depth of the details. We’ll also need to make sure to change the operation to join.
One other thing to consider, you may want to re-activate the outline component, to add a ledge. This will make it a bit more comfortable to press down on the cookie cutter.
I’ll first offset the outer edge 2mm in each direction.
I’ll then extrude all three profiles down 3mm, matching the thickness of the rectangle connections.
We now have a custom face cookie cutter that is ready to 3D print! I should point out that if you have access to a graphics program you could spend more time fine-tuning or creating the details, which will result in a better embosser. Certain things like the eyes may get lost or distorted with the use of an online convertor.
At this point, you can right-click on the top-level component to save it as one STL file. Otherwise, you can save the outline and embosser components one at a time, to print them out individually.
Should you print them individually, you may even want to consider adding an extra backing or outer edge to the embosser to make it a bit stronger – since it doesn’t have the outline reinforcing it.
After selecting the “Save as STL” feature, you can save the file to your computer or output it directly to your slicing software.
Last but not least, I want to give a shoutout to those who supported the channel over the last week by joining my Patreon or by contributing to my Buy Me a Coffee page.
Special thanks to the new Patrons…
Steven Litt, Scott Santana
And thanks again to those who bought me coffee….
Anonymous, Chris Wilander, GRNSOUTH, Phillip Jang, and Perry Friesen
I hope you’ve enjoyed episode number 4 of practical prints! Be sure to subscribe if you’re not already, click the thumbs up icon if you learned something in this video, and click on that playlist in the lower right-hand corner to view the rest of the series.
Leave a Reply