Low-Poly Mesh designs are popular among the 3D printing community. Just about any mesh file can be turned into a low-poly design.
Time needed: 15 minutes
In this tutorial, we’ll look at using Fusion 360 to turn a mesh body into a low-poly design. We’ll then convert the mesh body to a solid to further work on it.
- Get a Mesh File
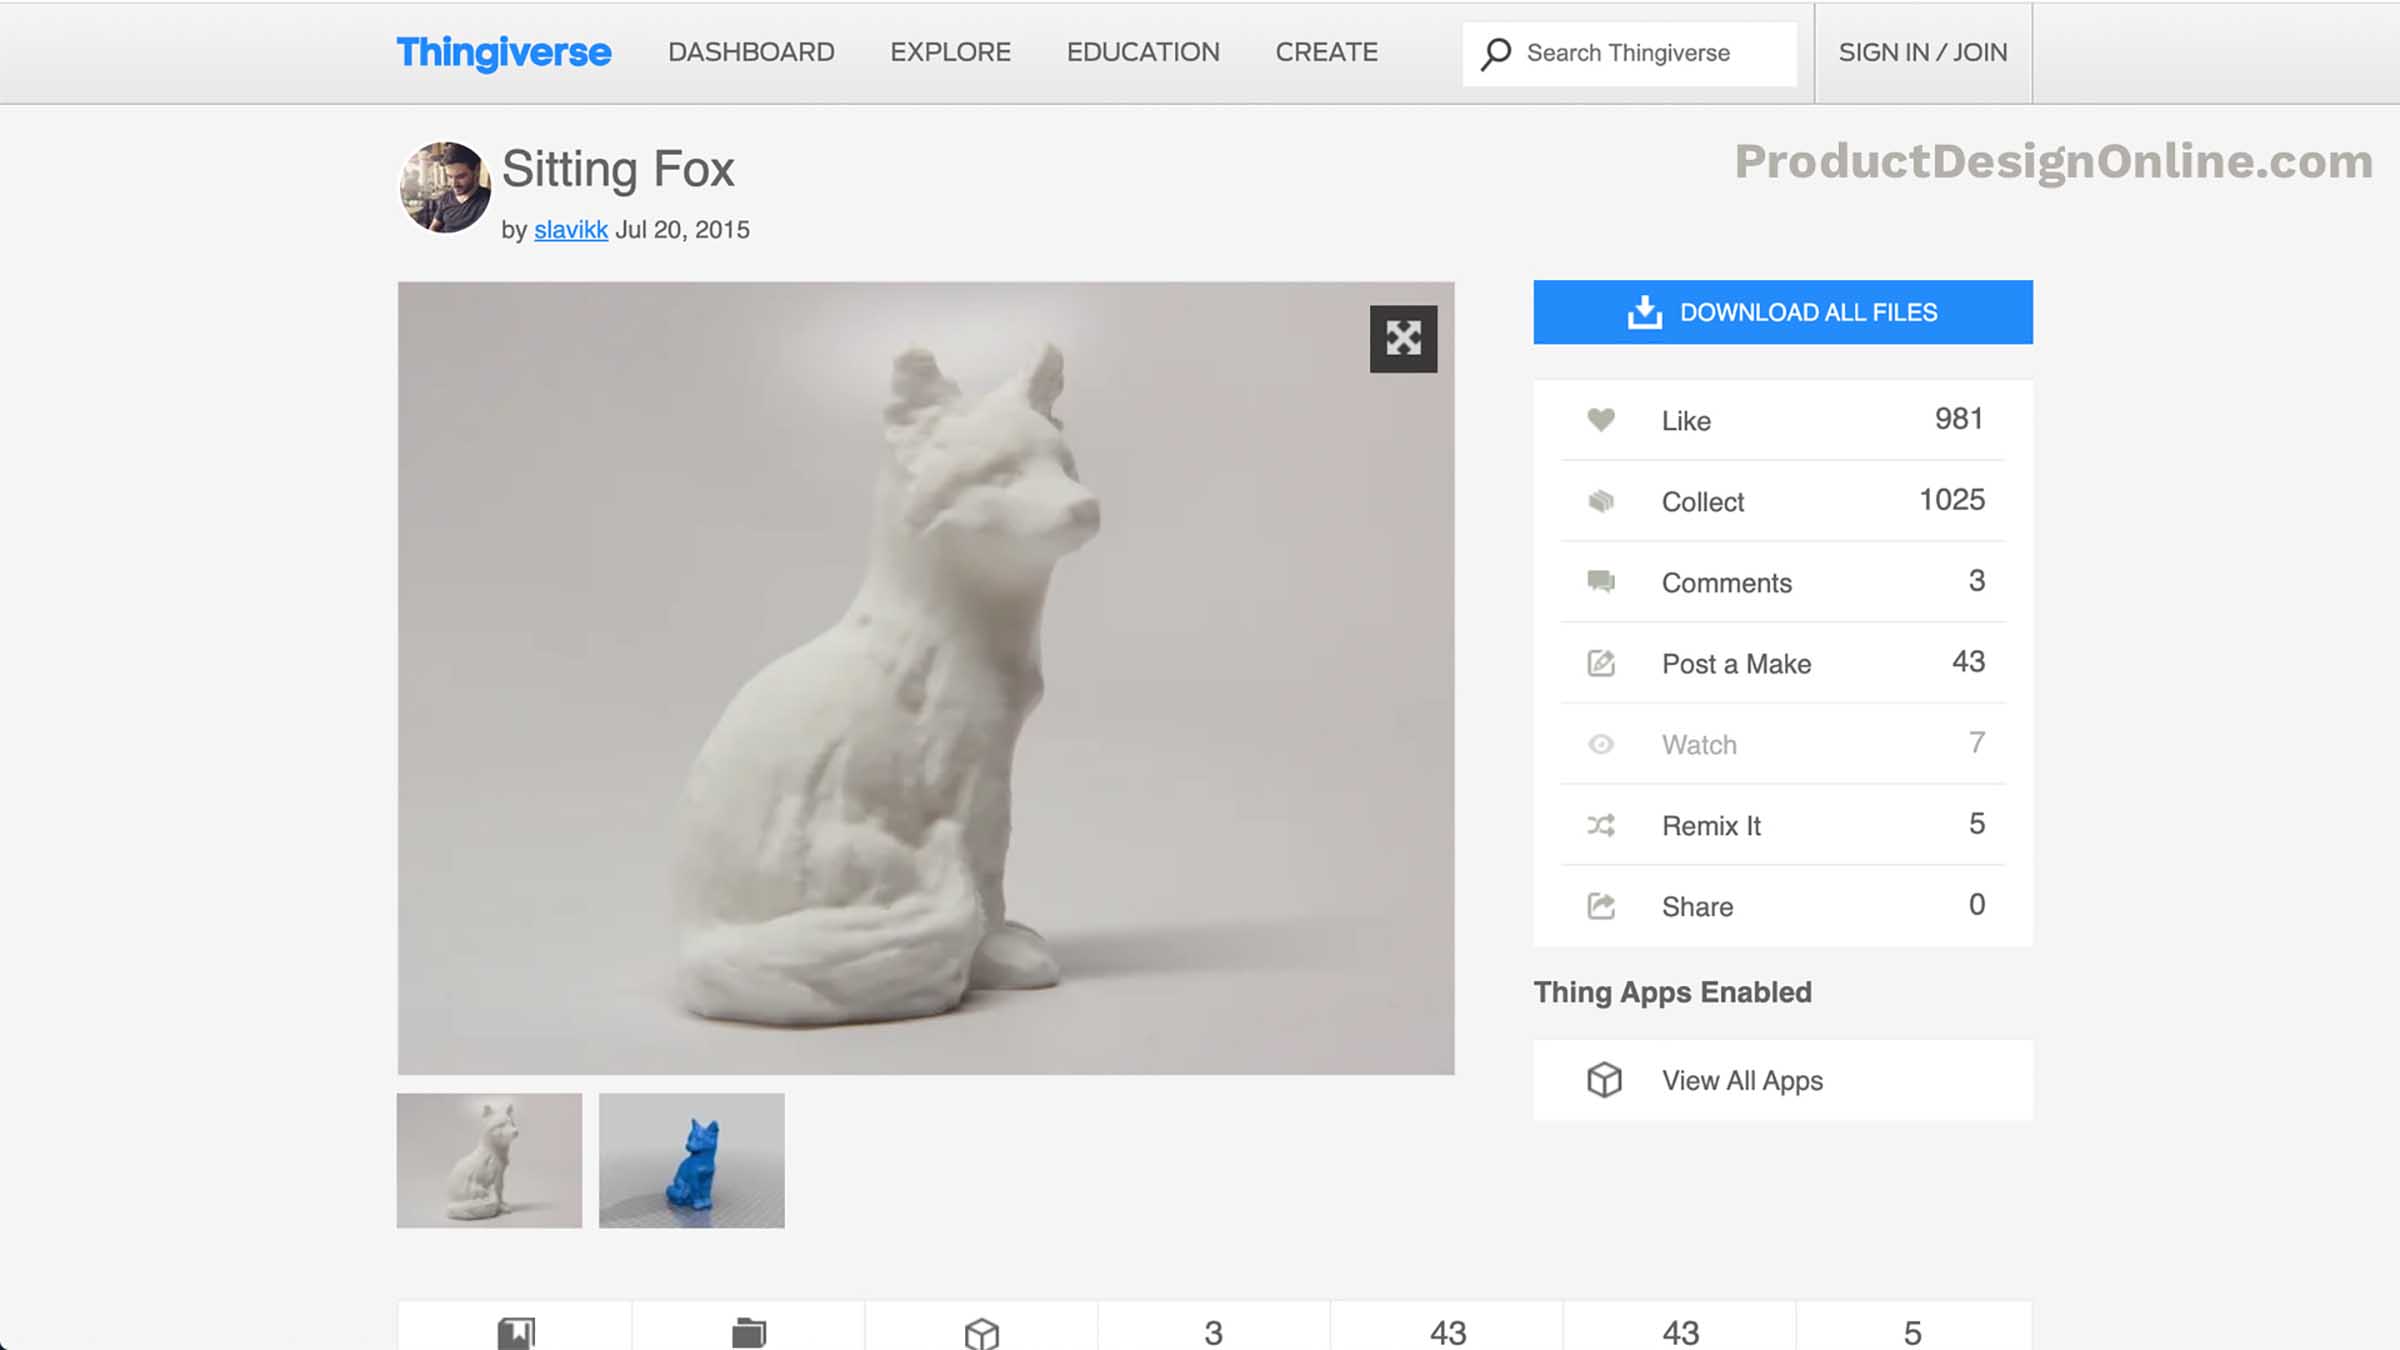
To start, you’ll need a mesh file. If you don’t have a mesh file you can use the Sitting Fox file from Thingiverse.
- Insert Mesh into Fusion 360
Select the insert dropdown > Insert Mesh. Select the file from your computer. Click OK to confirm the placement of the mesh file.

- Do not Capture Design History
You’ll have to turn off the parametric design history to access Fusion 360’s mesh tools. Right-click on the top-level component > select Do not capture Design History
Note: Simply click Continue if you get a warning message.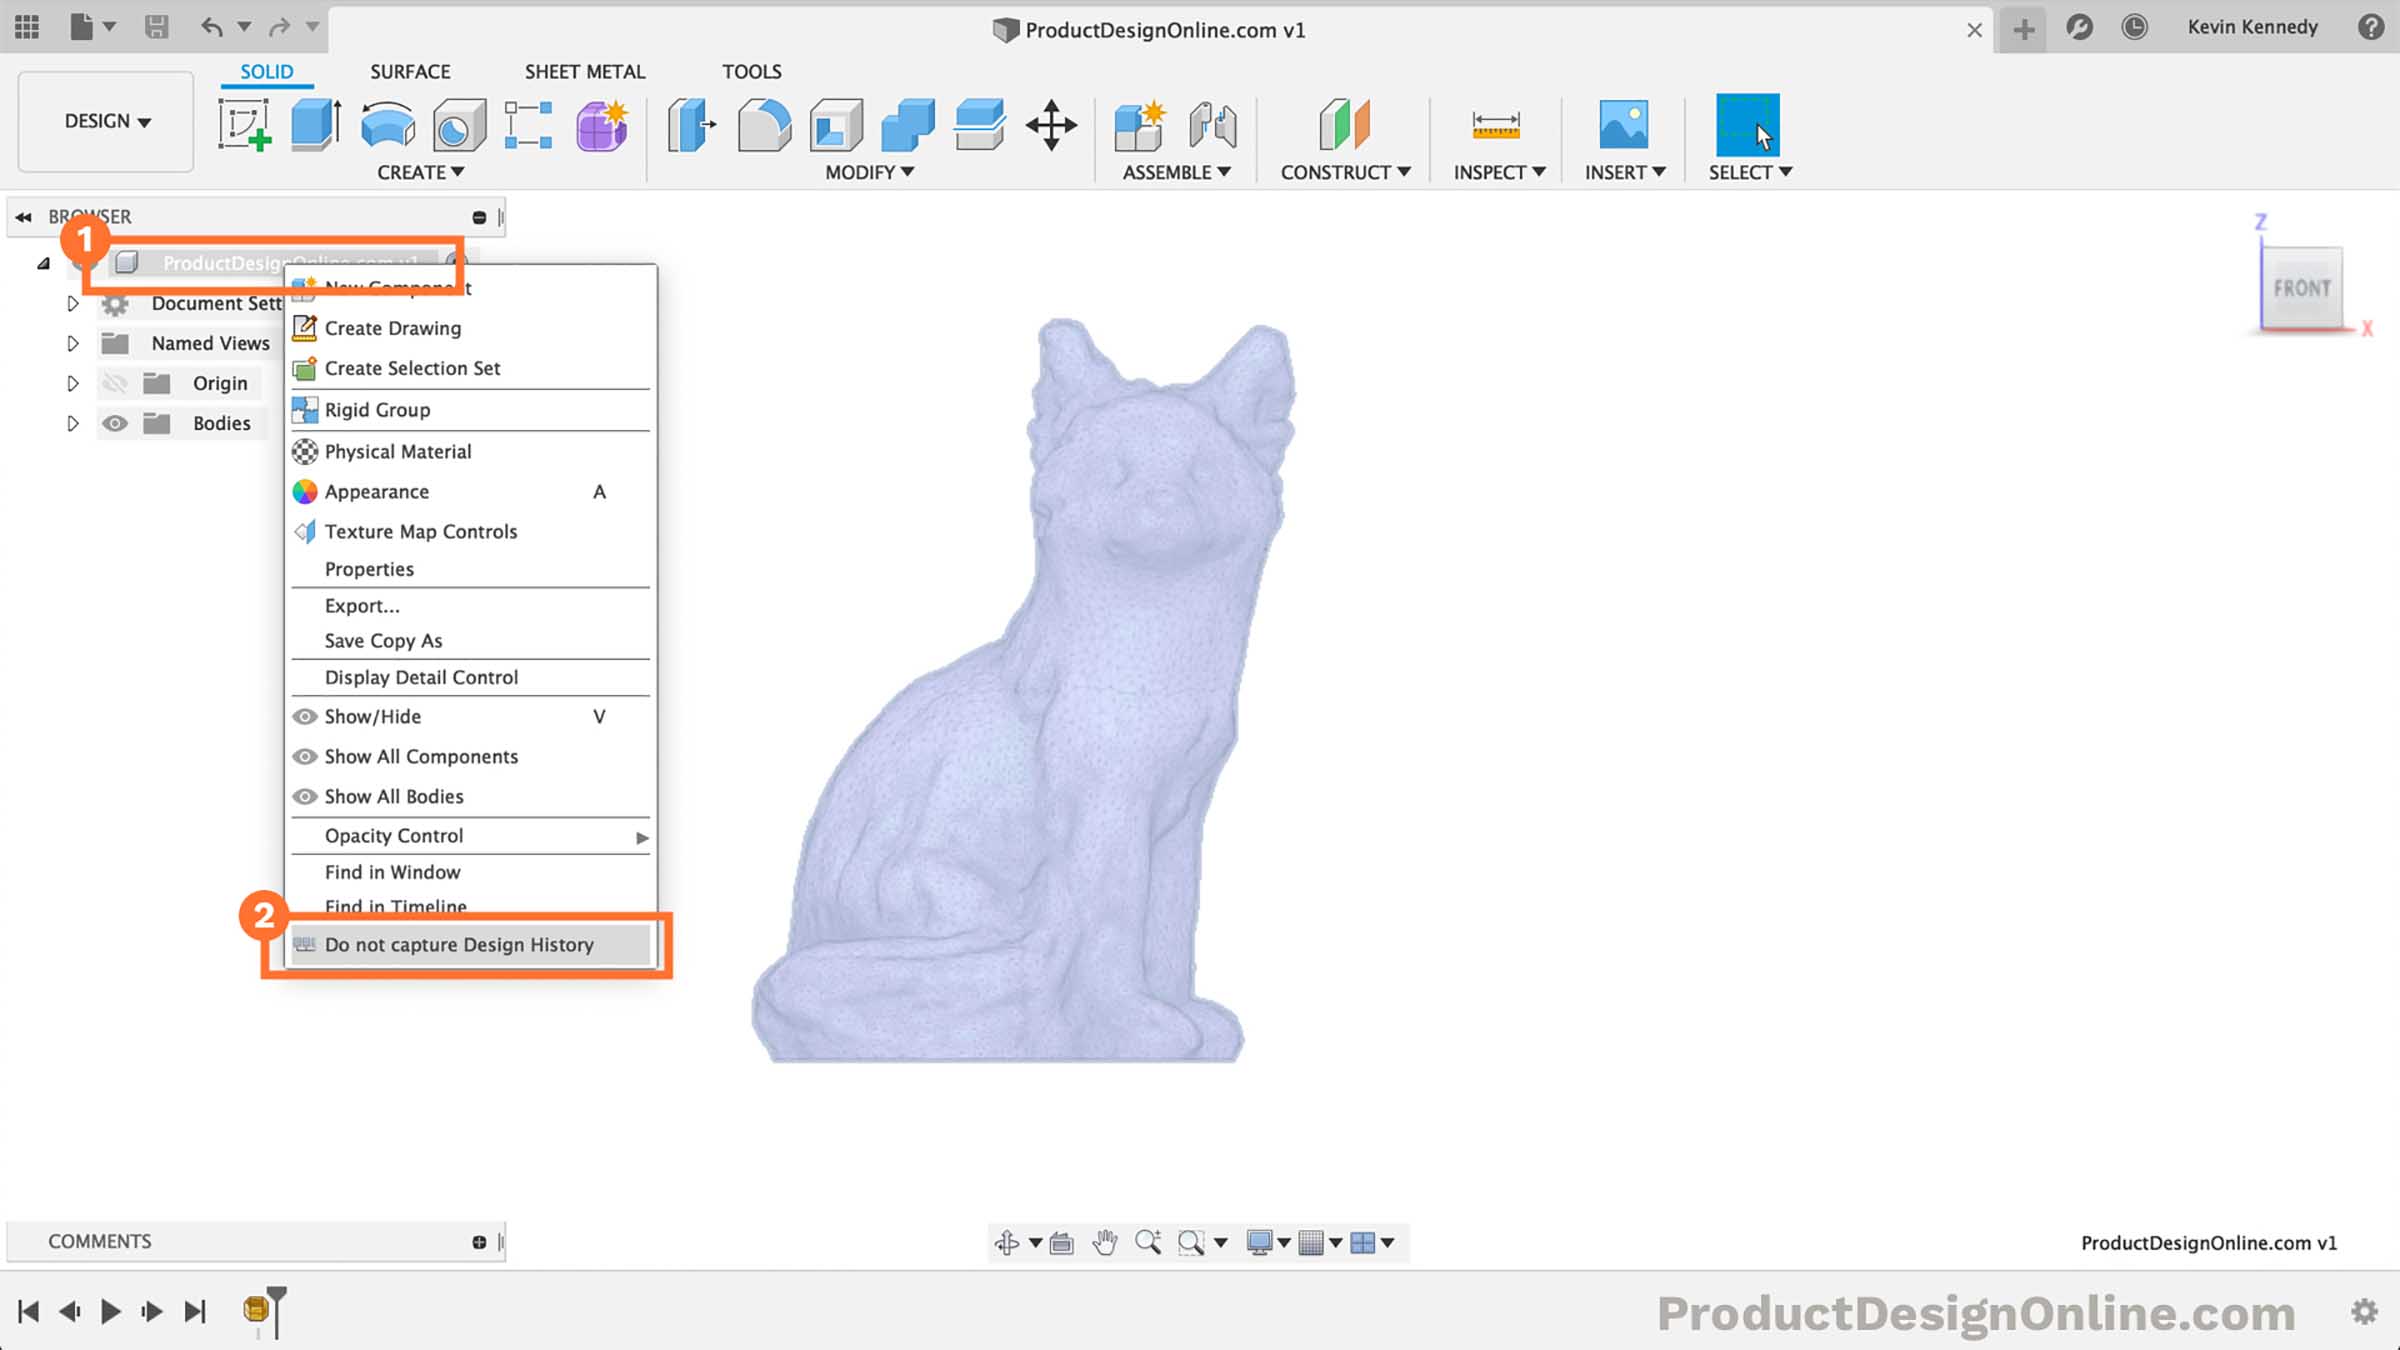
- Activate the Reduce Feature
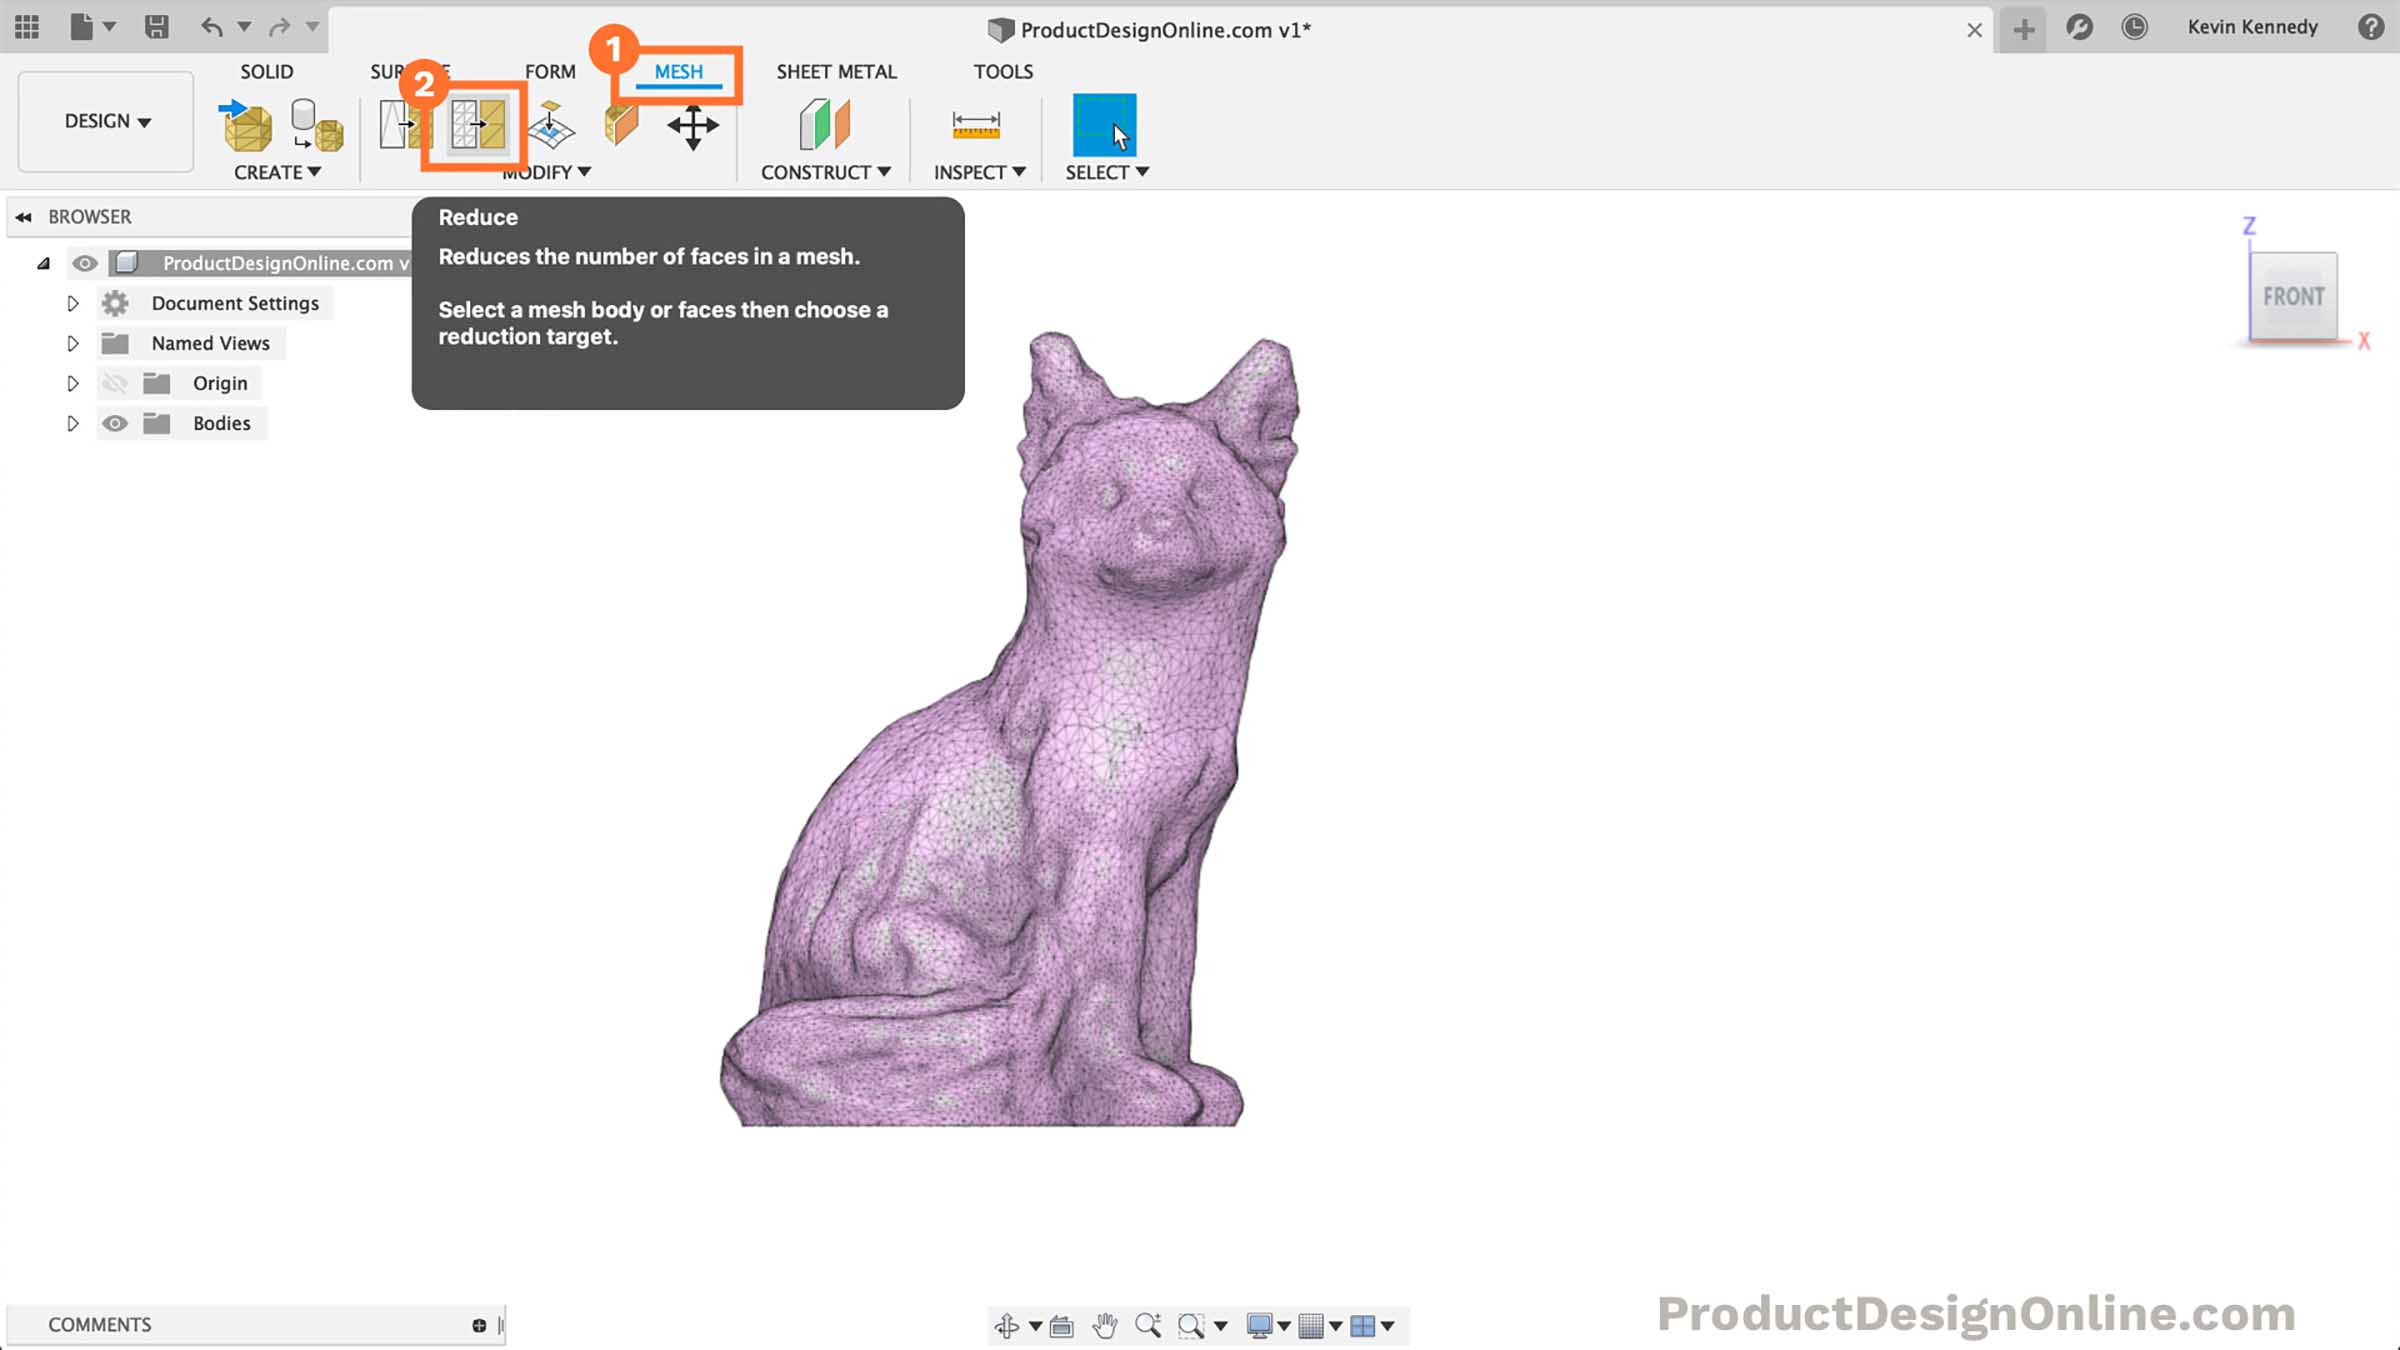
Notice the Mesh tab now appears in the toolbar. Select Mesh > Select the Reduce feature in the toolbar.
- Select the Mesh Body in Browser
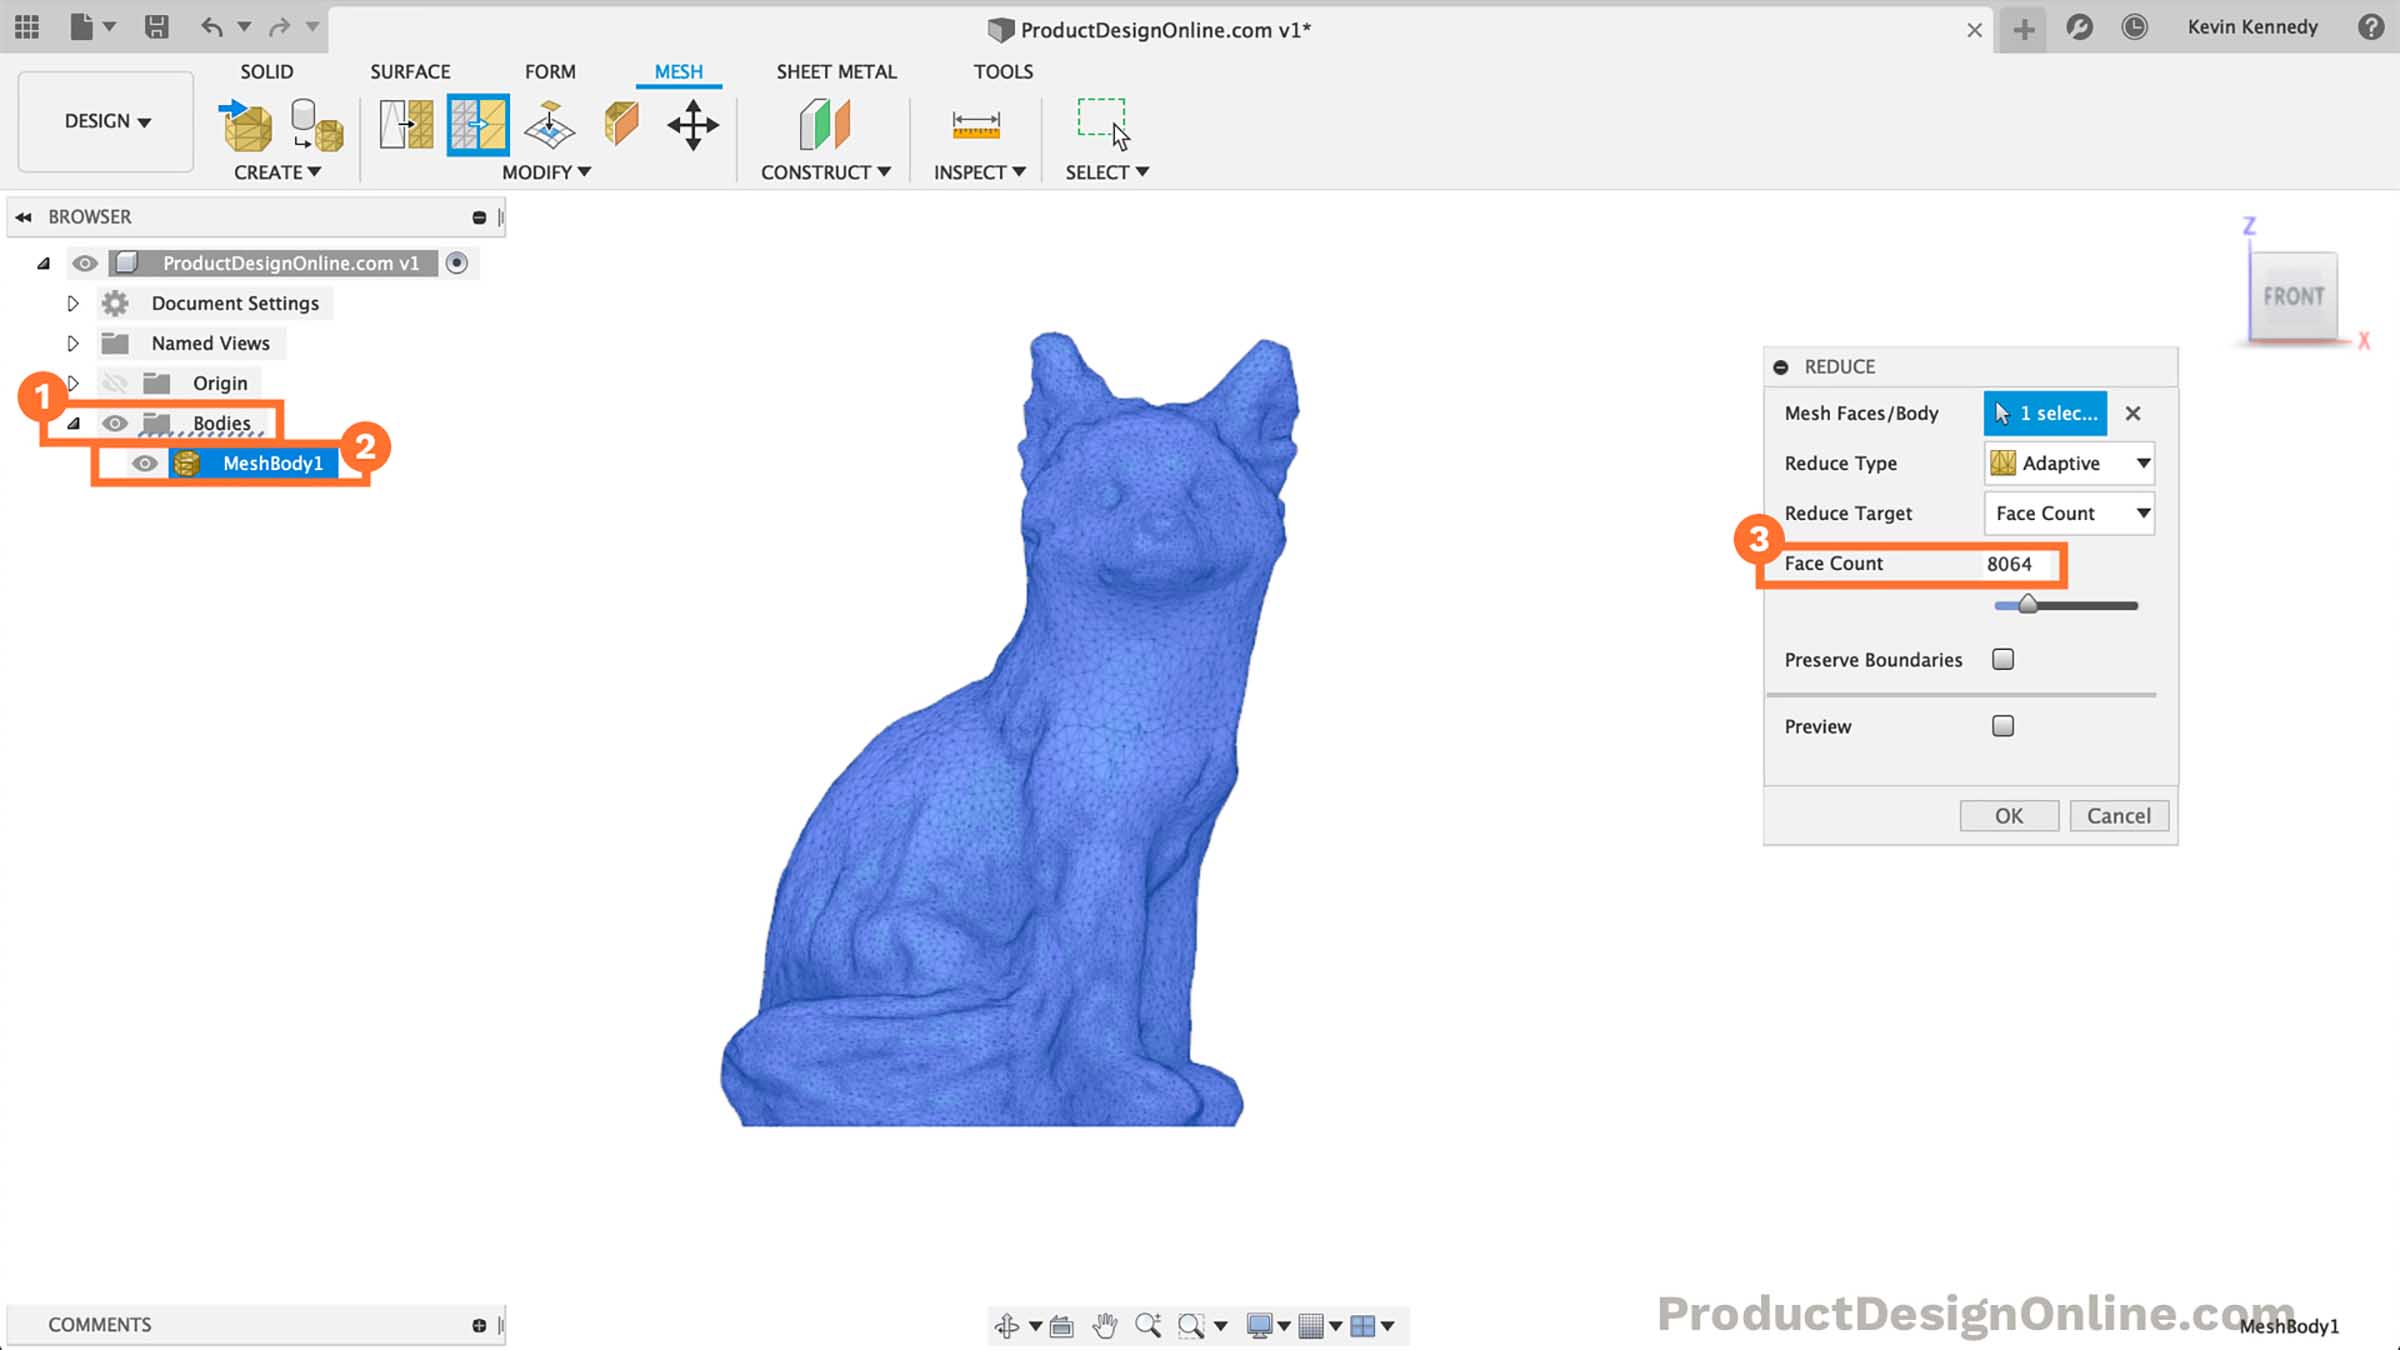
Toggle open the Bodies folder (in the Browser). Select the mesh body. Take note of the Face Count in the dialog. The sitting fox has a face count of 8,064.
- Reduce Face Count
First, check the Preview option. This lets us see the changes before we commit to them.
Next, make sure the Reduce Target is set to “Face Count.” Reduce the number of mesh triangles by dragging the slider or typing a new Face Count value. I lowered mine to 600.
Select OK when you’re happy with the appearance.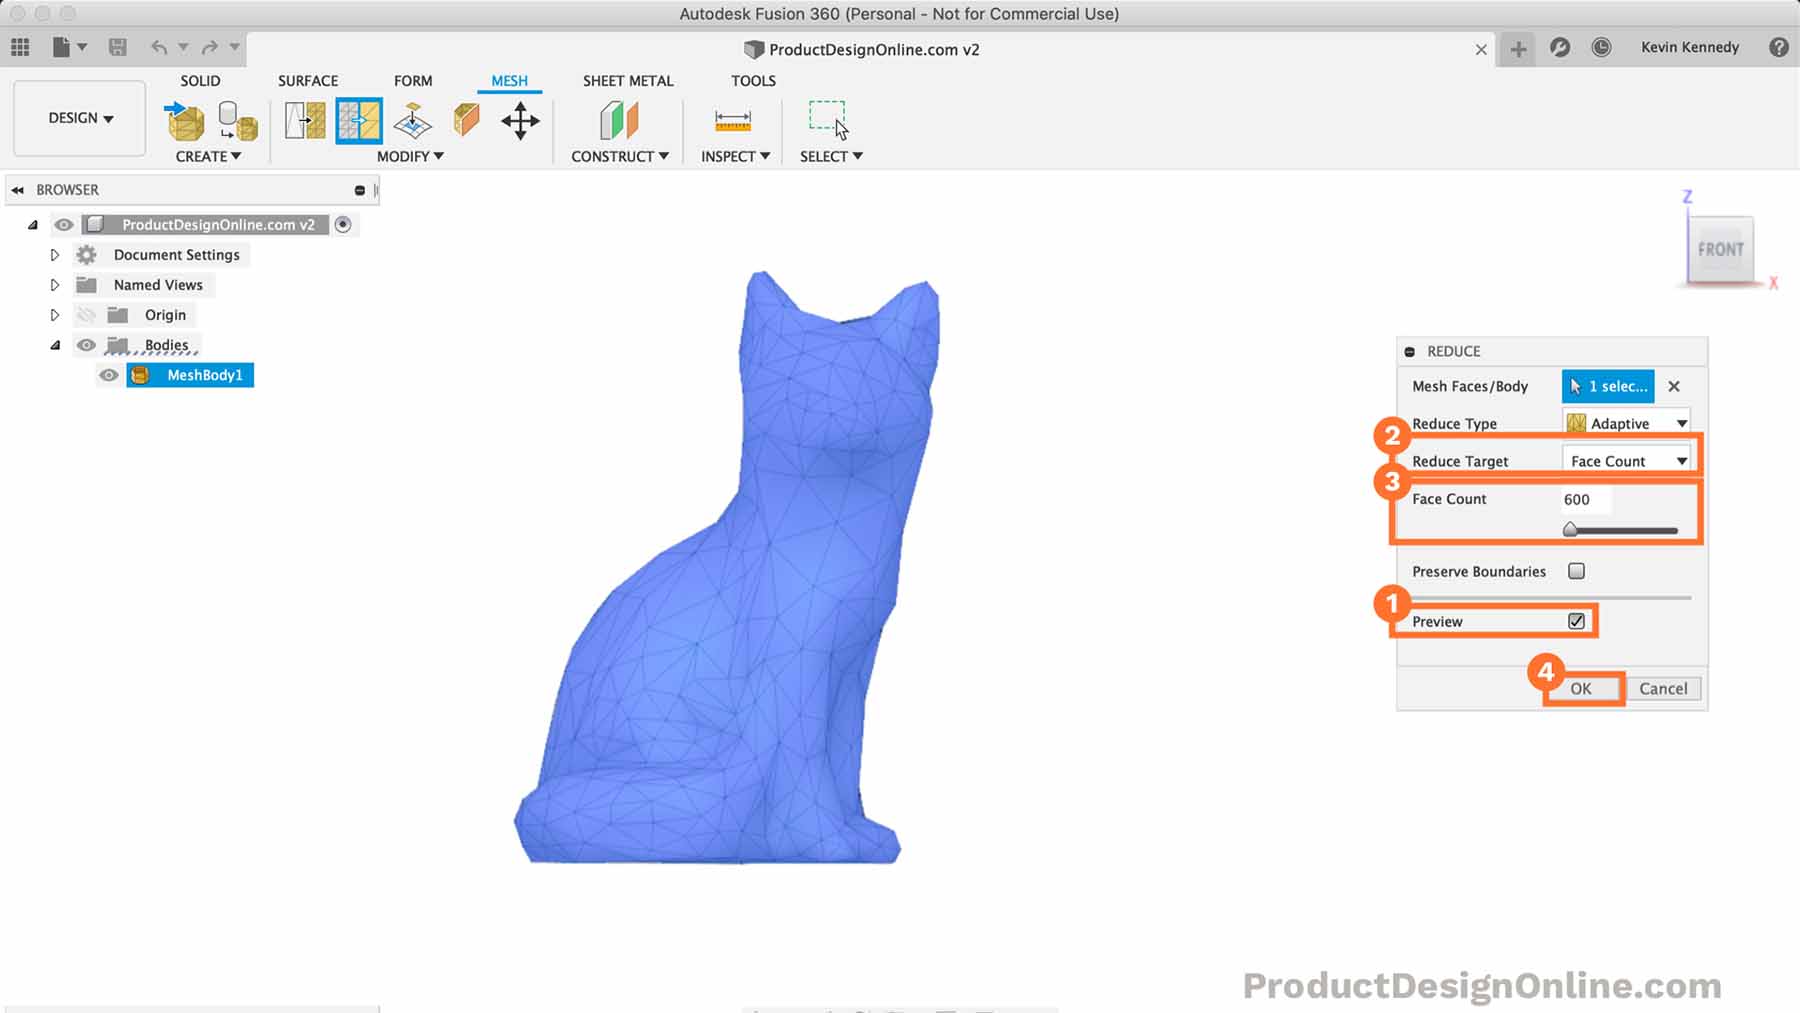
- Change Shaded Type
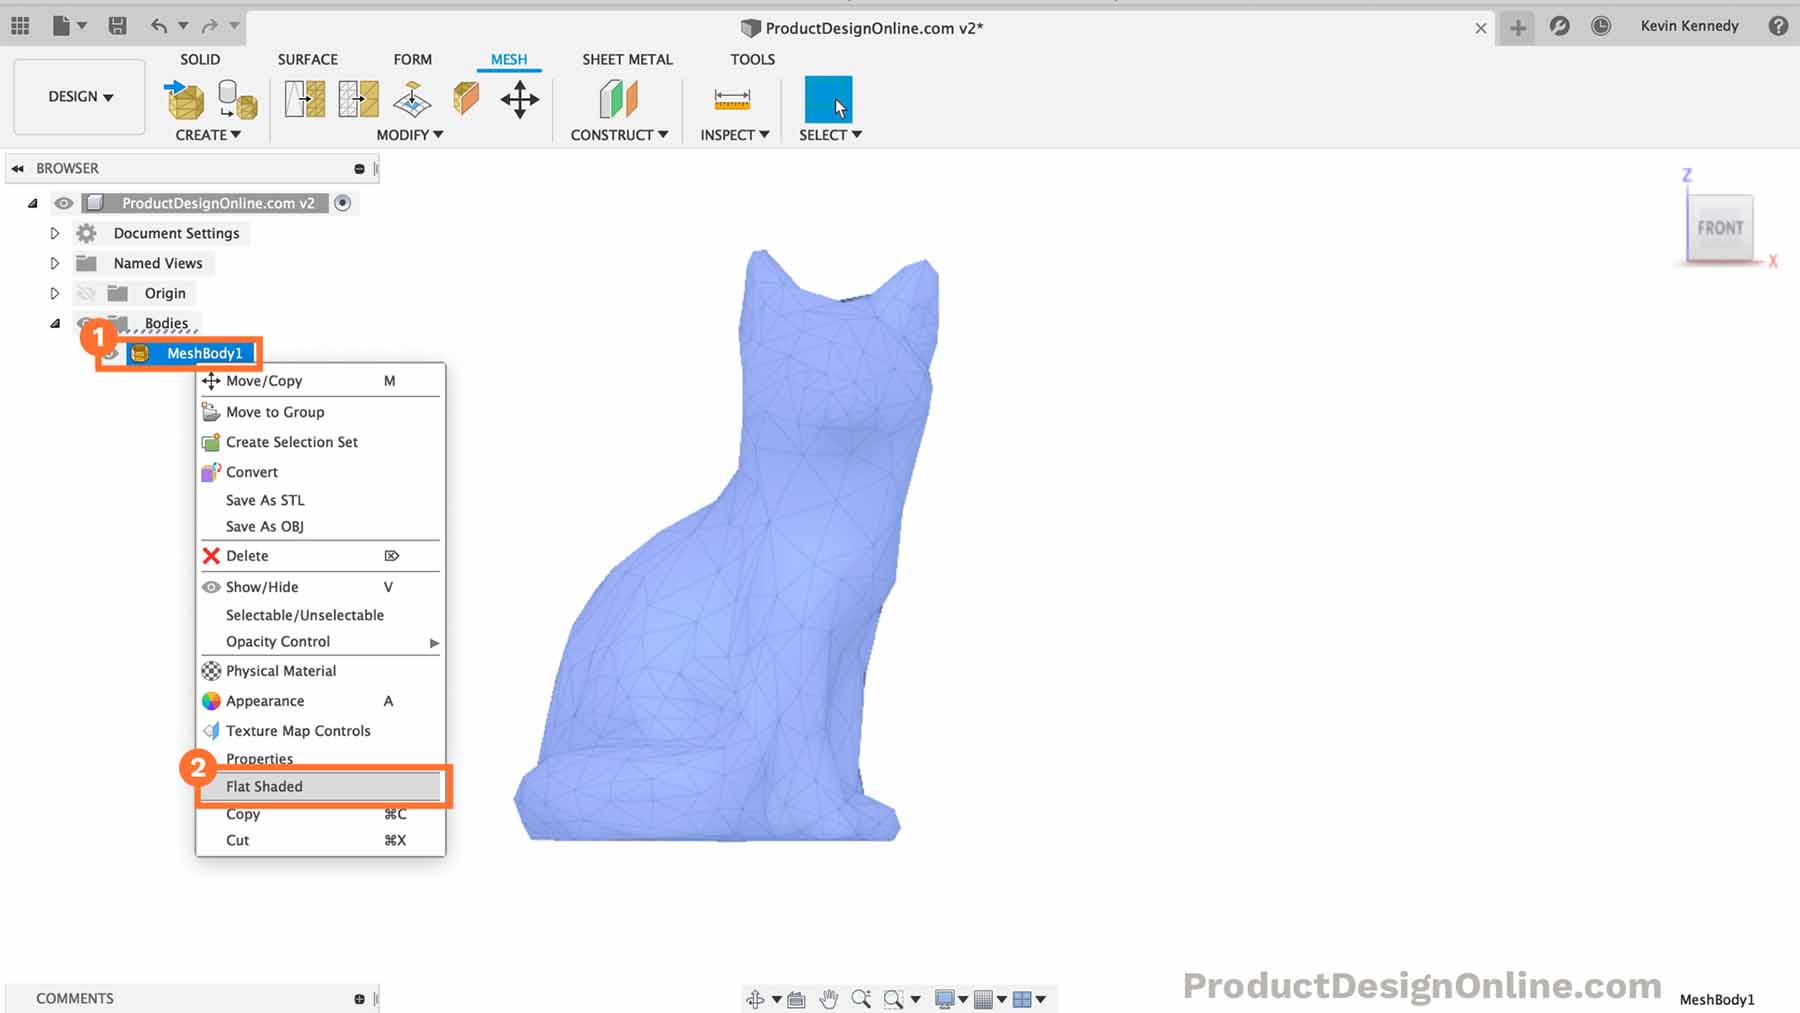
Right-click on the Mesh body in the Browser. Select “Flat Shaded” to change the appearance.
The model will now appear with sharp low-poly edges. This is how the model would come out on a 3D printer.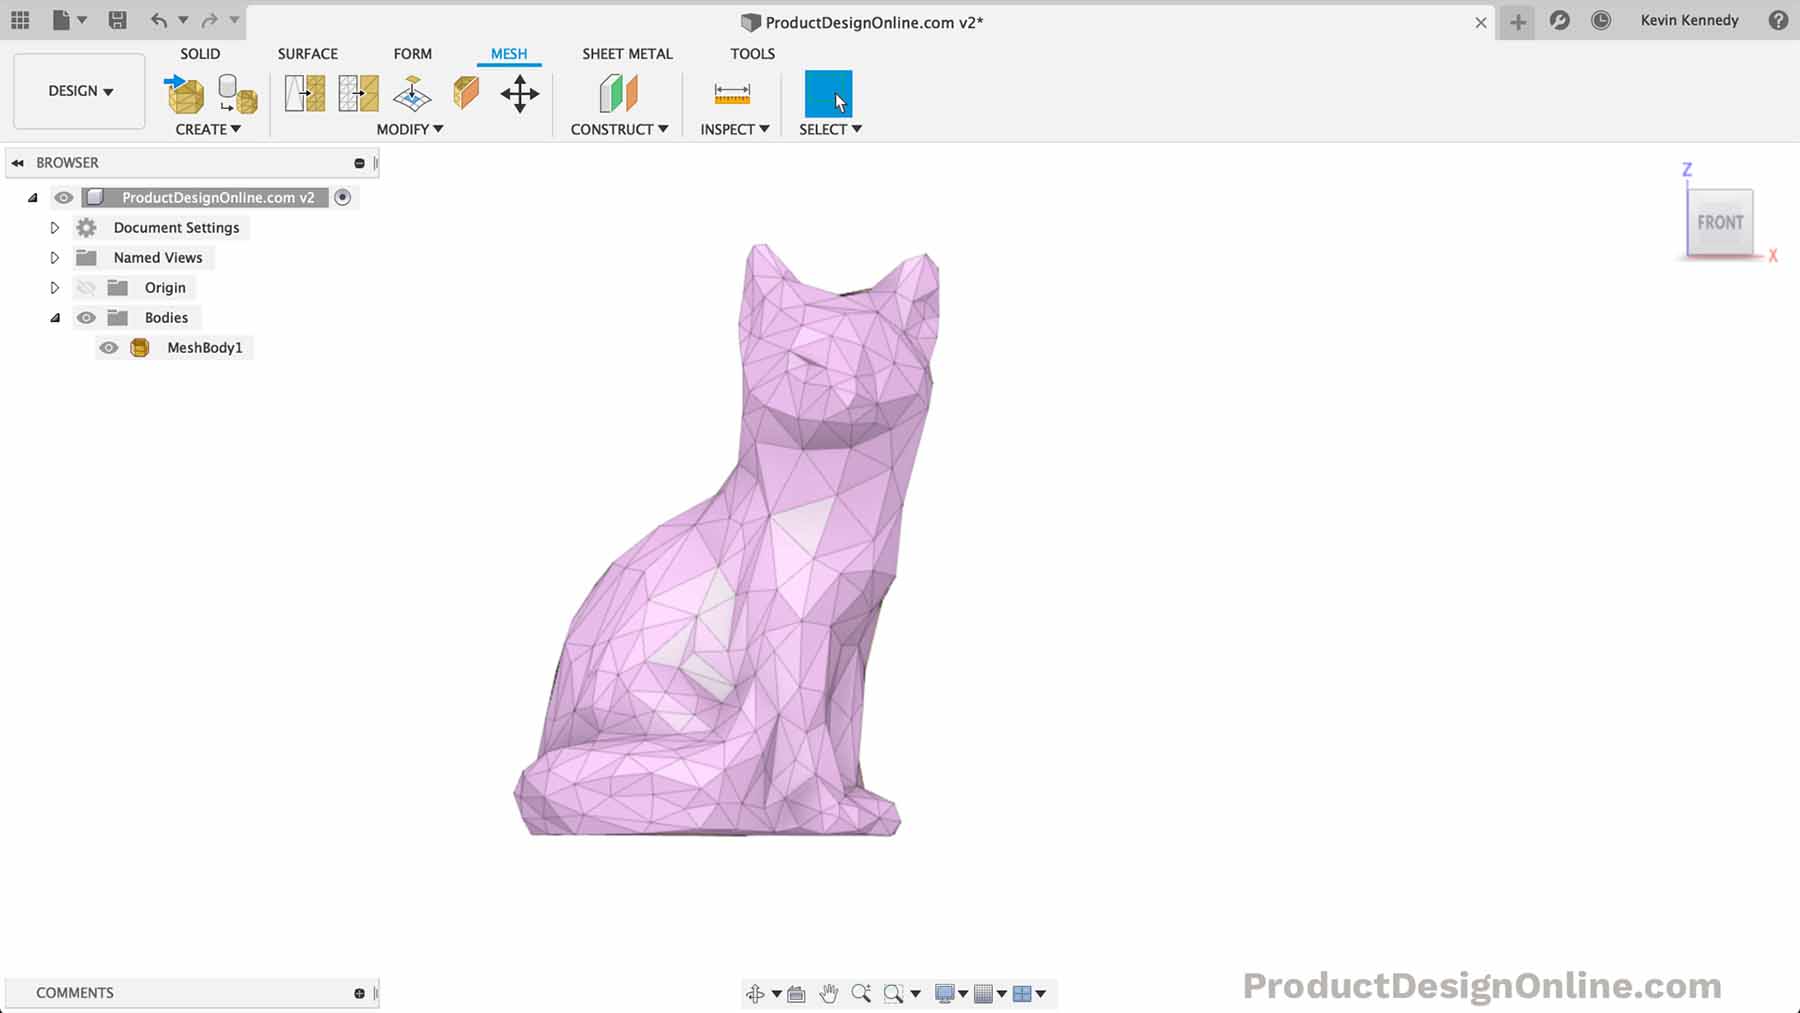
- Reducing Specific Areas
Often, you’ll want to reduce a specific area of the model. Reactivate the Reduce feature in the toolbar. Then, click and drag to conduct a Window Selection over the body of the fox.
Check the backside of the model to ensure that faces are selected all the way around. Reduce the Face Count until you achieve the desired appearance. Click OK to confirm the results.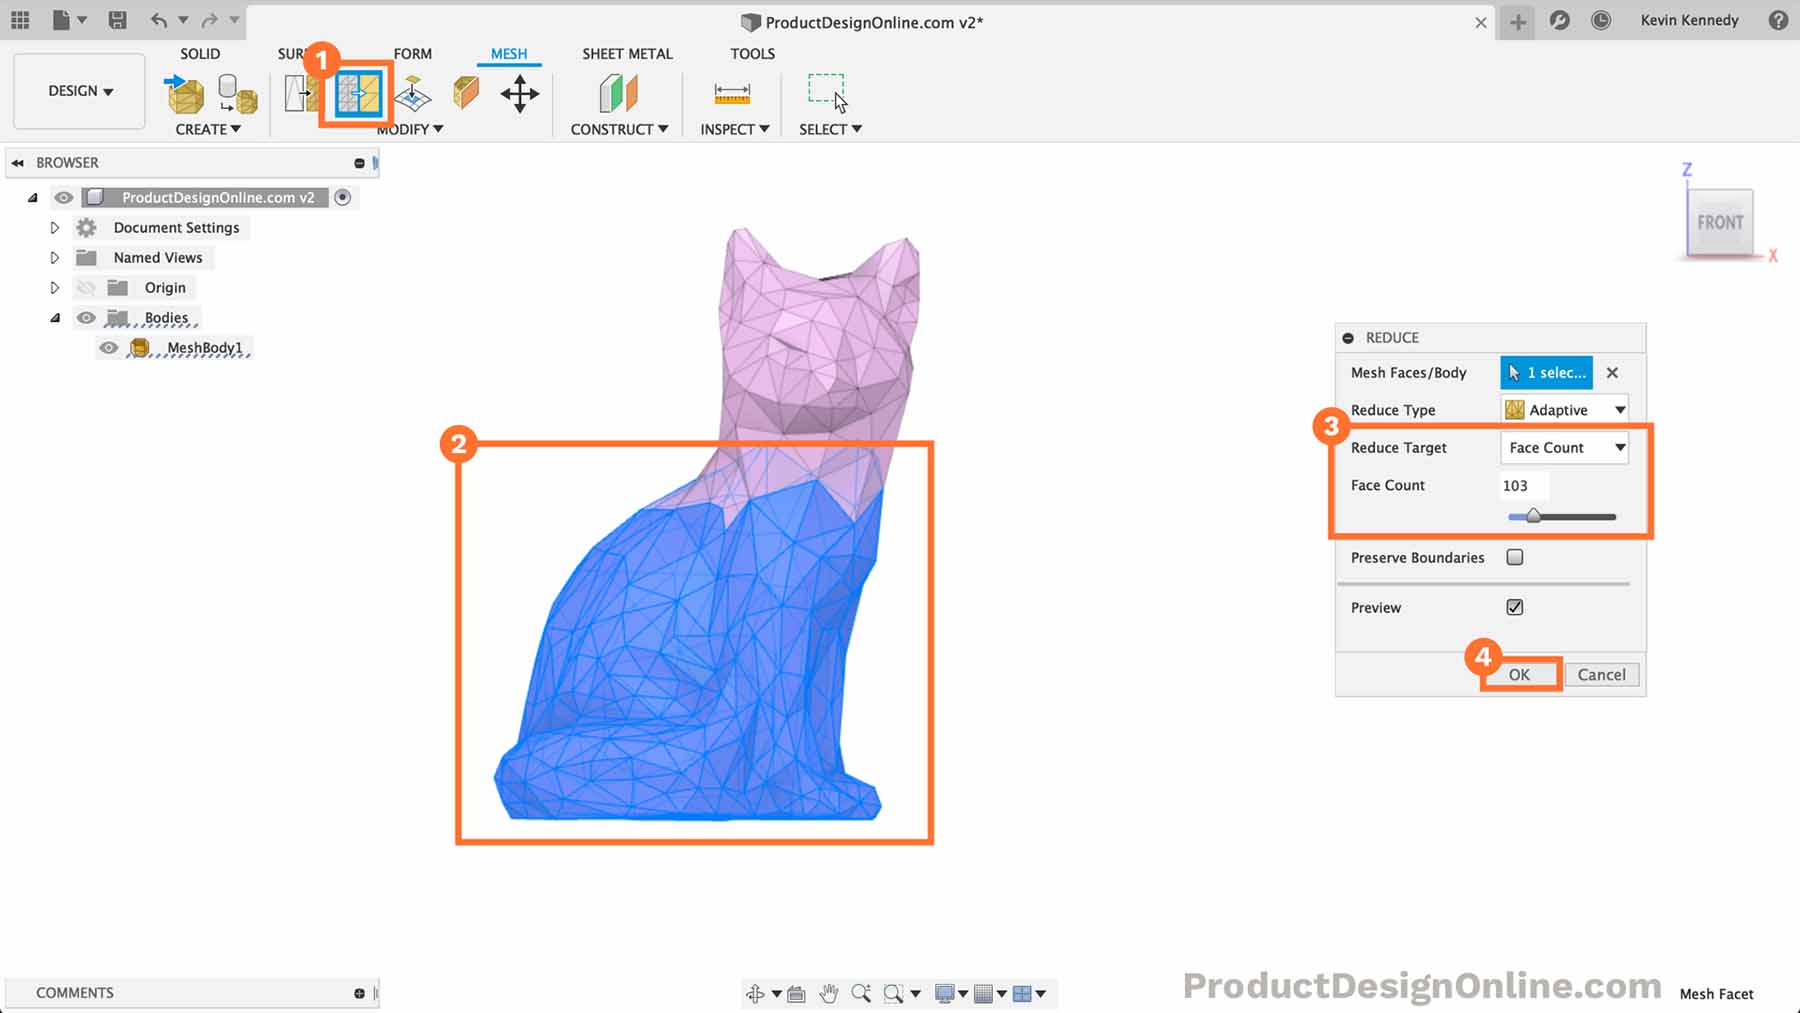
Notice how the body of the Fox now has less detail than the head. By selecting and reducing certain areas you can create a custom low poly look.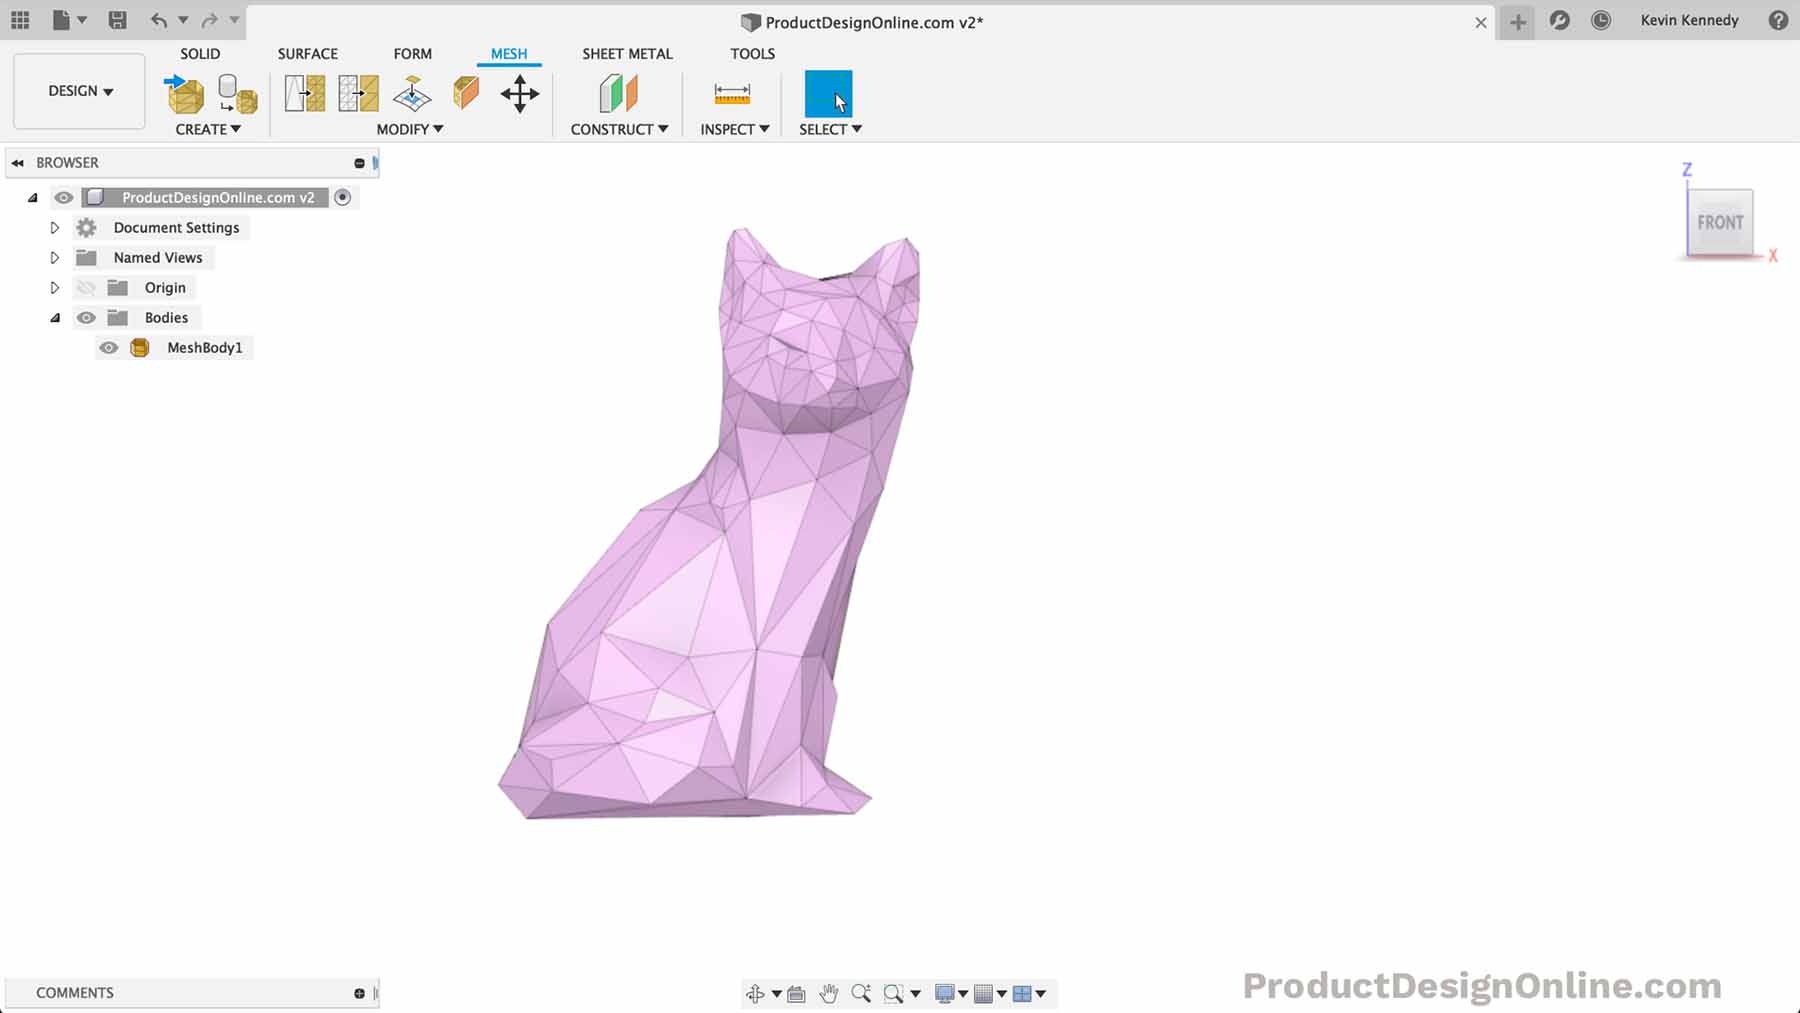
- Convert Mesh File to BRep Solid
You can convert the mesh to a BRep solid body to make additional modifications with the solid modeling tools. First, click the Solid tab in the toolbar. You must be in the solid tab for the mesh to BRep option to show up.
Right-click on the Mesh body in the Browser. Select “Mesh to BRep” and click OK in the dialog.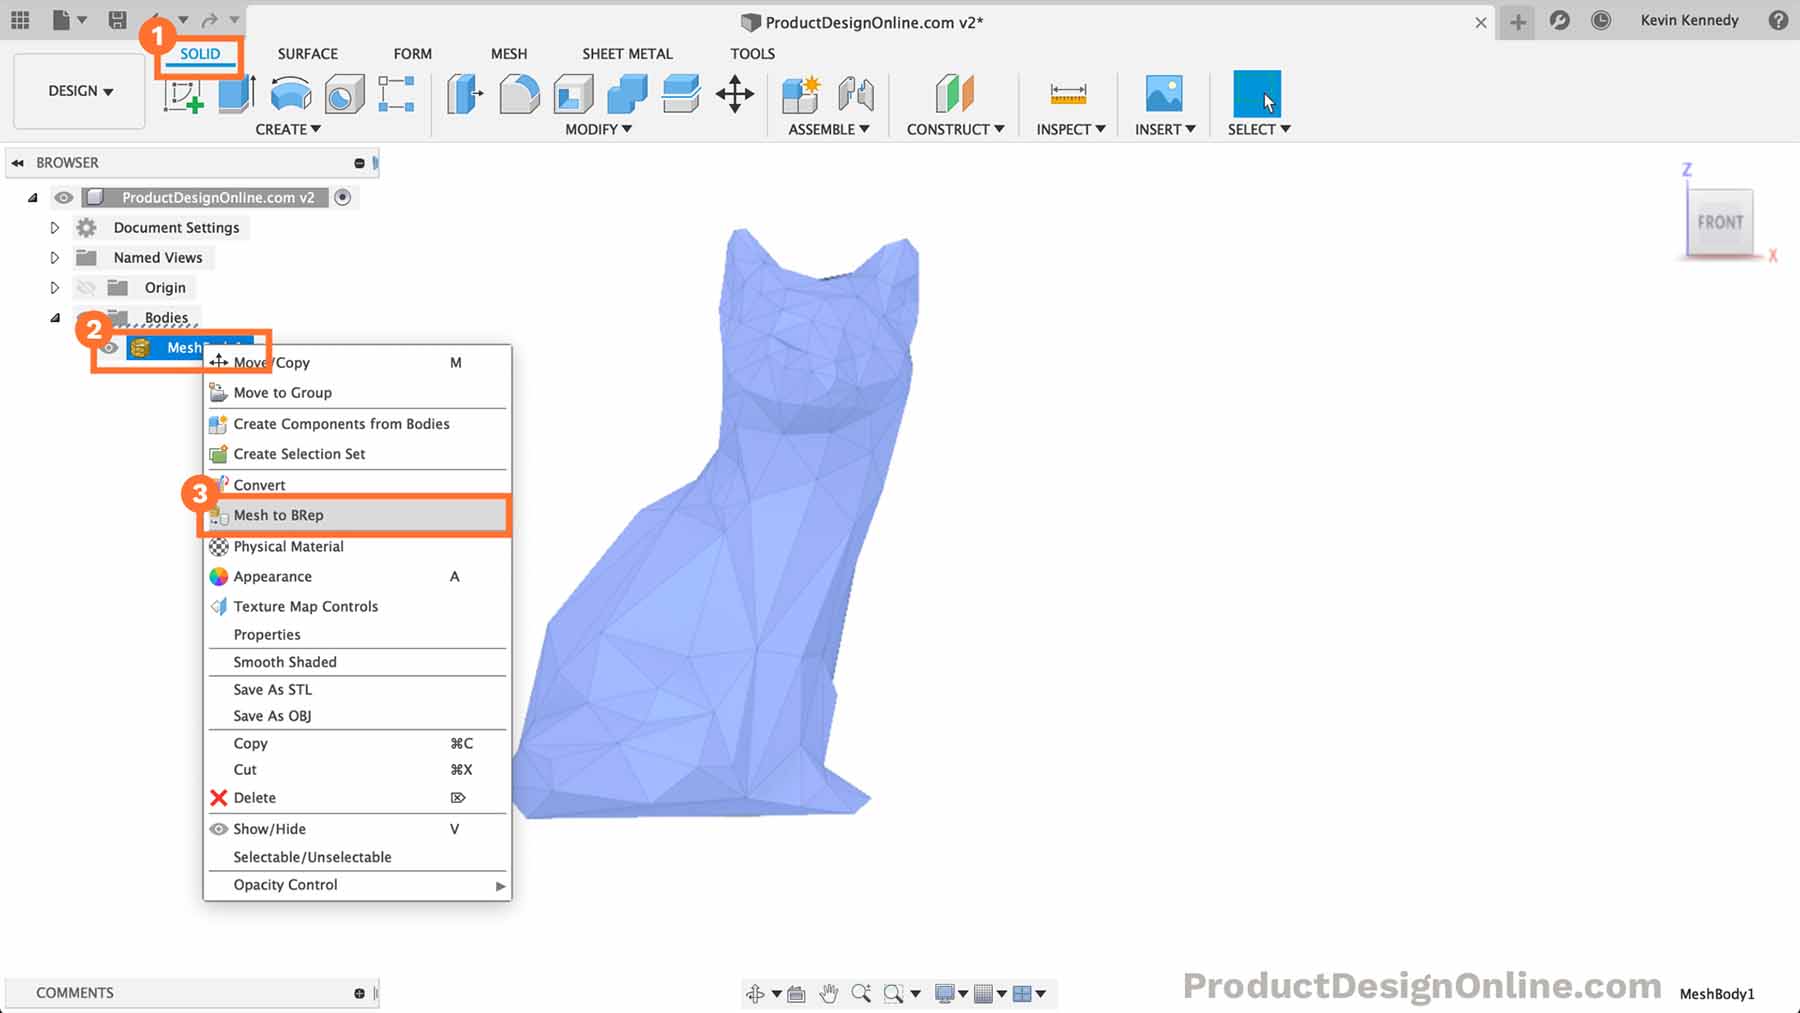
- Make the Bottom Flat
You’ll often find the bottom surface is not flat after converting mesh models to low poly designs. To fix this, we can simply select and delete the bottom faces. Fusion 360 will self-repair the faces, by merging them with adjacent faces.
Select 1-3 faces and use the delete key on your keyboard. Continue this process until the bottom surface is completely flat.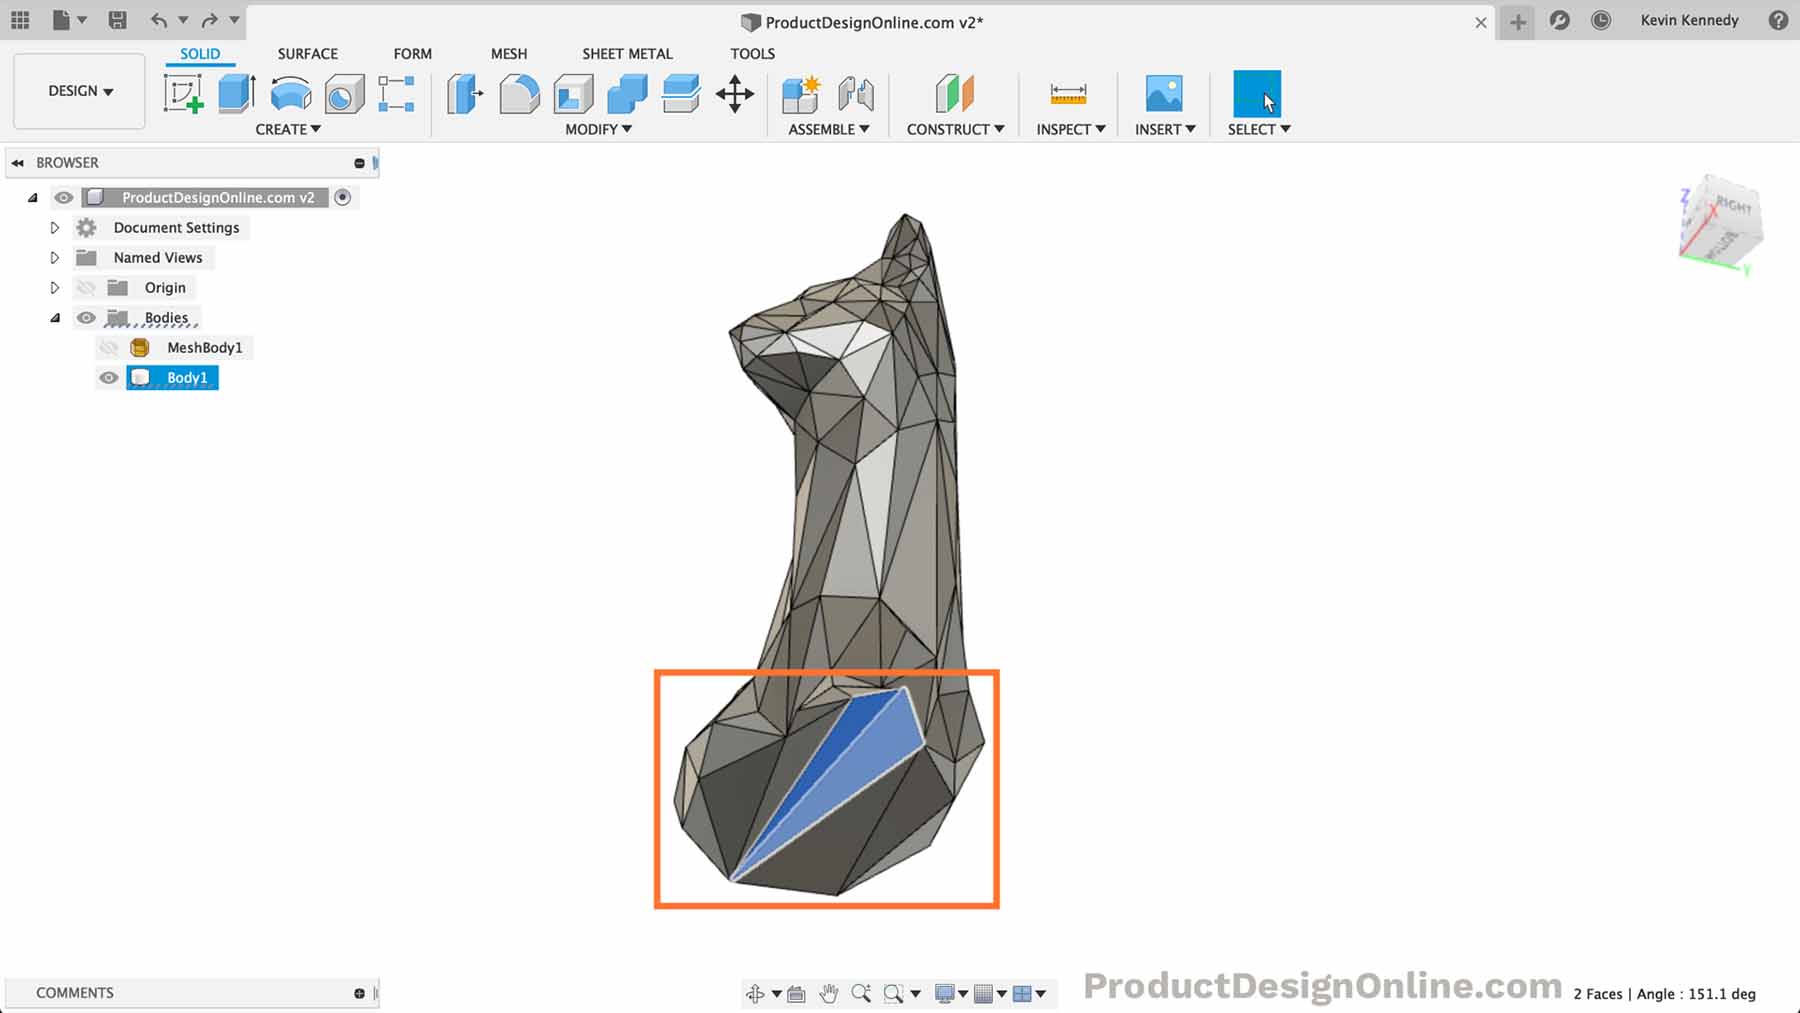
It takes some trial and error when working with self-repairing faces. Use the undo and redo features to try deleting different faces. The surface should result in a flat bottom. If not, you can always use the Split Body command.
Reduce Dialog Options
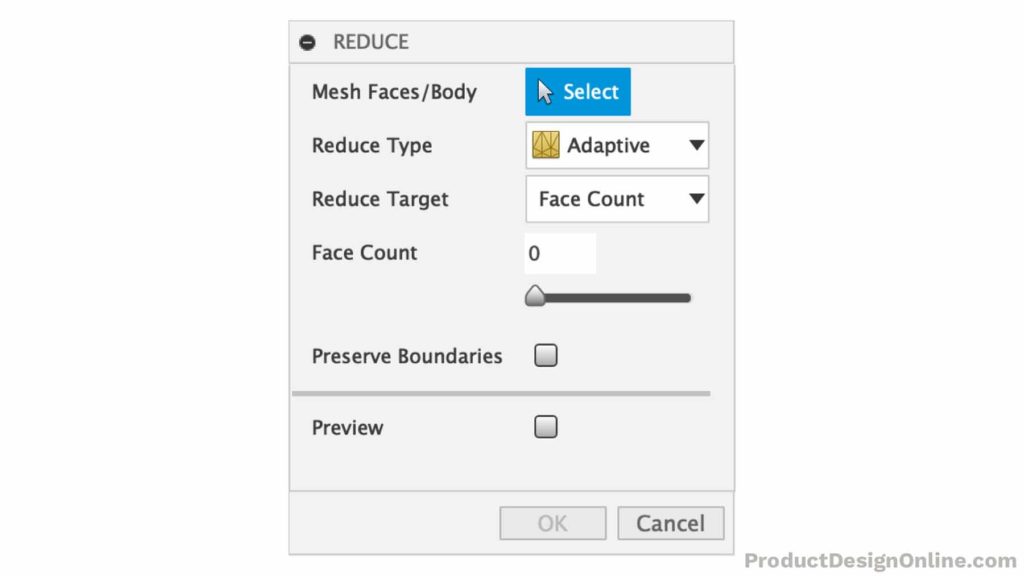
Reduce Type
- Adaptive – the mesh triangles will adapt to the shape of the model. Areas with more detail will have more mesh triangles.
- Uniform – the mesh triangles will be similar in size all throughout the model.
Reduce Target
- Density – Define the number of faces or drag the slider between 0 and 1 to define how compact the faces are. This works in a similar manner as the face count but is restricted to the current number of mesh faces.
- Face Count – Define the face count or drag the slider to reduce the number mesh triangles
Default Shaded
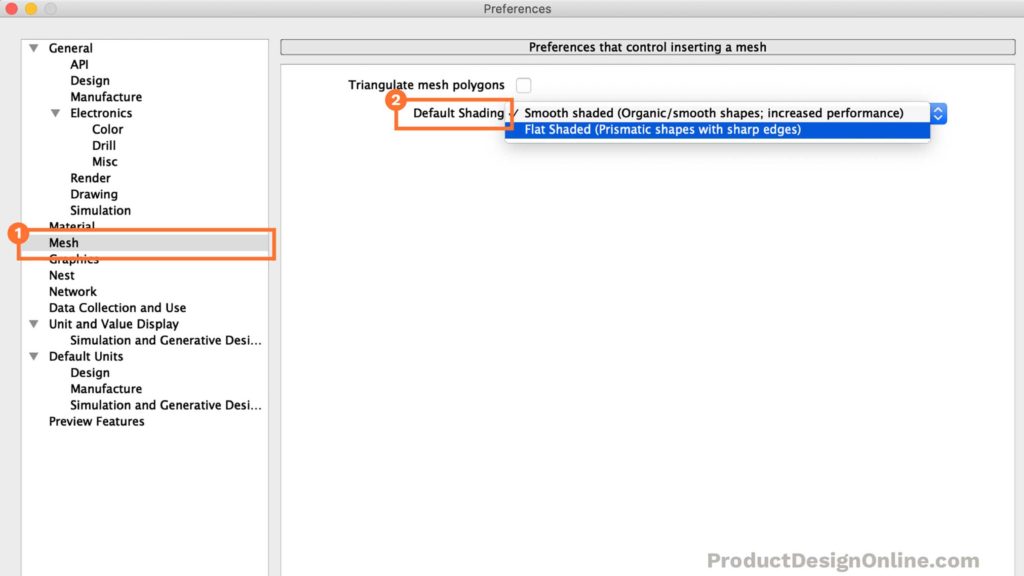
By Default, Fusion 360 gives all mesh files a smooth shaded option. This helps boost performance, especially with large mesh files. The default shaded effect can be changed in your user preferences.
Select your username > Preferences > Mesh (tab on left) > Default Shading option.
Transcript
By the end of this video, you’ll know how to turn a 3D model into a low poly design, using Fusion 360. We’ll look at inserting an existing model, lowering the facet count, and some other tricks to consider when turning a design into a low poly model.
Hey there, it’s Kevin Kennedy and welcome to episode number 5 of Practical Prints.
To start, you’ll want to have an STL or OBJ mesh file of the design you want to convert to low-poly. This workflow will often start with you finding something interesting on Thingiverse. However, you can also convert your own Fusion 360 built solid body into a mesh body. I’ll discuss that process in just a minute.
Otherwise, you can create something in Fusion 360 using the Sculpt tools, resulting in a mesh body.
For this demo, I’m going to use this “Sitting Fox” model that was uploaded to Thingiverse by the username slavikk. I’ll have the link to the Thingiverse model along with some additional resources at prodcutdesignonline.com/p5… that productdesignonline.com/p as in printer and the number 5.
Once you have your mesh file, you’ll want to go to the Insert Dropdown and select Insert Mesh.
Select the file from your computer and hit open or hit the enter key on your keyboard.
If you want to reposition the model you can do that as well. Otherwise, we’ll simply hit OK.
If I toggle open the Browser, you’ll see that I have a mesh body, meaning this file is made up of mesh triangles. To work with this mesh, we’ll need to turn off the design history. This is because Fusion 360 cannot record all of the mesh data in the parametric timeline.
To turn off the design history you’ll need to right-click on the top-level component and select “Do not capture Design History”.
We’ll need to click continue for the warning message.
Notice how our parametric timeline disappeared at the bottom. Again, none of the changes we make to the mesh file will be recorded. Just keep that in mind as you may have to utilize the undo and redo features.
If you’re paying close attention, you may have also noticed that we now have the Form and Mesh tabs in the toolbar.
We’re going to use the reduce command under the mesh tab.
As I mentioned earlier, you may want to start with a solid parametric model that was built in Fusion 360. If that is the case then you’ll need to use the “Brep to Mesh” feature in the toolbar. That will let you select a solid body, define the mesh refinement, and perform the conversion.
Because I already have a mesh file I’m going to start with the reduce command.
If we look closely at this Sitting Fox model we can see that there are hundreds of triangle facets that make up the geometry.
To create a low-poly model we’re going to essentially tell Fusion 360 that we want to have the same shape, but it should be built with a lower number of facets or mesh triangles.
If I select the mesh body in the Browser and change the reduce target to facecount, you’ll see that it tells us that this fox is made up of approximately 8000 mesh facets.
We’ll first want to select the preview button in the dialog. This way, we can see the changes before we commit to them. We can then start to drag the slider or type out different values for the face count.
Watch what happens as I lower the quantity to 6000. There’s not too much of a difference.
Let’s try lowering the value to 600.
You can now see our model is starting to become a low-poly model, as it’s made up of fewer triangles.
Some other things to consider. With most models, you’ll want the reduce type to be set to adaptive. This means the number of triangles used in each area of the model will be dependent on the amount of detail. In other words, if you look at the face of the fox, you’ll see there are more triangles than the chest area. This is because the face has more detail.
If I change the “Reduce type” to Uniform, you’ll see that all the triangles change to match one another in size. Ultimately, this depends on what look you’re going for and you may have to play around with this on a case-by-case basis. However, most of the time I think you’ll find the Adaptive option to better suit your needs.
Watch how much the face changes as I switch back to the Adaptive option.
For the “Reduce target,” you’ll almost always need to use the Facecount option. I’ve put some notes on the density option on this tutorials resource page.
One more important thing to note is the fact that this preview is a little bit deceiving. The facets appear to be blended together. However, when we change the shading, we’ll see that they do create that sharp low-poly effect that we’re going for.
For now, let’s click OK so we can take a look at the shading options.
By default, Fusion 360 renders mesh models with this smooth-appearance, mainly for performance reasons. This often confuses users when they export the model to Cura or another slicing software, only to realize it looks different.
To change this, we can right-click on the mesh body in the browser and select “Flat Shaded”. This Flat Shaded option is the true representation of what the model will look like when 3D printed.
If you find yourself working with a lot of mesh files then you can change this default shading in your preferences.
Under your user preferences, select the Mesh tab on the left. You’ll then see you can switch the default from Smooth to flat shaded. This can save you lots of time if you’re planning on converting a lot of designs.
Another important thing to discuss with turning a model to low-poly is the idea of targeting specific areas of the model.
For example, we may want this fox to be more prismatic, without losing too much detail in the face.
We can target just the body to reduce it even further, without affecting the face.
With the window selection, we can click and drag over the model to select all the body faces. You’ll want to turn the model around to check that the faces were selected on the backside.
Again, using the reduce tool, we can reduce the number of triangles to create the popular low-poly look.
I’ll just try out some different numbers to see what looks better.
Once you’re happy with this reduction, we can click OK.
I want to show you a few more things to look out for. First, you’ll find that a lot of models will lose their flat bottom when you alter the number of mesh triangles.
This is something to be concerned about if you’re going to 3D print the model.
You could work with the mesh tools to try to fix the shape. However, I’ve found that oftentimes it’s much quicker to convert the mesh to a Brep solid body and to then use the self-repairing functionality.
If you right-click on your model in the Browser you’ll see that the mesh to Brep option is not available. This is because you need to be in the solid modeling tab.
Once you’re in the Solid tab the “Mesh to Brep” option will appear in the right-click menu.
And you can click OK to convert the model.
At this point, we want to look at the bottom of the model. Simply click on a face and hit the delete key on your keyboard. You’ll see that Fusion 360 will automatically try to self-repair the faces by joining the adjacent faces.
You can continue to do this until you achieve a flat bottom. Note that you may have to undo or redo as sometimes adjacent triangles will not work with the self-repair, especially if you select several of them at once.
Because we created a solid body, the second option would be to use the Split Body command. You can even split the mesh file in a similar manner. I have an entire video on splitting up your models for 3D printing, which you can watch by clicking that info card in the upper-righthand corner.
I’ve gone ahead and printed out my low-poly fox so we can look at the results…and you can see that minus the stinging caused by my timelapse pauses, the 3D print of the fox came out great – looking like the popular low-poly effect that we were going for.
In summary, I’ve had several people ask me how to create low-poly designs in Fusion 360 – so hopefully, this gives you guys some insight into one way low-poly designs are made.
It’s also important to mention that if you’re looking to create low-poly designs from scratch then you’re likely better off using a mesh design program such as Blender or Maya.
You could technically create a low-poly design in Fusion 360’s sculpt environment. However, in my opinion, it’s not worth it, unless it’s a very simple design. You can crease edges with the crease command, or simply try to reduce the facet count.
With that said, Fusion 360 does not have enough mesh capabilities when compared to a full-fledge mesh program – which allows you to essentially paint your model.
Last but not least, I want to give a quick shoutout to those who supported my content over the last week.
Special thanks to my new Patron…
Ruud Noverraz
And thanks to those who supported the channel via my Buy Me a Coffee page…
Robert, Middomaker, Adam E, Ivan, bistro703, and the four anonymous contributions.
If you’ve enjoyed episode number 5 of practical prints help me out by clicking that thumbs up icon and share the video with someone you know that also does 3D Printing.
To watch the other episodes in the series you can click that playlist in the lower right-hand corner.

Leave a Reply