Looking for all 10 days?
View full course – Learn Shapr3D in 10 Days for Beginners.
Learn Shapr3D for Woodworking – Beginner Project

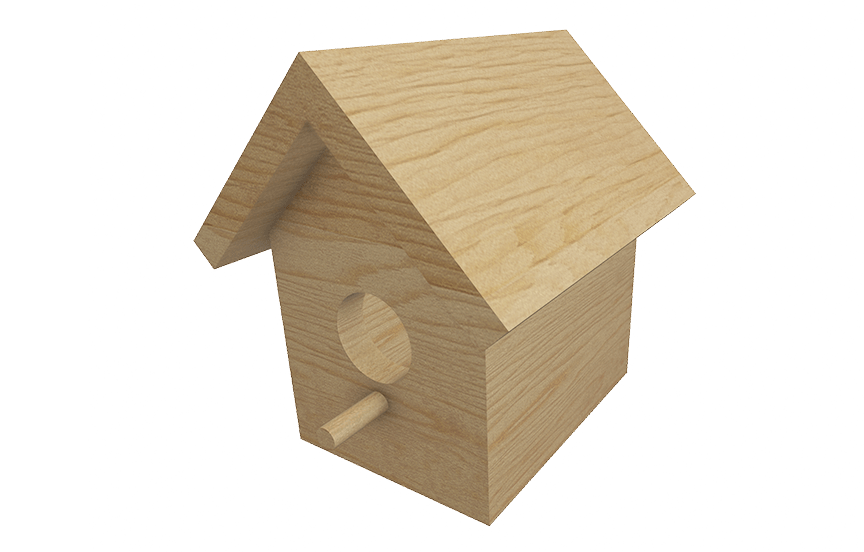
Shapr3D is a great program for woodworking projects. Apply realistic materials to help visualize your woodworking designs before building them in real life. Shapr3D’s Visualize tool allows you to drag and drop materials onto the model. You can then capture images (as done above with the birdhouse image) to upload to your website, share with clients, or use to communicate your design.
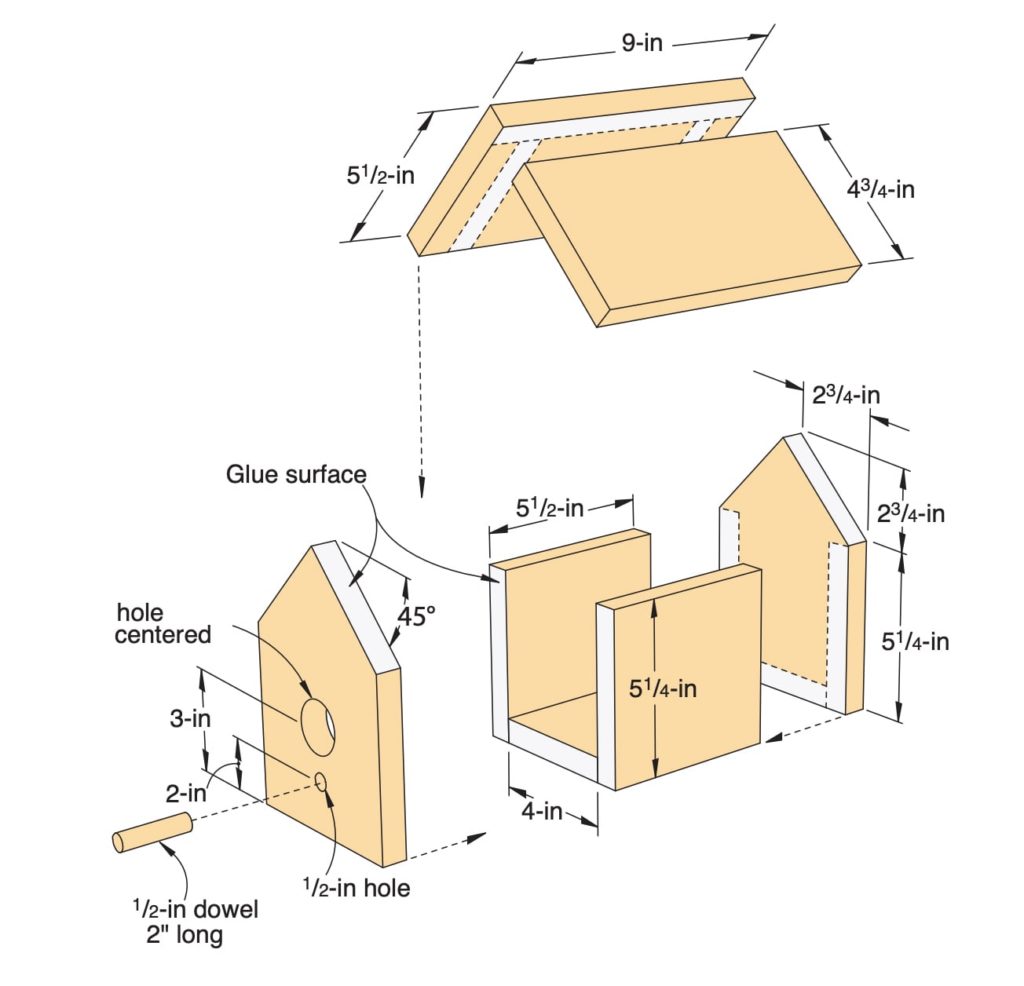
Birdhosue Dimensions

Cutting Diagram

Transcript
Welcome to Day #6 of Learn Shapr3D in 10 Days for Beginners. I’m Kevin Kennedy, and today we’ll design a one-board wooden birdhouse. We’ll look at copying 3D bodies, Aligning, cutting with Extrude, and the Visualize feature.
Let’s get started with a New Design. I’m going to change the units to inches and will reference these birdhouse dimensions on this tutorial’s resource page.
We can start by sketching the front of the birdhouse, using a diagonal rectangle. The width will be 5.5 inches, and the height will be 5.25”, not counting the pitch of the roof. Remember, before placing the rectangle, you can press the Tab key to switch between dimension inputs.
With the Line tool, sketch the roof by snapping to the edge of the rectangle. Notice Shapr3D will help us reference existing geometry. We’ll place the second endpoint at the center point of the rectangle. I won’t dimension this yet, as I’d like to first add constraints.
We want these two lines to remain equal in length, so we can shift-click both of them, followed by the equal constraint. These two lines will now remain equal in size when we add any dimensions.
I know the dimension between the vertex and the top of the rectangle. In Shapr3D, quickly define sketch dimensions by shift-clicking two entities. Define this dimension as 2 ¾”.
Looking at this from a perspective, we can use the arrow to quickly Extrude both profiles to ¾”. Note that you’ll need to hold the shift key to select both profiles.
To create the back panel, we can double-click the body to select it, and select the Copy badge. I’d like there to be 5.5 inches between the two, but keep in mind the selection point is in the middle of the body, so we’ll need to add .75” for the thickness of the board. Thus, 6.25 inches will leave us with the desired result.
Remember, you can shift-click two edges to check the distance between them.
To quickly create the sideboards, we can view the model from the Left side of the Orientation cube. This will allow us to sketch on the origin plane, with the Corner rectangle. Notice the purple points where we can snap to the existing edges, allowing us to quickly create the rectangle without having to define the dimensions.
Don’t forget to press the Escape Key to clear out any active sketch commands. Once complete, we can view from a perspective and Extrude to our board thickness of ¾” of an inch.
If your boards are ever going in the wrong direction, simply edit the dimension and add or remove the minus sign.
Repeating the same process, we can double-click on the side body and select the copy badge. We’ll move this over 4 ¾ inches.
In a few short minutes, we’ve completed the sidewalls of the birdhouse. Let’s create the bottom board, and then we’ll finish off the roof and a few details.
We can sketch on any existing planar face by hovering over the face, followed by the Space bar to reorient the view. Again, we’ll use the corner rectangle to quickly sketch this out, before extruding to our board thickness of ¾” of an inch.
The two roof boards are different sizes, however, they’re both simple rectangles as well. Instead of sketching them out, we can start by copying one of the existing sideboards.
Start by moving it above the existing board. Before we rotate this, make sure to deselect the Copy badge. We’ll want to match the 45-degree pitch of the roof, so we can rotate this 45 degrees.
We can now use the Align tool to precisely position this. Double-click to select the board, then activate the Align tool from the contextual menu.
Notice the face that’s highlighted in blue. We’ll want to change this to the underside that should align with the roof. This will allow us to drag the corner point to the corner of the roof. Before selecting Done, we can also offset the board an inch towards the front, to create an overhang. I’ll also position this up a ¾” of an inch, as this roof board will overlap the smaller one.
After you’re Done with Align, make the total length of the board 9 inches. Remember, you can select the face to Extrude, then update the distance.
We’ll also make the overall width 5.5 inches.
The first roof board is now complete.
Oftentimes, you’ll need to evaluate the most efficient way to create the next part based on your existing geometry. Consider whether it’s easier to sketch the part in place or copy and position the part.
I’ll sketch the last board, by referencing the edge of the roof and our known board thickness of ¾”.
This board is then shorter due to the overlap, so we’ll Extrude to a length of 4.75”.
Now that our boards are complete, we can create the cutout for the birds, and finish it off with a dowel rod.
Let’s sketch on the front face of the birdhouse, starting with a circle. We’ll make the circle where it aligns with the center of the rectangle. Define the radius as 1 inch.
We can then select the center of the circle and the bottom line to apply a dimension of 3.5 inches between them.
Any time you’d like to cut shapes out of existing 3D bodies, simply Extrude them into the body. Notice once we get past the thickness of the board, it cuts the circle out of the board.
We can return to our sketch on the front plane to create a small half-inch circle for the dowel rod. Before sketching, let’s open the Preferences with CMD + “,” (comma). Here you’ll find that we can change the setting that allows us to define circles by diameters as well as the radius.
We can now sketch out a circle with a .5 inch diameter. Notice this is now showing the diameter instead of a radius.
Finally, we can define a distance of 2 inches from the center of the circle and the bottom edge.
Let’s Extrude this circle out 1.5 inches to create the dowel rod.
Last but not least, let’s hold the CMD key and select all the bodies in the Items Manager. I’ll use the new Visualize feature from the Tools Menu. It’s here that we can apply realistic materials by dragging them to the model or the 3D bodies in the Items Manager. Find a wood material and drag it over.
Note that we’re in the visual contextual environment. When we return to the design, we’ll be left with only the solid colors from the selected materials.
While in Visualize, we can change the background environment, as well as quickly capture images from the Capture button in the header. This is a great way to save images of your project to upload to a website or to share with others.
We’ve now completed a simple one-board birdhouse, which is a fun project to not only build in Shapr3D but a great beginner woodworking project to build in real life.
Of course, don’t forget to rename your file from the Designs tab and I’ll see you in Day #7.
[Upbeat Music]
Be sure to subscribe for more free Shapr3D lessons and check out ProductDesignOnline.com for more resources. Then, click on this YouTube playlist to view the rest of the ten days.
[End Upbeat Music]
Leave a Reply