Fusion 360 is a popular CAD program among woodworking hobbyists and professionals. Some consider it to be the “jack of all trades,” given the flexibility to go from 3D designs to setting up CAM tool paths.
The (2D) Drawing workspace has always been lacking when compared to the others. However, that’s finally about to change. In recent months, the Fusion 360 team has made a lot of significant updates to the Drawing workspace. They also publically released their road map, making it clear that Drawings are going to continue to be improved.
Parts list or bill of materials (BOMs) with dimensions has long been a missing element of Fusion 360. Presently, you have to enter dimensions for each component. It’s painstakingly slow to enter them one-by-one. Fusion 360 also doesn’t support a multi-level parts list. That means sub-assemblies will have to be done individually.
Fortunately, there’s a better solution that’s available today! Fusion 360 allows 3rd-party developers to create “add-ins” that extend the functionality.
The Autodesk App store has over 200+ individual add-ins built specifically for Fusion 360. These add-ins range from very niche use-cases to large enterprise solutions that coincide with other software.
OpenBOM is my favorite and most used add-in.

Automating Parts List Dimensions Fusion 360
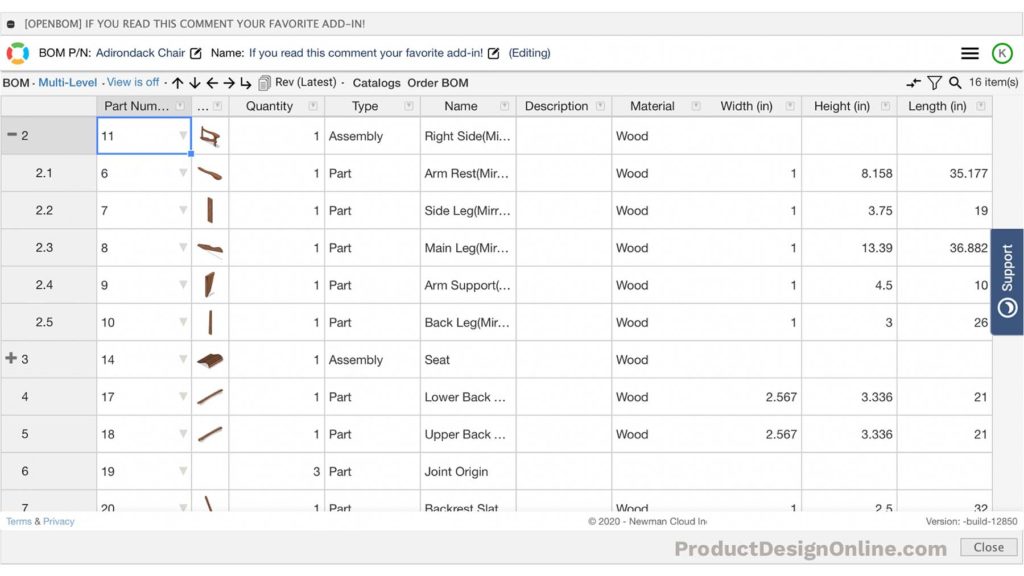
Using the OpenBOM add-in can automate the parts list process, including the length, width, and height. The automation saves a ton of time, making it the most useful add-in for woodworkers.
- Download the official OpenBOM add-in from the Autodesk App Store.
- Install the add-in on your local computer, following the typical installation process. Note: OpenBom does not have to be installed like most add-ins, because their installer does it for you.
- Create a free OpenBOM account. Note: If you’re a hobbyist, you can request a non-commercial license that gives you access to the Fusion 360 add-in.
- In Fusion 360, select the Tools tab > Scripts and Add-ins > Add-ins (tab within the dialog) > select OpenBOM from the list > hit the Run button. The OpenBOM icons and features will then appear in your toolbar, while in the Tools tab.
- Select Create/Update Multi-Level Bom > The add-in will then automatically generate everything based on your components.
Manual Parts list Dimensions Fusion 360
You can still use Fusion 360’s native parts list table if OpenBOM isn’t the right solution for you. However, you will have to manually enter the dimensions of each component.
In the Fusion 360 Browser, right-click on the desired component > select the “Properties” option. You will then find a description” field, where you can input anything else you want to include in the table. Currently, this is the only place to type-out the length, width, and height.
I cover this native Fusion 360 parts list table in the following tutorial.
Save Time and Master Fusion 360 for Your Woodworking Projects
Quickly learn the correct techniques with our structured and easy-to-follow Fusion 360 courses for woodworking. Learn Fusion 360’s core workflows, best practices, and professional tricks with our Masterclass: Fusion 360 for Professional and Hobbyist Woodworkers.

Transcript from OpenBOM Tutorial
Fusion 360 allows third-party developers to create “add-ins,” which extend the functionality. Oftentimes add-ins solve a niche use case where Fusion 360’s native tools are not sufficient.
One of my favorites is called OpenBOM. It helps you create a more detailed bill of materials or parts list, all derived from your Fusion 360 model. This is the perfect add-in for all of you that do woodworking projects…or the mechanical engineers or designers out there that are working on large assemblies.
To be clear, OpenBOM did not sponsor this video…I’m simply a happy customer.
With that said, they do have a freemium model, where you can sign up for a free account. They also offer a 14-day free trial for the professional plan if you need to test out the additional features. I’ve put a link below this video to their pricing page so you can look at the available features.
I encourage you to sign up for a free trial to test it out. I’ve found this add-in to be well worth it if you regularly use Parts Lists. Particularly for woodworking projects, the automated dimensions are a huge time saver.
With that said, I don’t think this add-in will be beneficial to everyone… it depends on your workflow and how you’re using Fusion 360.
You’ll want to sign into the Autodesk app store, which I’ve also linked to below. This will be your same credentials as your Fusion 360 account.
Then, select your operating system, download the files, and follow the regular installation process for your computer. I’ll link to notes below this video to help those of you who have never installed a Fusion 360 add-in.
Once you have OpenBOM installed you’ll want to go to the Tools tab of the Design workspace.
We’ll select the Scripts and Add-ins feature, followed by the Add-ins tab.
You should then see OpenBOM in your list.
Select the OpenBOM option and hit the run button. If you get any weird error messages then you can close out of them and try running the add-in a second time. It also helps to restart Fusion 360 after you install the add-in.
Once successfully run, you will see several OpenBOM features added to your toolbar within the Tools tab.
You may see an update notice on the far right. If so, go ahead and click the feature and then restart Fusion 360 once the update is complete.
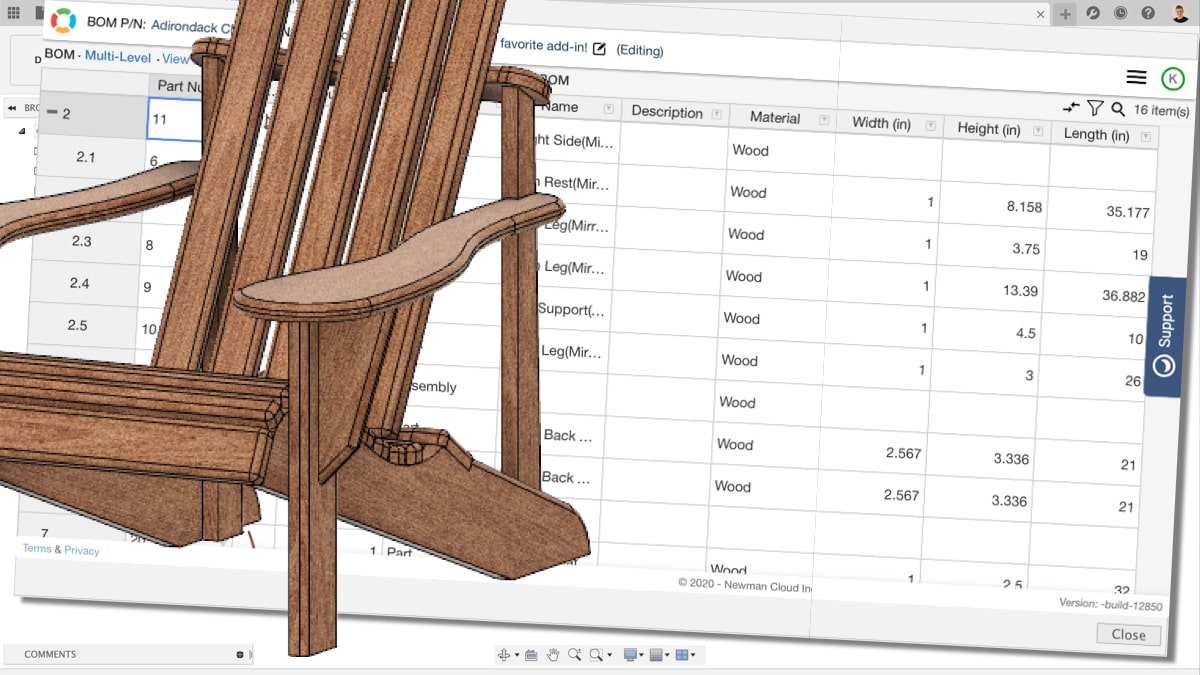
Otherwise, you’ll want to open your desired file. I’ll go ahead and use the Adirondack chair, but feel free to use any file as you can still follow along.
Back in the Tools tab, we can now click on “Create Multi-Level BOM” or the one with the letter “M”. Multi-level BOMs are something that Fusion 360’s native parts list cannot do. Multi-level refers to the ability to include sub-assemblies or nested components.
You’ll then be prompted to sign in with your OpenBOM account that you created earlier. Otherwise, you can go ahead and click register to create a free account.
The add-in will then take a minute or two to import all of the Fusion 360 data. This may look crazy as it’s processing, but what it’s doing is putting each component front and center while hiding the rest of the assembly. It does this so it can capture a snapshot of each component.
Once complete, you’ll see that the OpenBOM dialog takes over half the screen.
Upon first glance, you’ll see that the parts list is more intuitive than the native parts list. It also includes multiple levels for each sub-assembly. You can click on the plus or minus symbols to toggle the assembly’s hierarchy.
One of the things I like most about this add-in is that you can simply double-click on fields to override their values, much like how you would control an Excel spreadsheet.
Let’s take a moment to look at all of the info that it generates.
First, is the Part Number, which is automatically pulled in from the Part Number field of your component’s properties. If you need to change this you can simply double-click and edit the field, otherwise, you can edit the source in Fusion 360. We’ll take a look at how to update the BOM in a minute.
The second column is a thumbnail image, which is a great way to visually see the part. Similar to Excel, we can drag the height and width of each column or row.
As you can see, this automatically captured an image for each sub-assembly and the individual parts.
The quantity and type are then automatically filled out for the 3rd and fourth columns.
The fifth column is the name. This is pulled in from the Component name, as seen in the Fusion 360 Browser. It’s important to note that if you override the name here in the OpenBOM add-in, it will not adjust the name back in Fusion 360. However, similar to the part number, or anything for that matter, we can adjust it in Fusion 360 first and have the BOM automatically update. Which route you choose depends on your workflow and need.
At any time, you can update the parts list by selecting the same Multi-Level BOM option in the toolbar. This will process every part again, ensuring you have the latest information.
The description field is also pulled in from the Properties dialog. If you didn’t fill that out then this will stay empty.
The seventh field is the CAD file, or in other words, the link to your file via the Fusion 360 hub. If you’re working solo this may not be a big deal. However, if you’re working with a team then this will help ensure you’re referencing the correct file.
Next is the materials. It’s important to note that this is derived from the physical material and not the appearances. Those are two different features in Fusion 360…and ones that I often see beginners get confused with. Physical materials will affect the physical properties such as mass, while appearances will only affect the visual representation.
Now, most importantly and why many of you are interested in this tutorial, is the automation of not only the Density, Area, Volume, and Mass…but the automation of Length, Width, and Height of every single component, which is something that Fusion 360 does not natively do.
The great thing about OpenBOM is that it pulls this in for every single part or individual component. On occasion, you may end up with an error in one of these fields. I’ve found that running it again will often take care of them. If you still end up with an error then I recommend checking out the BOM via the web version instead of this Fusion 360 integration.
Before we view the web version, I want to call out that you also have a lot of flexibility when it comes to sorting and managing the BOM. You can easily reorder the columns, filter them, and override or delete any data.
You’ll find that each column, row, or individual cell also includes additional functionality when you right-click on them.
In some scenarios, you may want to reference your BOM or parts list without Fusion 360. The great thing about OpenBOM is that it’s not just a Fusion 360 add-in but a full-on browser-based software.
Selecting the logo in the upper left corner will automatically open the BOM in your default web browser. This makes it easier to work with your BOM in parallel with Fusion 360, or if you need to make changes or reference the BOM without Fusion 360.
The last thing to point out is that you can export the BOM as an Excel, CSV, or PDF format.
Hopefully, this gives you an idea of just how powerful Fusion 360 add-ins can be to extend the functionality even further. Let me know in the comments below if you think this would be helpful for your woodworking or other projects.
Last but not least, I want to give a quick shout out to the new Patrons and supporters who bought me coffee…
Special thanks to… Billy, Erik, Klif, Joseph, and Deddy.
And thanks to Kevin, Robert, and John for the coffee…
Click on that playlist in the lower right-hand corner to watch more Fusion 360 woodworking tutorials and I’ll see you in the next tutorial!

Leave a Reply