Understanding the difference between bodies and components is an important first step to becoming proficient in Fusion 360. Whether you’re an experienced CAD user coming from Autodesk Inventor or SolidWorks, or you’re completely new to the world of 3D modeling, this is the place to start.
By the end of this article, you’ll have a solid understanding of the difference between Bodies and Components and we’ll talk about the dubbed Fusion 360 Rule #1 and Rule #2.
Bottom-Up VS Top-Down Assemblies
Before we dive right into the world of bodies and components it’s important that you understand the difference between Bottom-Up Assemblies and Top-Down Assemblies – which will help you better understand WHY Fusion 360 is set up the way it is.
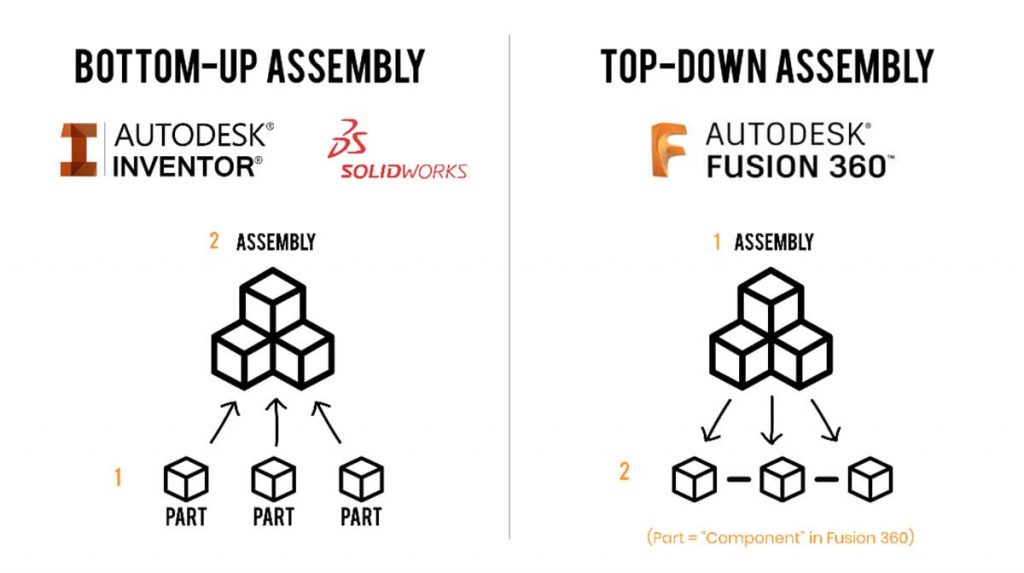
Bottom-Up Assemblies
Let’s take a look atRe-arranges screen to look at selected object. More Bottom-Up Assemblies first. This is the traditional assembly modeling technique. If you’re coming from Autodesk Inventor or another CAD program then you’re likely already familiar with it.
The essence of the “Bottom-Up Assembly” Technique is that each part is created individually, and then all the parts are inserted into an assembly document and constrained to each other. There is NO link created between parts, so the parts fit(keyboard shortcut “f6”) Makes the current file fill the screen. More together because you designed them to fit together. If you change one part, you’d better know which other parts will be affected by the change and make sure that they are also updated accordingly.
Top-Down Assemblies
On the other hand, we have “Top-Down Assemblies” which means you start with an assembly file and build all your parts within the context of the assembly. Fusion 360 falls in the top down assembly category, although technically you could also use Fusion 360 as a Bottom-Up assembly.
In Fusion 360, each new document you create can be treated as an assembly, which is why you’ll never see “create new assembly” under the file menu (but you will in Autodesk Inventor and SolidWorks).
The benefit of top-down assemblies is that we can reference other sketches and parts, so if we change one thing the other features or parts change accordingly. This is a great way of ensuring that parts that need to fit together always fit together, without you having to go back and manually edit the parts each time. This top-down technique is intuitive and much quicker, but it does still have some drawbacks. You can still get yourself into a pickle, especially with large assemblies, which is why it’s important to plan out your model before you even start your very first sketch.
Now that you know the main idea behind Fusion 360 is based on the “Top-Down Assembly” technique, let’s take a look at the difference between Bodies and Components. (Although, remember that technically you can use Fusion 360 the Bottom-Up Assembly way as well).
Bodies in Fusion 360
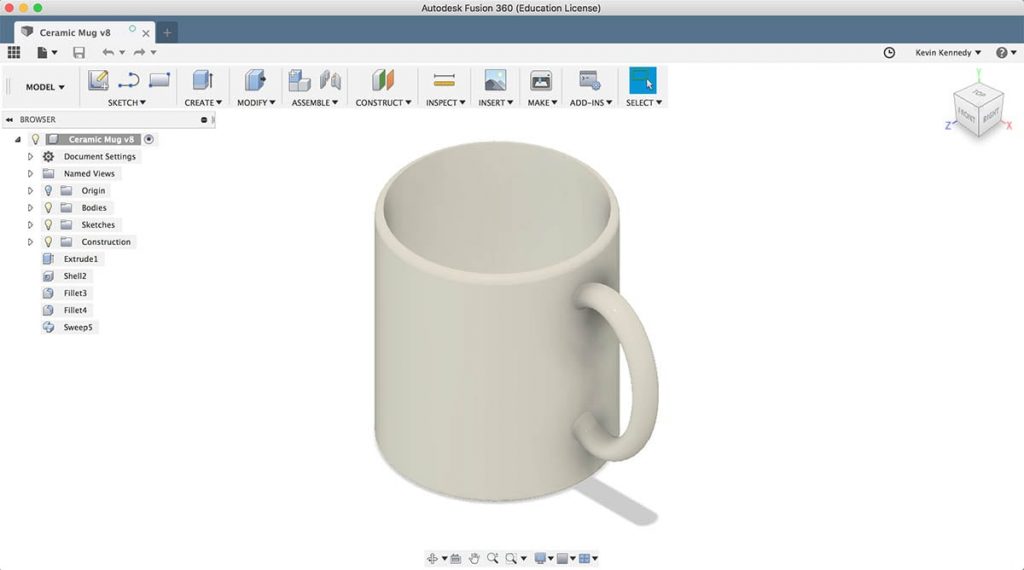
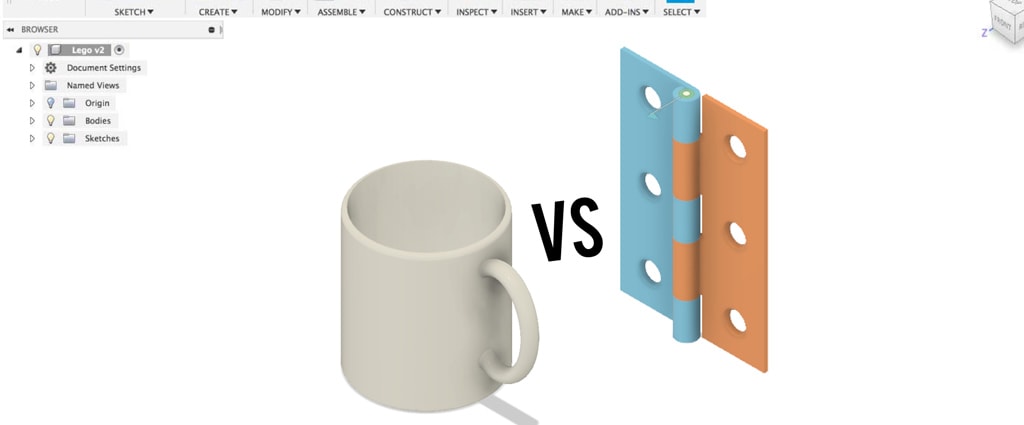
Bodies can be seen as modeling tools. You use separate bodies to add or remove geometry to achieve the final shape of your design. An example of a body could be a ceramic mug. You would create one body for the cylindrical part of the cup and another body for the handle, and of course, join them together. New bodies will be created any time you turn a sketch into a 3D object.
Some CONS of Bodies:
- They won’t show up in a parts list, which could be troublesome if you need to create a drawing with all of the parts
- Patterned bodies will act independently from their parent. So if you alter one body, you’ll notice the others don’t change. Whereas if they were components the other “parts” would update accordingly
So what the heck are components and why should we use them?
Components in Fusion 360
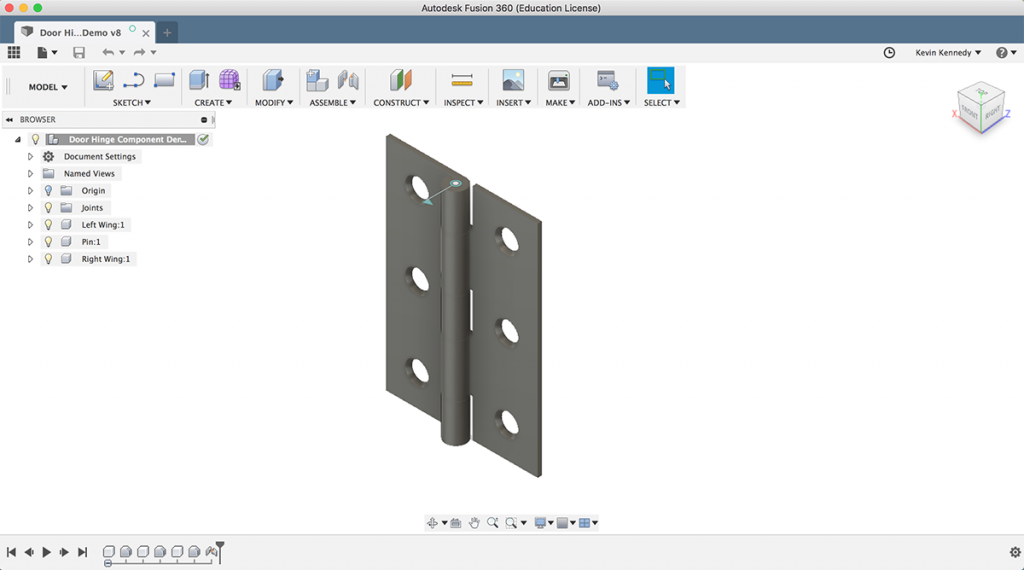
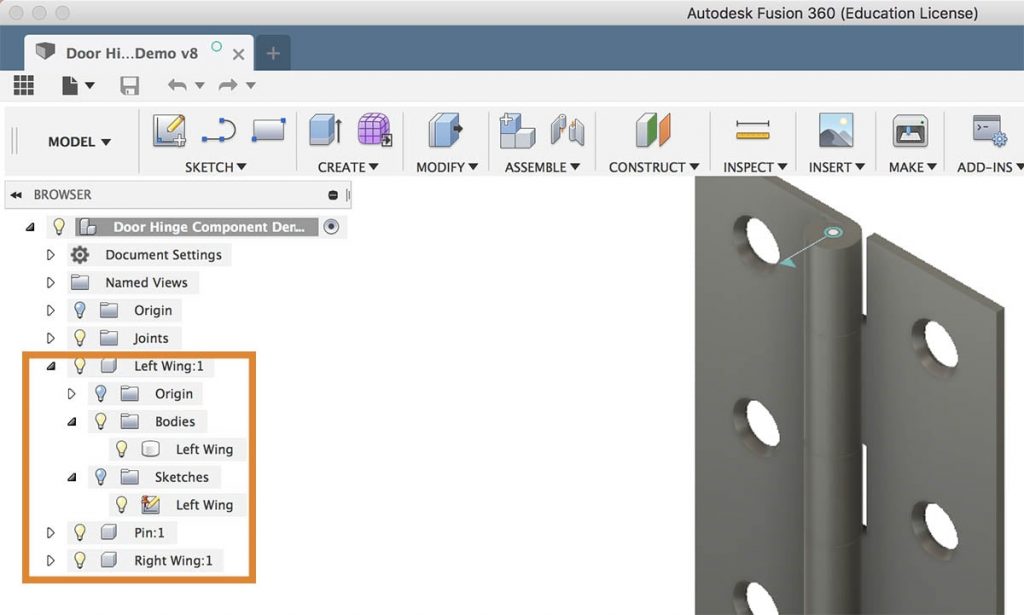
Contrary, components represent real-world parts. You can think of components as parts that are manufactured with multiple pieces. You’ll want to use components every time your design consists of multiple parts that may be assembled to one another. A good example of a component would be a door hinge, as it consists of three components: one for the left wing of the hinge, one for the right wing, and the pin that holds the hinge together.
PROs of using components over bodies:
- You can drag bodies and other objects from one component to another in the browserThe browser lists objects in your design (everything from planes and sketches to parts and assemblies). Use the browser to make changes to objects and control visibility of objects. More.
- A component can also contain other components, which is often referred to as a subassembly.
- Components allow us to use joints to assemble and create mechanical relationships between components, such as this door hinge example. It moves based on the joints I applied, but if I had created the door hinge with bodies and not components, then I would not be able to apply these joints.
- Another trick with components is that you can activate components, which offers many advantages. Activating a component allows you to focus solely on it, and the other components will be shown with some transparency. The advantage of activating components means that bodies, sketches, components, or other features you create will be nested within that component.
- Lastly, and probably one of the most important things about components is that they can be reused or copy and pasted in a design. By right-clicking and selecting “copy/paste” you can duplicate them as many times as you would like. And as we discussed earlier, all component instances update when a change is made to one of them.
Fusion 360 Rule #1
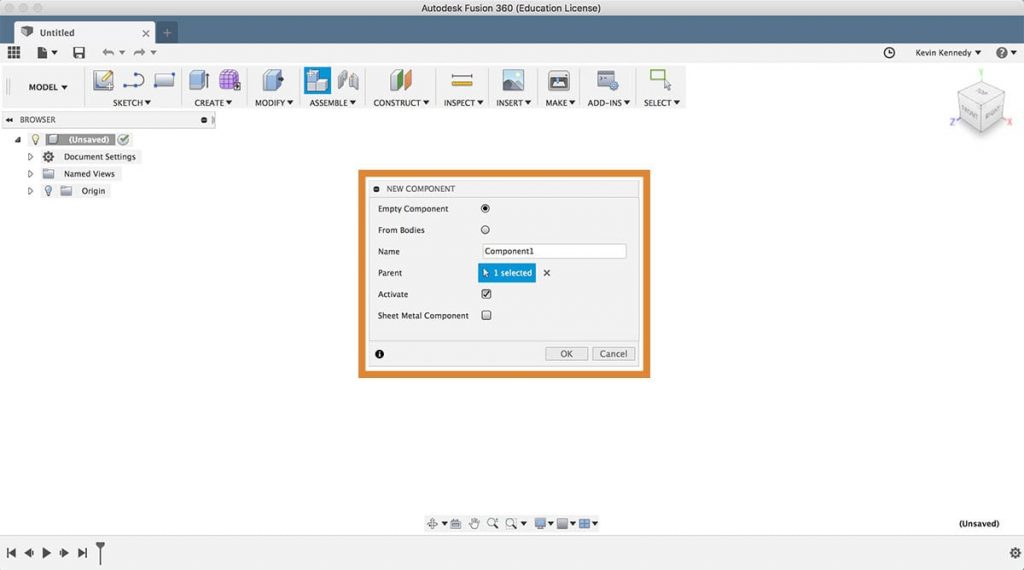
Having a basic understanding of the difference between Bodies and Components leads us to the dubbed Rule #1 from the Fusion 360 forum which is to ALWAYS start your file off with a new componentCreates a new empty component or converts existing bodies to components. When creating an empty component, enter a name and select the parent. When converting bodies, select the bodies to convert. More. Now Rule #1 was created by the Fusion 360 community on the forums, and the idea is that if you always start with a component, you’ll never be kicking yourself in the foot when your browser tree is messed up because you’re trying to create components after creating your bodies.
Fusion 360 Rule #2
I gave you rule #1, so we may as well discuss rule #2, right?
Rule #2 from the Fusion 360 forum is to ALWAYS re-name your components and bodies right after you create them. It’s also a very good idea to get into the habit of re-naming any sketches, decals, or any other layers in your Fusion 360 Browser.
Re-naming “assets” in the Fusion 360 browser will not only help you speed up your workflow, but it will ensure you’re manipulating the correct body or component later down the line(keyboard shortcut “L”) Creates lines and arcs. Select a start and endpoint to define a line segment. Click and drag the endpoint of a segment to define an arc. More. Especially as your assembly file gets filled with many parts – components and bodies.
(Ps. If you’re wondering, there is no Rule #3 yet… Be sure to participate in The Official Fusion 360 forum and maybe you’ll help create Rule #3!)
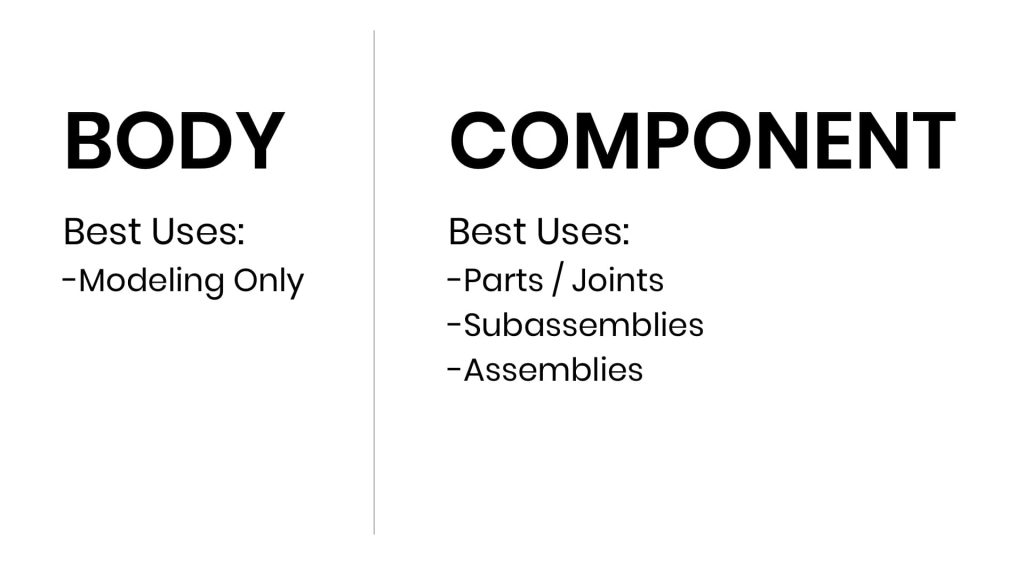
RECAP: Bodies VS Components
It’s OKAY to use bodies if you’re just creating a small or quick model for something like 3D printing, or something to play around. Especially when you’re certain that you won’t be needing any assembly features. Otherwise, it’s good practice to get into the habit of always using components at the beginning of your design, which will ensure that you can successfully create joints, subassemblies, and assemblies without any major headaches.
As a friendly reminder, it is possible to create components from bodies BUT it’s not recommended because it won’t always work and sometimes it will cause errors throughout your file.
i hate to say it but i didn’t get this very well. The door hinge was pretty obscure to me. I come from Systems Engineering where we built complex machines like CT Scanners. So for me Component was a motor, bolt or sensor. while a body was a machined or created part like a bracket, plate, adapter, cover. What i would like to do in my hobby is to create major components as Fixed entities to work with as constraints. Where Bodies are the fabricated parts to facilitate the organization and assemble of components for an operating assembly. I may case, a model train. I am adapting new digital technology to old trains. So Motors, Sensors, PC Boards, are all fixed shapes, bolt patterns etc. Then I try to create a Shape that allows them to be arranged and fit on the existing frames and chassis and within the shells or bodies of the train. I have tried to create a chassis as component but the sketch lines go out of control. Matching the bolt patterns should be been easier but it wasn’t. Maintaining clearance in fitting parts or moving parts was Print, Assemble, correct, reprint, test, over and over and over. Ughly. I still fail in setting constraints, and how to sketch without layering 3 or 4 sketches on top of one another when the bodies share interface dimensions. We used to make a large D or E size Draft Layout where we put down all the components then connected the faces and matched the drill holes to make the adapters. When i do that in Sketch it just turns into a mess and i get lost. I need to revise my design process and come up with a logical workflow using the new tools and i am struggling to do that via tutorials and trail and error. ???/
Hi Dennis,
Thanks for the feedback. Let me try to clarify the use of bodies and components a bit more in relation to your project(s).
Based on your usage of Fusion 360, with the custom parts for your trains, you’ll almost always want to use components. Components are required if you want to add joints, motion, copy and paste “parts”, and if you want to move parts around within a design file. In Fusion 360, the bodies are automatically created and grouped under your components while you create new 3D bodies. In this regard, bodies can be seen as individual entities that make up an entire component. For example, you may have a “Wheel” component that includes 3 bodies – the railway wheel, brake system, and train axle.
Ideally, the only time you should be using bodies without a component is when you’re making a very simple object. The object would need to be so simple that you’re not planning on adding it to a larger assembly (or adding motion or anything else outlined above). For example, let’s say that you want to create a simple extruded rectangle to mimic a railroad tie. If you were to create that one railroad tie so you could 3D print it unlimited times, then it would be fine as a body, as long as you have no intention of using it within an assembly file (to create a section of railroad ties perhaps).
To summarize, with your projects you should pretty much always be creating components for each and every part. Especially since it sounds like you’re using the parts in many places and may need to add joints/constraints.
In regards to your workflow, you should always be creating a “New Component” before doing anything. Then, as you create your first sketch, try to keep it as simple as possible. The general idea is that your model should have “design intent” where you know how everything will change if you were to change a dimension. Following that guideline, you should always be fully constraining your sketches when possible. As in, they should utilize the “constraints” and should have the least amount of dimension applied, so it’s easy to update and understand what the dimensions will change.
As far as your comment on “layering sketches” I would recommend utilizing the “Project” sketch feature. Using the “project” will ensure your sketches are tied to one another. That way, if you update the initial sketch the other sketches will update accordingly.
With all that said, it does take some time to find a workflow per each project, as each project can have its own unique needs. I’ll have to create some more videos that cover the idea of “design intent” and keeping sketches as simple as possible.
Cheers,
Kevin 🙂
Hi Kevin, I have just started learning Fusion 360 on your excellent Skillshare videos. I bought Fusion as I was trying to learn Solidworks thinking my son (expert trainer) would help but unfortuneatly little has transpired. It’s really easy to develop bad practice on SW basics unless someone can monitor your progress. Fusion was bought for the CAM post software function as the SW option is expensive and complicated. Now I’ve read your description above I’ll focus all my projects on Fusion 360 as what you say makes sense now that I’ve dabbled with SW. Thanks, Mike
Hi Michael,
Glad to hear that!
As a former (longtime) SolidWorks user myself, I think you’ll find Fusion 360 to be more intuitive and more forgiving. With that said, getting the best practices down will definitely set you up for success. Don’t hesitate to post on the Skillshare forum should you run into any roadblocks.
Cheers,
Kevin
Hi,
Thanks for a good explanation of the body vs component.
If I create a new body in the assembly and make it a component. The component will show in the part list together with other components ( screws, nuts ) with the name i´ve given it. Difference is that it is not linked to an original part. Can I open this component as a separate part and create a drawing from it ? I cant seem to find the “open” command that is present for the linked components in the assembly tree.
Hi Niklas,
Glad you found this to be helpful!
Currently, the only way to “open” that component in a second Design file (without including the whole file) would be to Copy and “Paste New” the component in a new file. Once you save you can then reinsert the component back into your main assembly file via “Insert Into Current Design” (from the Data Panel.
Cheers,
Kevin
Hi – great article! My project is a coffee mug with a lid. I will have 2 bodies. Should I create a component and create these 2 bodies under the component? Or should I just have 2 bodies and no component? Thank you! I appreciate any advise you can give me with this.
Hi Anne,
Generally, I would recommend a new component for each unique part. In your example, one for the mug and one for the lid would be ideal. This would mean you can use Joints and other features that require components.
Some projects/examples like this (with only 2 or 3 parts) are often what confuse people. There’s nothing wrong with you having two 3D bodies (1 for the mug and 1 for the lid) in a single component if you don’t plan to use Joints, Animations, or any of the other intermediate/advanced features. However, I often encourage folks to always use components regardless as it helps create a good habit and you’ll never have to rework or ‘fix’ files should you change your mind later.
Hope that helps!
Cheers,
Kevin
Hello Kevin,
I am coming to Fusion 360 with a SolidWorks background. That may be a disadvantage. but it seems to help my learning.
My question is:
Is it possible to use the same part (component) in multiple independent designs without them linking, and all changing if you change it in one design.
How would you do that.
Or do you copy and paste giving the part a new name.
I realise essentially you would lose any version control over the part.
Hi Henry,
That is possible. Aside from copying/pasting the components, you can go to the “Insert into current design” workflow (by right-clicking on the part in the data panel) > Then you will break the link. Right-click on the component in the Fusion 360 Browser and “Break Link”.
Breaking the link means it will no longer (ever) reference the original source.
Cheers,
Kevin
For example, I want to draw a crate. If I create components for 4 different subassemblies (top, ends, sides & skid), I can create a side assembly, then copy it. I can do the same for the ends. This looks clean on the browser. But when I create a drawing with parts list, I can select ‘First Level’ and get the 4 assemblies with no components, Or I can select ‘All Levels’ and get a list of (with quantity) of each of the 4 assemblies, followed by the quantity of each component part required for EACH assembly.
Is there a way to organize my browser/work flow like this, yet get a concise list of exact number of pieces required of each size part? I would use the drawing for manufacturing process. Expecting the worker to understand “3 parts per assembly and 2 assemblies per crate” is a step I would like to avoid.
I have created a ‘component library’ of different size 1×4’s, 2×4’s etc. (using External Component). So drawing product from scratch is just ‘drag/drop/position’ if the correct size parts are already drawing
Fusion 360’s native parts list is pretty limited when it comes to understanding the Assemblies/sub-assemblies.
I recommend OpenBOM (3rd party add-in) if you would like more control over this. More on that here: https://youtu.be/xCh2_T_9ijs
Cheers,
Kevin