Intent-Driven Design represents a major change in how Autodesk Fusion users think of assemblies. Before 2026, all Fusion files allowed top-down and bottom-up assembly methods. This was unique in the CAD industry and gave users the ultimate flexibility to work on the designs as they evolved into assemblies or multi-part models representing sub-assemblies.
There are now three “design modes” in Autodesk Fusion (formerly ‘Fusion 360’): Part, Assembly, and Hybrid. Watch our free lesson or read more below.
- Intent-Driven Design explained (Video)
- 1. Part Design in Autodesk Fusion
- 2. Assembly Design in Autodesk Fusion
- 3. Hybrid Design in Autodesk Fusion
- Why Autodesk Fusion is Moving to an Assembly-Centric Design Workflow
- How to Switch Design Modes in Autodesk Fusion
- 3 Essential Tips for Intent-Driven Design in Autodesk Fusion
- Frequently Asked Questions: Intent-Driven Design in Autodesk Fusion
Intent-Driven Design explained (Video)
1. Part Design in Autodesk Fusion
A Part Design allows you to create a single component (equivalent to “part” in other CAD software, e.g., SolidWorks). Think of a part as creating a single manufacturable object, such as a toy block.

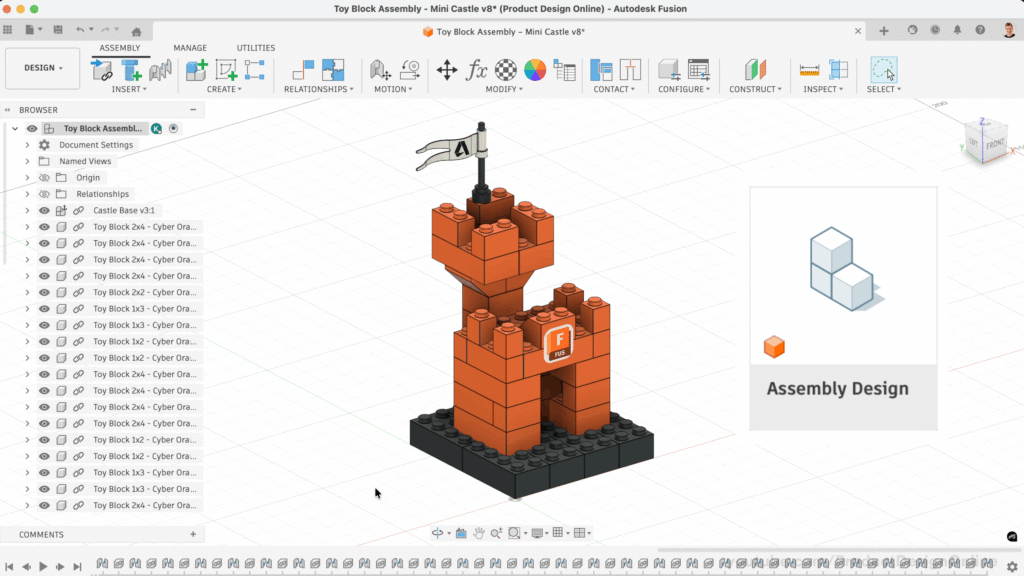
2. Assembly Design in Autodesk Fusion
An Assembly Design is where you take all your individual Part Design files and insert them into one single file to create an assembly or sub-assembly.
Using our toy block example, this is where you would take all those individual toy blocks (of various sizes and dimensions) and join them together using Constraints or Joints to assemble them.
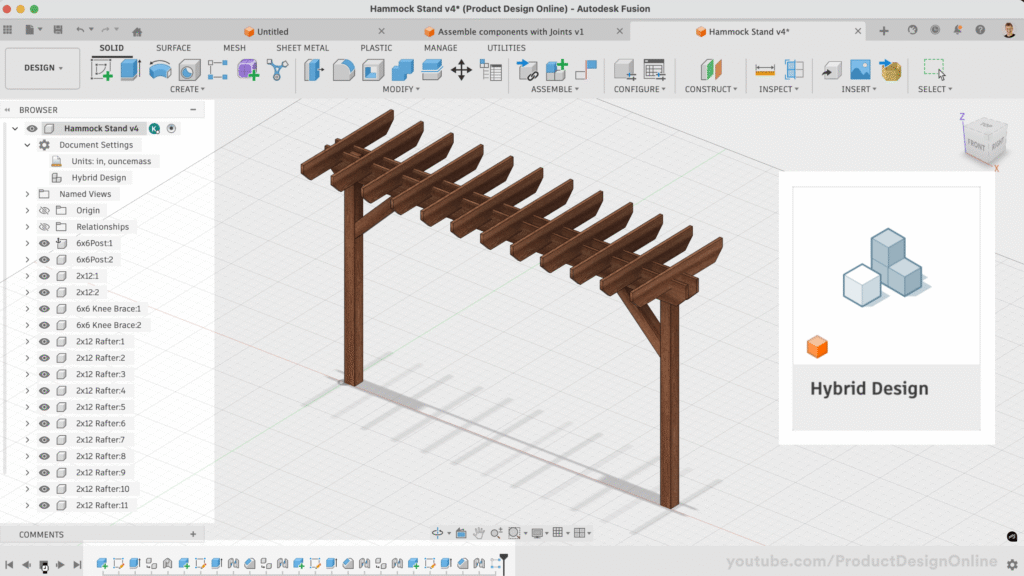
3. Hybrid Design in Autodesk Fusion
The Hybrid Design type is the “classic” Fusion experience that “Fusion 360” launched with and promoted for over a decade (Fusion 360 was launched in 2013!). The Hybrid Design option allows you to create components (parts) all within the same file. Files can be an assembly or an individual component/part.
Why Autodesk Fusion is Moving to an Assembly-Centric Design Workflow
Autodesk Fusion is evolving its core architecture to better support professional engineering teams. By transitioning from a Hybrid (Top-Down) Design model to a dedicated Part and Assembly workflow, Fusion addresses two critical pillars: software scalability and industry interoperability.
1. Enhanced Performance and Large Assembly Management
The traditional hybrid design approach often struggles with computational overhead in complex projects. In older workflows, a minor edit to a single component could force Fusion to reprocess the entire assembly’s data tree, leading to significant latency.
The new Assembly-Centric approach solves this via:
- Data Caching: Individual parts are treated as independent data packets.
- Reduced Latency: Fusion only reloads the specific part being edited, rather than the entire file.
- Optimized Compute: Commercial users working on large-scale assemblies experience smoother navigation and faster rebuild times.
2. Industry Standardization and Market Transition
For decades, industry giants like SolidWorks, PTC Creo, and Autodesk Inventor have utilized a strict Part (.prt) and Assembly (.asm) file structure. By adopting this industry-standard methodology, Fusion is removing the “friction of adoption” for enterprise-level firms.
Key strategic benefits include:
- Professional Scalability: This shift positions Fusion as a direct, high-performance alternative to traditional desktop-bound CAD suites.
- Lower Training Costs: Engineers migrating from legacy CAD packages can apply their existing knowledge immediately without relearning fundamental file structures.
- Easier Data Migration: Aligning with the workflows of competitors makes it simpler for companies to transition their massive libraries of legacy data into the Fusion ecosystem.
How to Switch Design Modes in Autodesk Fusion
If your project requirements change, Autodesk Fusion allows you to convert your Design Type at any time. You do not need to restart your project to change your design intent.
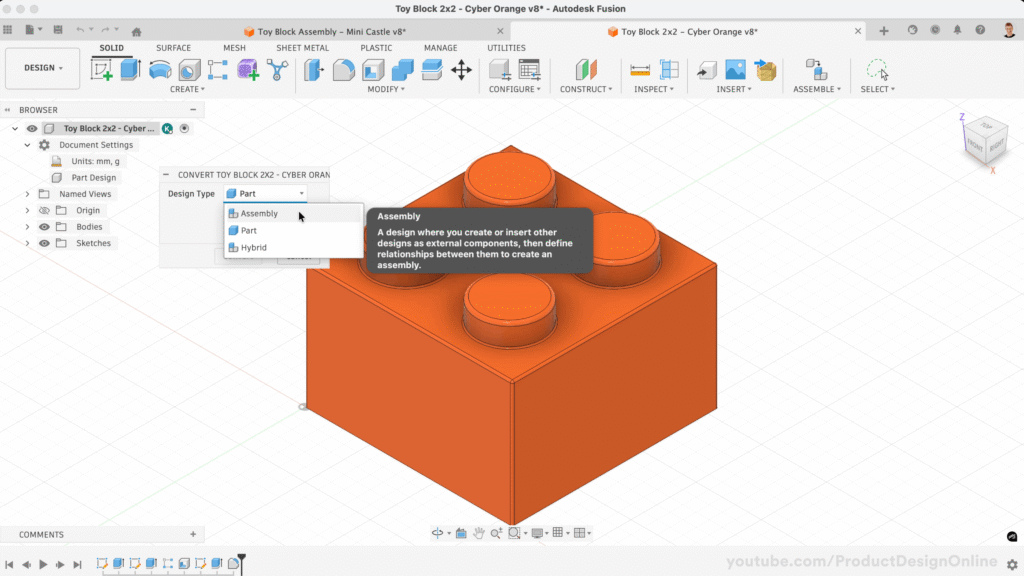
Step-by-Step Conversion:
- Open the Browser: Navigate to the Fusion Browser tree on the left.
- Access Document Settings: Expand the Document Settings folder.
- Change Design Type: Hover over Design Type and click the edit/change icon.
- Select New Intent: Choose between Part, Assembly, or Hybrid mode.
Important Constraint: You cannot convert an Assembly into a Part if the file contains multiple components. A “Part” designation is reserved for single-item geometry to maintain data integrity and accurate Bills of Materials (BOM).
3 Essential Tips for Intent-Driven Design in Autodesk Fusion
Mastering the new 2026 workflow requires understanding when to lean into legacy flexibility versus professional structure. Use these strategies to optimize your productivity.
1. Maintain Compatibility with Legacy Tutorials
Every Autodesk Fusion tutorial, course, or video produced prior to 2026 utilizes the Hybrid Design (Top-Down) approach.
- The Fix: If you are following an older lesson and the interface or browser behavior feels unfamiliar, switch your Design Type to Hybrid to match the instructor’s workflow perfectly.
2. Choose Your Workflow Based on Project Complexity
While the Hybrid mode is versatile, choosing the correct intent early prevents technical debt.
- For Hobbyists: Hybrid Design remains ideal for rapid prototyping and simple, single-file projects.
- For Professionals: Start every complex project using individual Part Files. This ensures cleaner data trees, faster loading times, and professional-grade file management as your assembly grows.
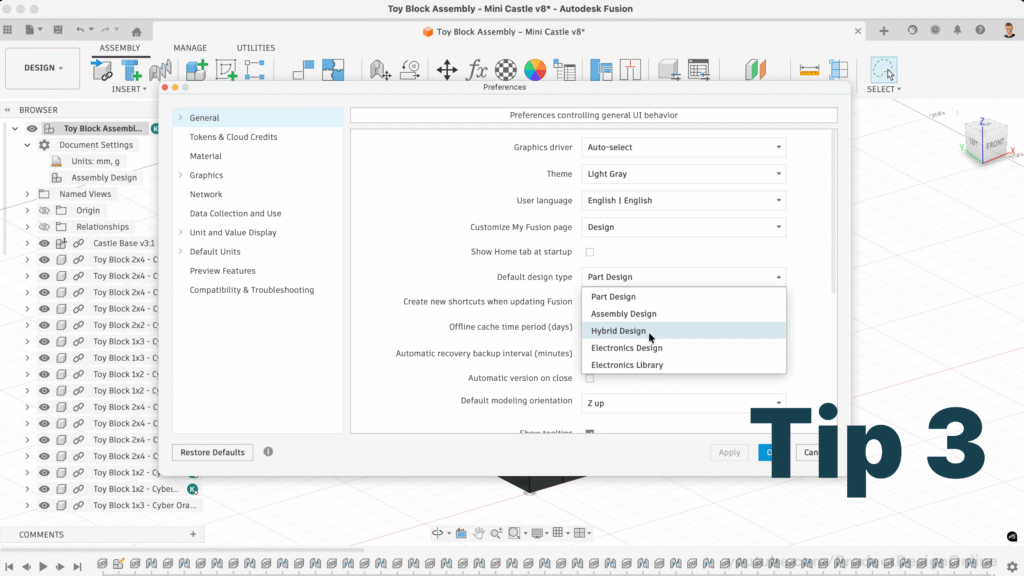
3. Automate Your Workflow via Preferences
You can bypass the manual selection process by defining your primary design intent in the software settings.
- Action: Navigate to Preferences > General.
- Set Default: Locate Default Design Type and select your preferred mode (Part, Assembly, or Hybrid). Every new file will now initialize with your chosen workspace automatically.
Frequently Asked Questions: Intent-Driven Design in Autodesk Fusion
When was Intent-Driven Design released?
Intent-Driven Design was introduced in the January 2026 major product update for Autodesk Fusion. This update redefined how the software handles parts versus assemblies to improve performance and industry alignment.
Why is “Create New Component” or the Assemble menu missing?
If these tools are missing from the toolbar, you are likely in Part Design mode.
- The Fix: Switch to Hybrid Design mode via the Document Settings in the Browser. This restores the “legacy” workflow where internal components are accessible directly from the toolbar.
Why can’t I “Convert Bodies to Components”?
The Convert Bodies to Components command is restricted to Hybrid Design mode. In the new Part Design mode, the software assumes the file represents a single physical item, removing the need for internal component conversion.
Why are Copy, Paste, and Paste New missing?
These are component-level functions. They are disabled in Part Design mode because that mode is intended for a single part’s geometry.
- Solution: To use these tools, you must be in Hybrid Design mode, which supports multiple components within a single file.
I’m in Part Mode and need to add a component. What do I do?
In Part Mode, internal component tools are hidden to maintain a “single-part” structure.
- How to fix: You must “promote” the design. Right-click the top-level file name in the Browser Tree and select Convert to Hybrid or Convert to Assembly to unlock component creation.
How does “Edit in Place” work in the 2026 update?
In Assembly Mode, components are external references. To modify a part within the assembly context:
- Click the Pencil Icon (Edit in Place) next to the component.
- Fusion will enter Contextual Edit mode, allowing you to reference other assembly geometry while editing the specific part file.
Does this update affect the Fusion Personal/Hobbyist license limit?
The 10-document limit remains, but the new modes change how you manage it:
- The Challenge: Assembly Mode uses external files (one file per part), which can quickly add up. However, you can still reference more than 10 parts in an assembly file without a problem. You simply won’t be able to edit 10 or more at the same time. Meaning, having 10 or more tabs open at the same time with designs in their ‘editable’ state.
- The Alternative: Hobbyists should use Hybrid Mode. This keeps all components inside one single file, counting as only one editable document regardless of how many parts are inside.
Why are McMaster-Carr and Insert Fastener not working?
To use external libraries like McMaster-Carr or the Insert Fastener tool, your file must be set to Hybrid Design or Assembly Design. These features require a component-aware environment to function correctly.
Making CAD education accessible to anyone, anywhere.
We hope you’ve been enjoying the wealth of free Fusion training provided by Product Design Online. Our commitment to empowering individuals like you with valuable skills is at the core of what we do.
If you’ve found our free content beneficial in your learning journey, we kindly ask for your support through a donation. Your contribution will not only help sustain the availability of free materials but also enable us to expand our offerings and reach even more learners globally.
Please select a donation method