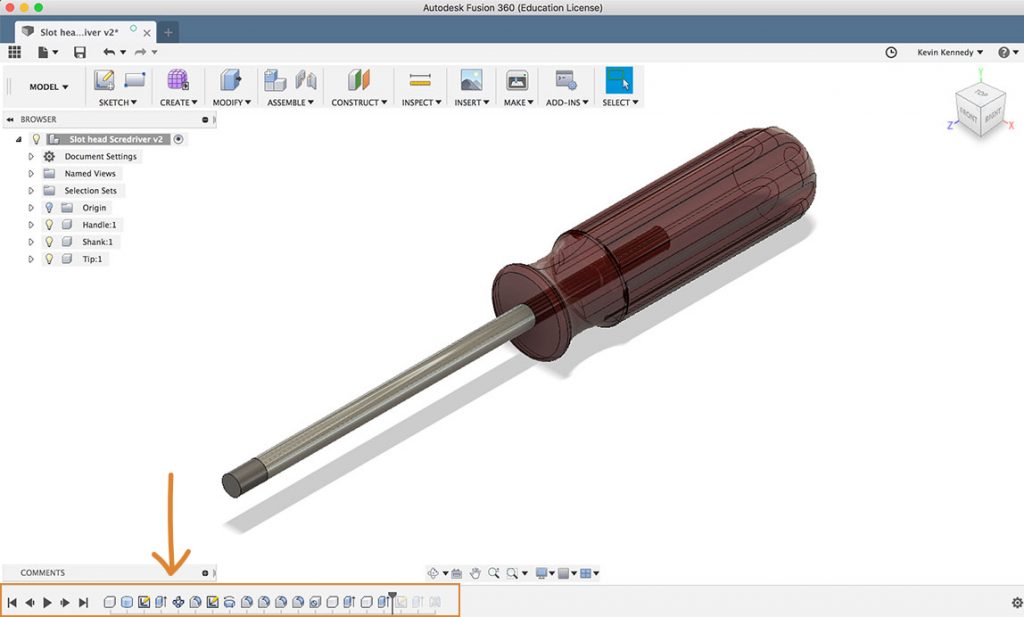
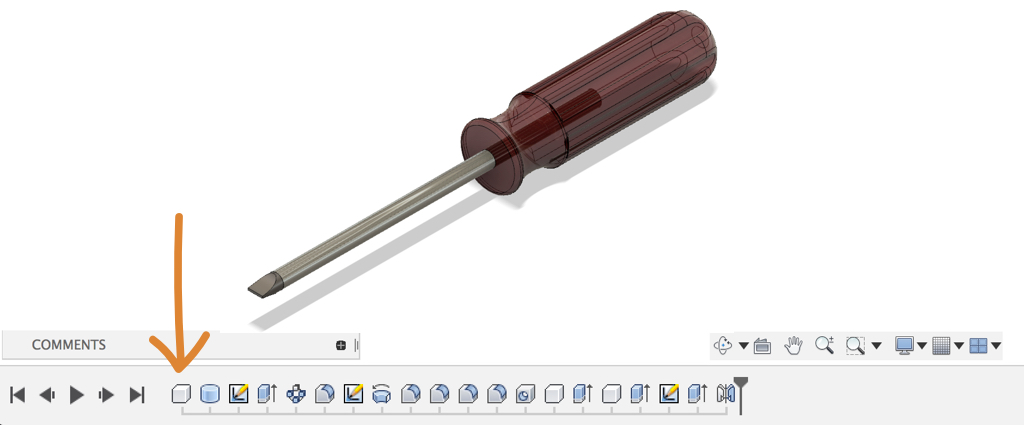
The Fusion 360 timeline is the bar at the bottom of your screen that captures your design history. If you’ve used another CAD program, such as Inventor or SolidWorks, then you’re likely already familiar with the concept of a timeline. If not, then you’ll want to familiarize yourself with the timeline as it’s an important step in becoming a Fusion 360 expert.
Here are 8 of my favorite Fusion 360 timeline tips that you must know.
Tip #1 – Rollback the Design
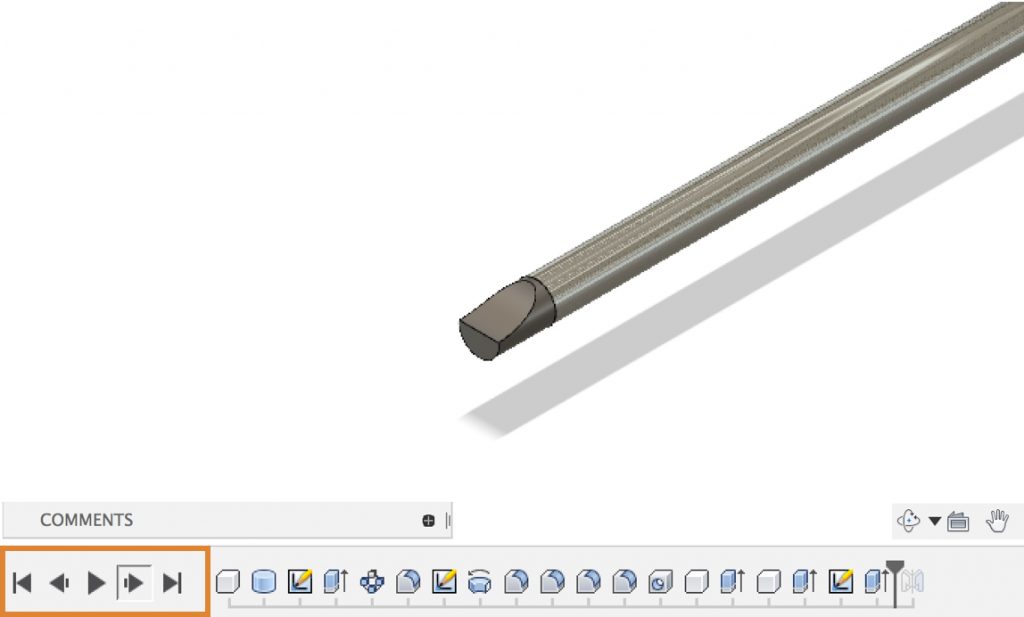
The first timeline tip is that you can play back the design history. As you are learning Fusion 360 this can be a great way to learn from someone else’s design. All you have to do is click the play button to the left of the timeline, and you’ll see that it will instantly start walking through each step in the timeline. You can also click on the “previous step” button to go to the previous step. The “move to beginning” button to go to the beginning. The “next step” button to go to the next step, or the “move to end button” to quickly go to the end of the timeline.
You can also simply drag this slider around, which is referred to as “rolling back the design.” Or, you can right-click on a timeline feature and selectThe selection mode controls how objects are select when you drag in the canvas. More “Roll History Marker Here,” which will quickly move the timeline marker to the end of that feature.
Tip #2 – Color Components
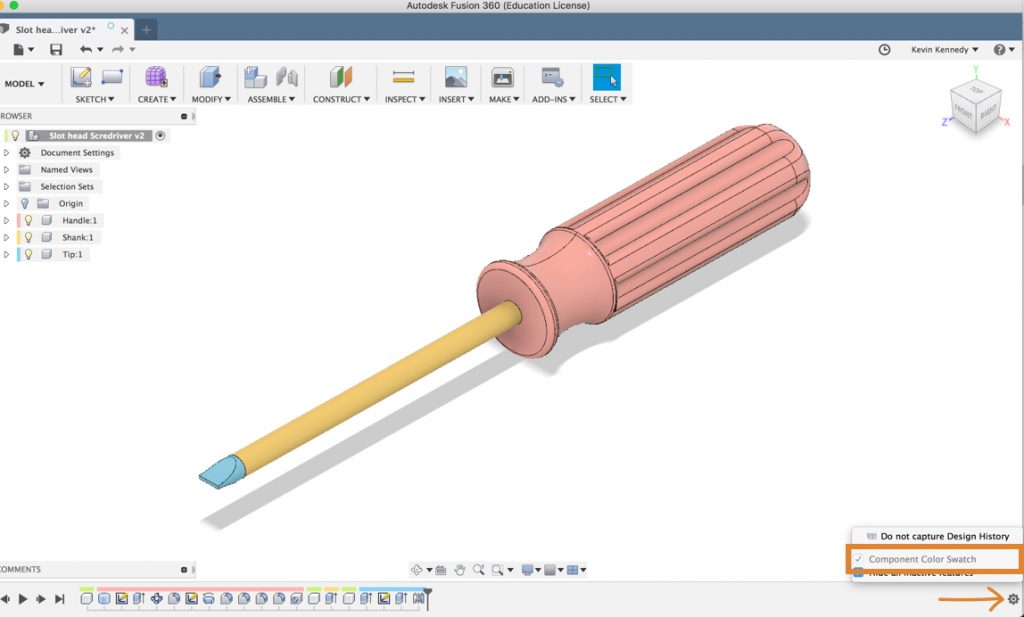
The second timeline tip is that you can turn on the “component color swatch” under the timeline options in the lower right-hand corner. Click on the settings (gear) icon and select “component color swatch.” This will label all of the features in your timeline per their component.
If you go to the inspect menu and turn on the “Component Color Cycling Toggle(keyboard shortcut “Shift + N”) Applies different colors to each component to help differentiate between components. Click the command to toggle this setting on or off. More” you’ll see that it will color the components to further help us see how the features in the timeline relate to each component in the graphics window. It’s also important to note that it added the same color in the Fusion 360 browserThe browser lists objects in your design (everything from planes and sketches to parts and assemblies). Use the browser to make changes to objects and control visibility of objects. More, and if you click to activate a component you’ll see that the features in the timeline are isolated to only show features pertaining to the activated component.
Tip #3 – Find in Browser
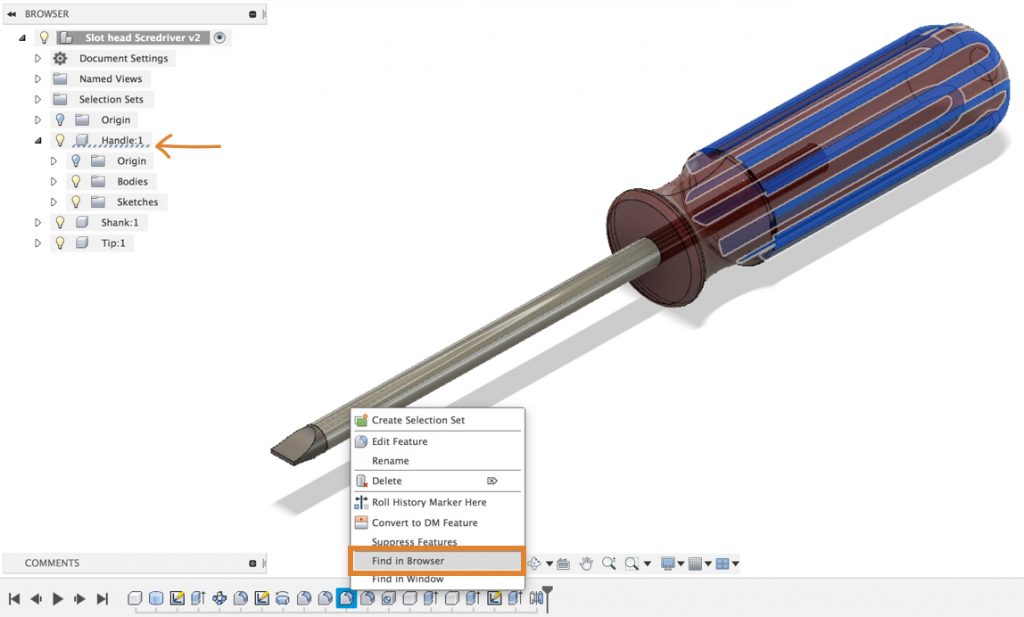
The third timeline tip is that you can right-click on a feature in the Fusion 360 timeline and select “Find in Browser.”You’ll see that it will highlight the related features in the browser with dashed lines. This is particularly helpful in very large assembly files where the timeline may take up the entire screen. You can also do the opposite and right-click on an object in the browser and select “Find in Timeline” and you’ll see that the timeline features are also highlighted with dashed lines.
Tip #4 – Suppress Features
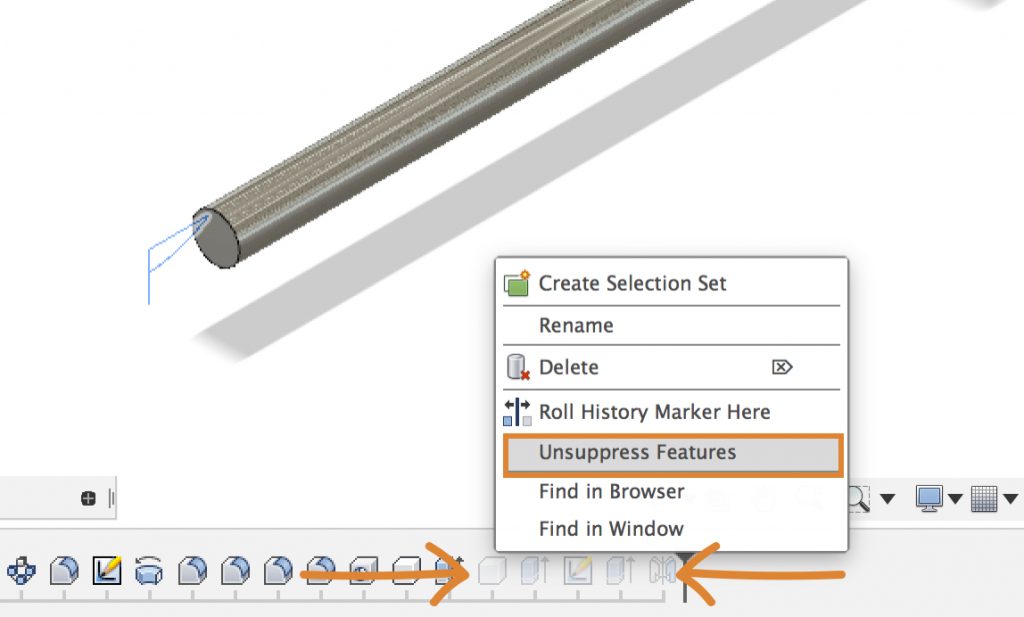
The fourth timeline tip is that you can suppress features and make them temporarily unavailable. To suppress a feature simply right-click on the feature and select “Suppress.” Suppressed features do not display in the graphics window and they will be dimmed in both the browser and the timeline. You’ll notice that if you suppress the beginning of a feature that has others dependent on it then it will suppress all dependent features. If you select a feature or occurrence that has nothing depending on it, then it will suppress just that one feature.
Tip #5 – Group Features
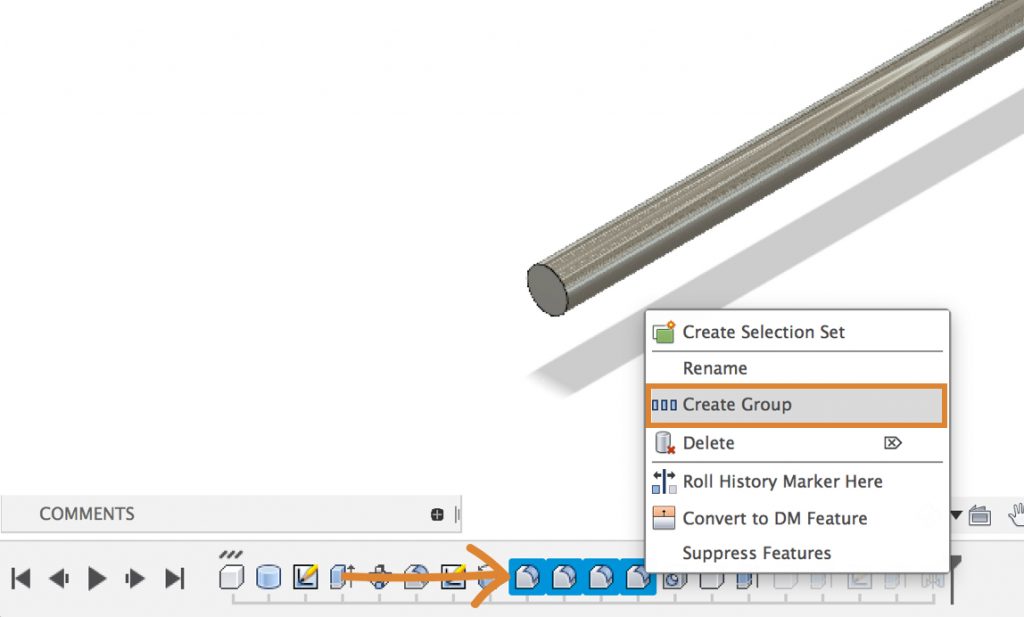
The fifth timeline tip is that you can create groups to further organize your timeline. This can be helpful if your timeline is very long in a large assembly file. To group timeline features simply hold down the Command key on Mac or the Control key on Windows and select all of the fillets. Then, right-click and select “Create Group.”
You’ll see that it will immediately group the features and you can toggle the group open and closed by clicking on the plus or minus icon, respectively. You can also right-click on the group, select “rename,” and rename the group to whatever naming convention helps your workflow.
If you want to deleteDeletes the selected entity from the design. Select components, bodies, sketches, and construction entities to remove. More the group you can select the group, hit the delete key, and then make sure you’re only deleting the group and not its contents…unless you do want to delete everything you can select that option as well.
Tip #6 – Rename Features
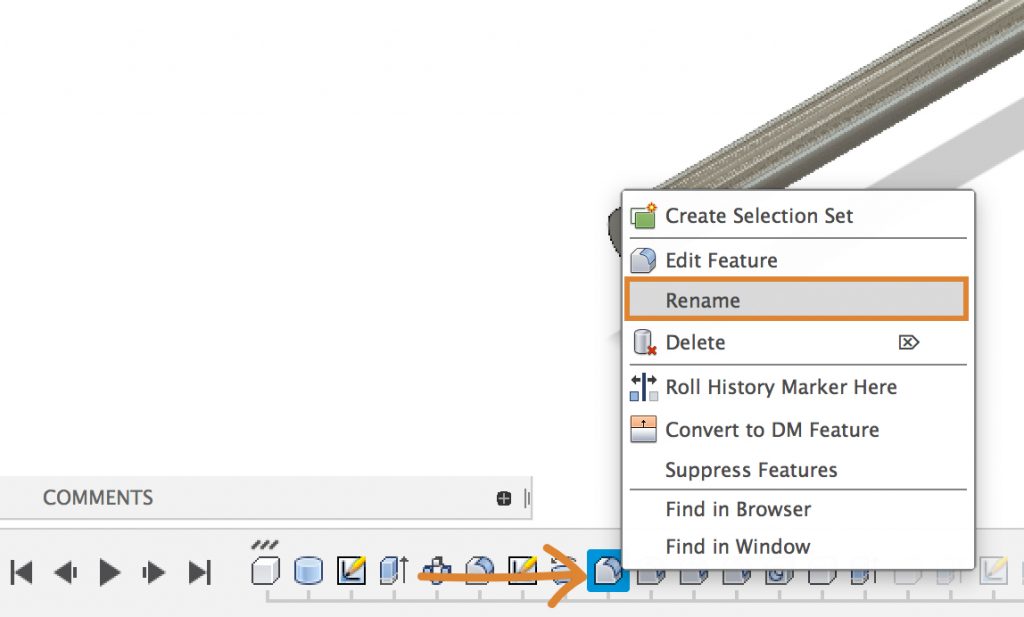
The sixth timeline tip is that you can right-click on an individual feature and rename that, similar to how you can rename groups. Re-naming features in the timeline can help you find specific features later on. This really depends on your workflow and personal preference, as you can always select features in the timeline and look atRe-arranges screen to look at selected object. More the corresponding highlight in the graphics window.
Tip #7 – Selection Sets
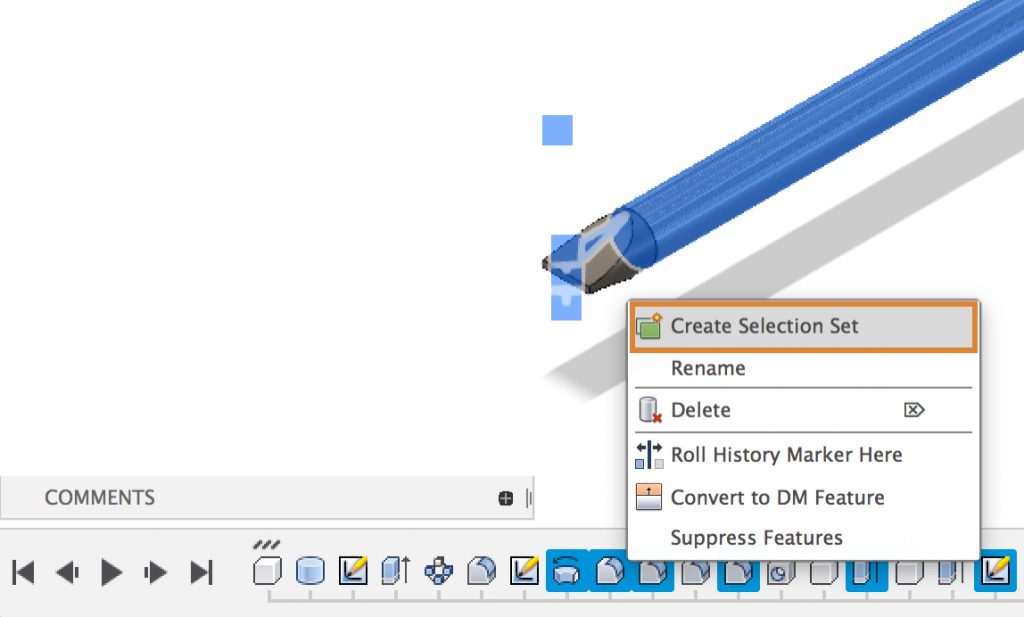
The seventh timeline tip is that you can create “selection sets.” A selection set is a way to select a number of different components or features in a complex assembly, in which you don’t have to keep selecting them one by one. Selection sets can help you spend less time selecting and more time focused on designing.
To create a selection set simply hold down the Command key on Mac or the Control key on Windows and select all of the timeline features that you want to use. Then, right-click on one of the features, and select “Create selection set.” You could also create a selection set by selecting multiple components or bodies in the Fusion 360 browser.
Then you’ll notice in the browser the selection sets will be grouped in a folder. You can click on the “select icon” to quickly select all of its objects. You can also right-click on the selection button and you’ll have a number of options. Again, this selection set really only becomes useful in very large assembly files, especially if you need to keep selecting components or features to suppress them or make other changes to them.
Tip #8 – Drag Features Around
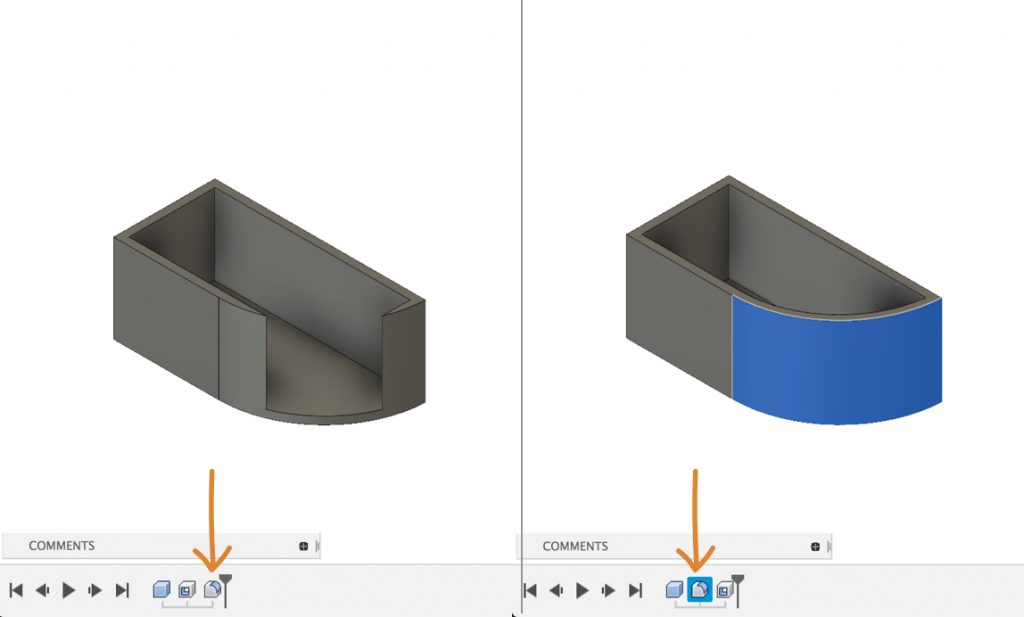
The eighth and final timeline tip is that you can drag features around to fix errors in your model. Probably one of the most common errors occurs when using the shellRemoves material from a part interior, creating a hollow cavity with walls of a specified thickness. Select faces then specify a thickness. The selected faces will be removed and the body will become hollow. More feature. If you filletPlaces an arc of a specified radius at the intersection of two lines or arcs. Select the vertex or the two lines or arcs. Specify a radius for the fillet. More an object after a shell then it may cut too much of the object away. Contrary, if you click and drag the fillet in front of the shell feature in the timeline, then you will notice that it fixes the model.
Keep in mind that moving features around should be treated as a last resort. I highly recommend sketching out your designs before working in Fusion 360, which will allow you to think about these sort of things before they happen. Otherwise, you’ll find that sometimes sliding timeline features around can cause more errors than it fixes.
REALLY appreciate these tips, especially about the “group delete (expand contents)”
Hi Dave,
Glad to hear you enjoyed the tips! Thanks for stopping by and happy learning. 🙂
Cheers,
Kevin
How do you move something to the END of the timeline? I can drag a feature around and see the vertical line where it’s going to place it, but it won’t let me move it all the way to the end.
Hi Mitch,
There are a few things at play when moving items in the parametric timeline.
Firstly, the timeline marker must be all the way at the end.
If the items still won’t move, it’s likely because there is a dependency on another item. For example, you cannot move an Extrude past a Fillet command if the fillet is applied to the Extruded object. In that case, you would want to shift click both items and move them together. I’m guessing that’s what’s at play with your scenario.
Try checking for any other timeline items that it may be dependent on and move them together.
Best,
Kevin
Hi … great tips!
A quick semi-related Q: Is there any history when sketching? e.g. I created a square then offset it by 2mm outside then extruded that 2mm profile.
Then I work on and later want the profile I extruded to be 1mm – can I somehow edit the offset feature within the sketch?
Thanks!
Mike
Hi Mike,
While your sketch is active (editing), you can double-click on the Offset icon next to the lines/entities that had the offset applied. That will allow you to adjust the original offset value.
That said, when possible I recommend using modeling feature over sketches as it’s much easier to maintain the ability to update in a parametric manner.
That often means using Offset Faces, Thicken, Shell, or other means to create the desired wall thickness.
Regards,
Kevin
Thanks Kevin
I’ll look more into the items listed…
I’m very much a beginner and only just getting to grips with how it works (mostly) so thanks for pointing out the different ways to possibly achieve the result.
Cheers
Mike
You’re welcome, Mike! Happy to help!
Regards,
Kevin