Fusion 360 does not (currently) have a native way to export all your files at once. Of course, you could manually export each file – but that’s unrealistic!
Fortunately, 3rd-party software developers have created add-ins and scripts to extend Fusion 360’s functionality.
There are two add-ins and one script that is available to help automate the bulk export process. Below you’ll find links to the add-ins, along with instructions for installation and troubleshooting.
- Add-ins for Exporting Fusion 360 Files
- Steps to Install the Project Archiver Add-in
- Step by Step Video Tutorial
- Troubleshooting Project Archiver Errors
- Video Transcript
Add-ins for Exporting Fusion 360 Files
I found the following two add-ins and one script that automate exporting all your Fusion 360 files. I’ve tested all three and numbered them in order of how well they worked for me. Try another one if you find one doesn’t work with your files.
Remember, these are add-ins and you may experience unique bugs based on your file names, types, structure, or other variances.
- Project Archiver (GitHub) – Add-in
- Fusion 360 Total Exporter (GitHub) – Add-in
- Fusion 360 Bulk Exporter (GitHub) – Script
Steps to Install the Project Archiver Add-in
IMPORTANT: The Project Archiver download has an extra folder that prevents the add-in from working. To fix this you will have to navigate to the “apper” folder. You will notice the folder contains a second “apper” folder that includes the files. You will need to delete the top-level apper folder. There should only be one, which includes all of the source files, and it needs to be placed at the same level as the other folders.
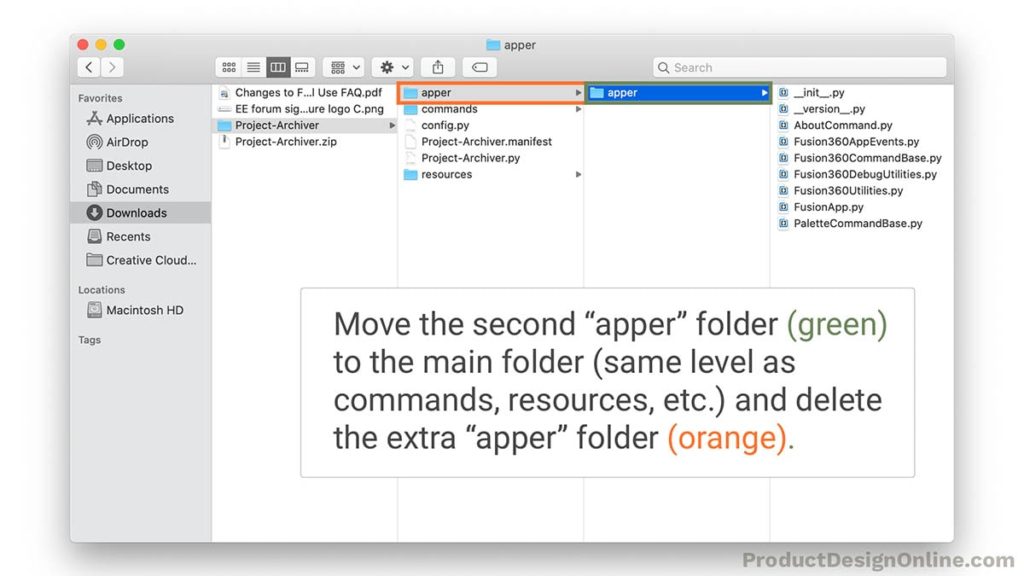
You can also use the following file download where I’ve fixed this for you.
- Download the Source Files
Head to the Project Archiver GitHub page and select the Download button OR use my Fixed Project Archiver Files above – that way you don’t have to fix the folder structure.

- Choose Installation Location
Temporary Installation – If you only plan on using the add-in a single time then keep the add-in files in your downloads folder.
Permanent Installation – If you want the add-in to stay available in Fusion 360 then move the add-in files to the following directory based on your operating system.
Mac: ~/Library/Application Support/Autodesk/Autodesk Fusion 360/API/AddIns
Windows: C:\Users\your_user_name\AppData\Roaming\Autodesk\Autodesk Fusion 360\API\AddIns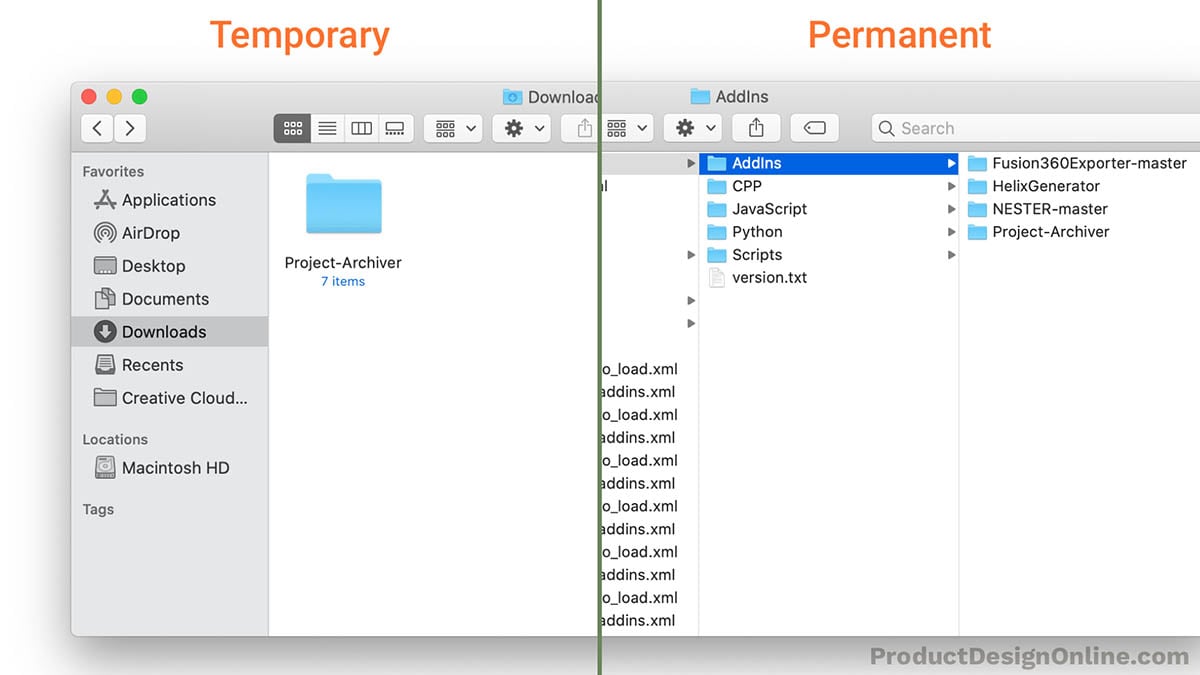
- Open Scripts and Add-Ins Dialog
You’ll need to open the Scripts and Add-Ins dialog to add and run it. Select the Tools tab, followed by selecting the “Scripts and Add-Ins” feature.
Tip: You can use the shortcut SHIFT + S to open the Scripts and Add-Ins dialog.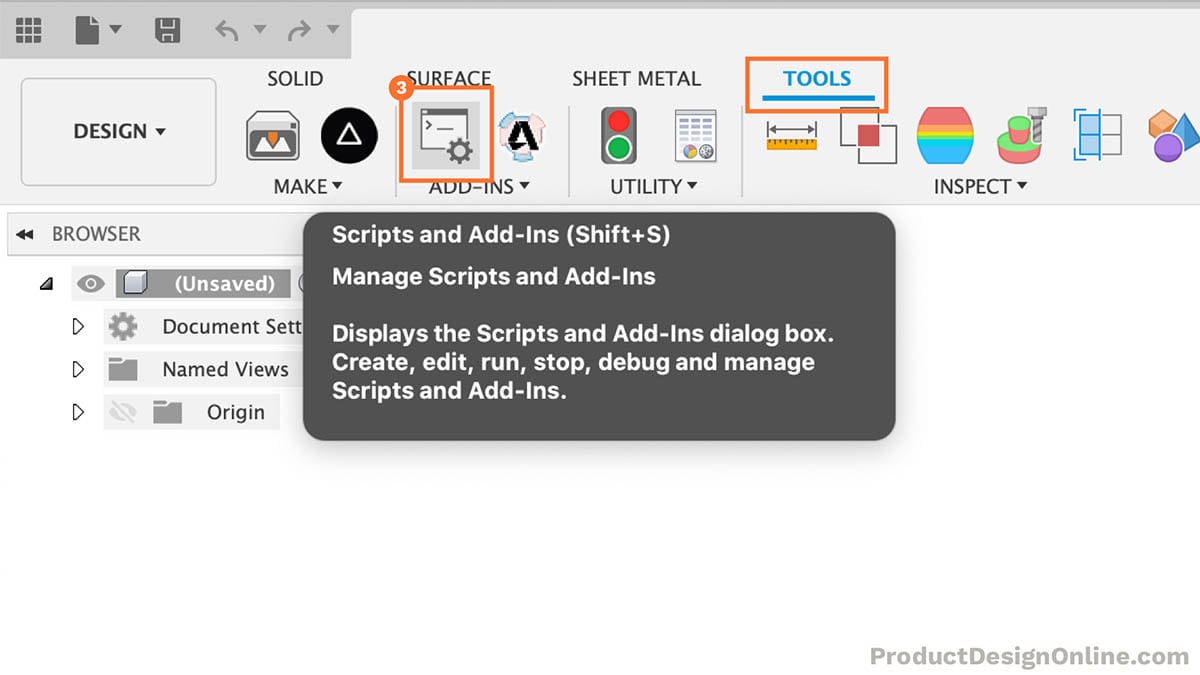
- Add and Run the Add-In
Select the Add-ins tab, followed by the green plus symbol. Your local folders will open. Select the Project Archiver folder (from your chosen location in Step 2).
Select the Project Archiver name (highlighted in blue) and select the Run button.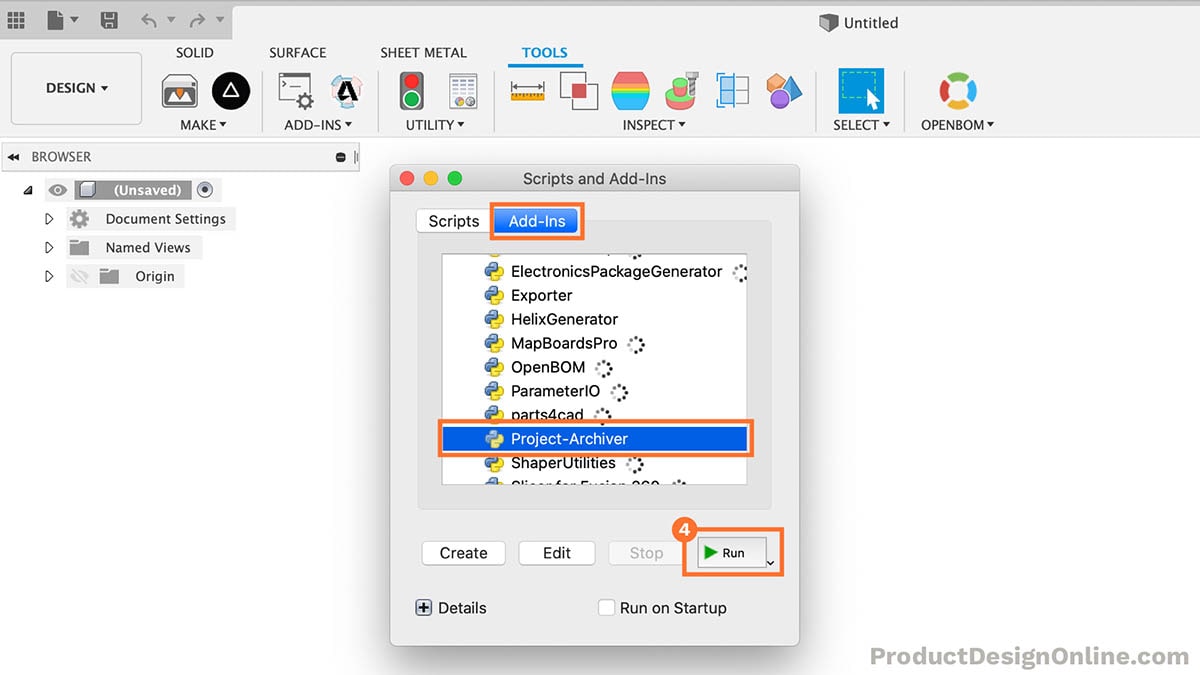
- Project Archiver Tab
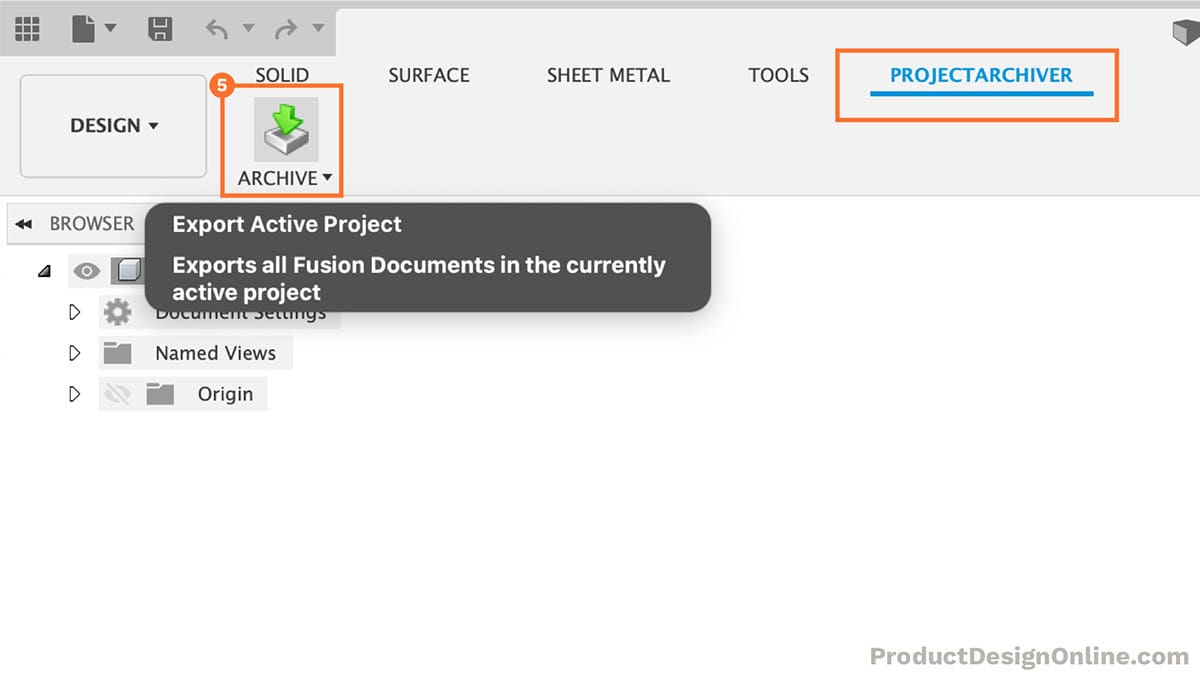
Once you run the add-in a “ProjectArchiver” tab will appear in the toolbar. Select the tab, followed by the “Export Active Project” button.
- Define Export Settings
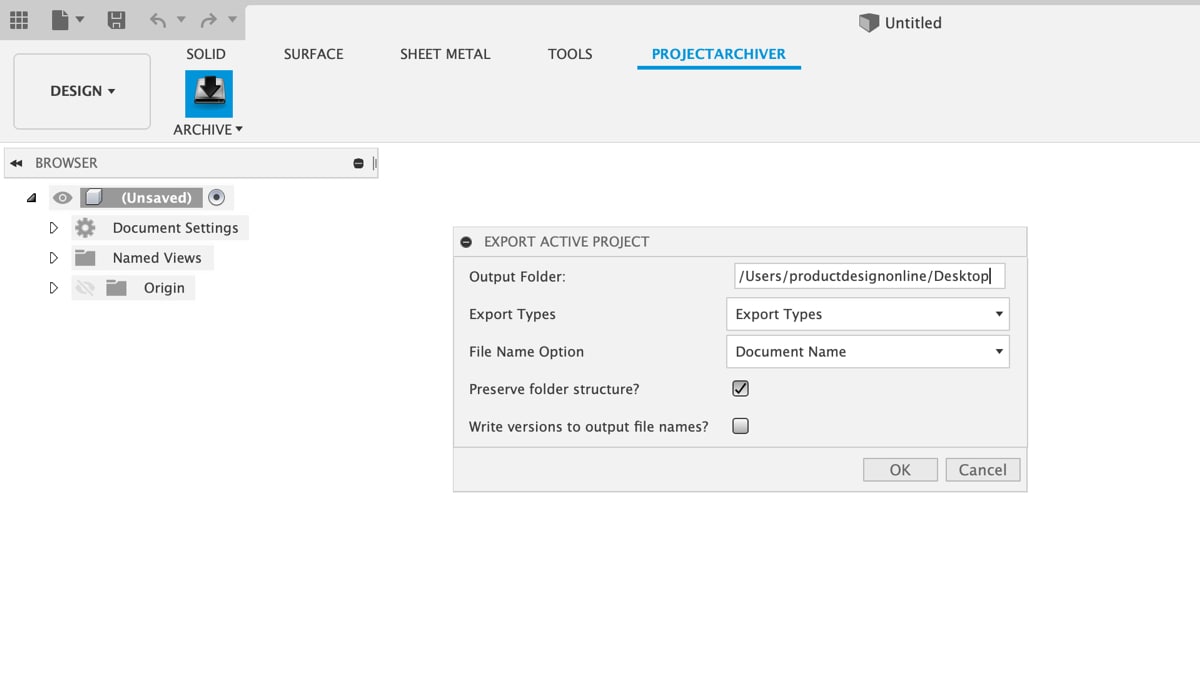
You can define the following export settings within the “Export Active Project” dialog:
Output Folder – Choose where the files and folders will be exported. Change this to your Desktop, Documents, or Download folder by changing the last word.
Export Types – Enable which file extensions (IGES, STEP, SAT, SMT, F3D, and STL) each file should be exported as.
File Name Option – Choose between the default Document (file) Name, Description, or Part Number. The description and part number are both pulled from the Properties of each file’s top-level component.
Preserve folder structure? – Checking this option will export any ‘folders’ that you have within each project, keeping the files organized. Otherwise, all files will be exported will export to a single folder if this is unchecked.
Write versions to output file names? – This option will automatically add the latest version number to the end of each file name.
Once settings are defined, select OK to run the add-in.
Troubleshooting Project Archiver Errors
Add-Ins and Scripts are often developed by 3rd-party software developers. (Only a few are actually developed and maintained by Autodesk). This means they are not thoroughly vetted or tested across all operating systems and use cases.
On occasion, you may run into an error message when trying to export your files. Sometimes this results in cryptic error messages full of code snippets or developer lingo.
Below you’ll find a few things to look out for when using the Project Archiver add-in. If you find any additional errors – and their meaning behind them – then please comment them on this page. I’ll update the list accordingly.
- Add-In Won’t Run – If you get an error message immediately after clicking “Run” then it’s likely your file structure. First, make sure all the add-in files are in the correct location (Step 2 above). Second, make sure there are not any unnecessary folders or files within the add-in source folder.
- Weird File Names – Make sure your file names do not include any slashes or unique characters, especially those special characters that programs don’t like [# $ % & ‘ ( ) * + , – . / : ; < = > ? @ [ ] ^ ` { | } ~]
- Delete Empty Folders/Files – If your project has any empty folders or files then you’ll want to delete them before running the add-in. The add-in cannot export something that does not exist. Instead, it will lock up the add-in and you’ll have to run it again.
- STL/Mesh Bodies – Any mesh bodies (STL or OBJ) cannot be exported as a STEP file. You may need to manually export any files that contain mesh bodies.
Did this Save You Time?
Step by Step Video Tutorial
Video Transcript
Are you wondering how to bulk export all your Fusion 360 files? There’s currently not a native way to do it, but I found something that will automate the process and I think you’ll like it.
Today, if you want to export a Fusion 360 file from within Fusion 360, the only option is to have the file open, go to the File dropdown > Export > and then select the file type and location.
There’s no native way to export entire projects or folders. As you can imagine, this would be quite an inconvenience to do for every single file.
However, I found a great add-in that automates the process. There are actually 3 add-ins available that all try to do similar things.
I’ll link to all three of them, but I’m going to walk you through one called Project Archiver, which is the one I’ve had the most success with.
I’ve placed a link in the video description for this tutorials resource page, where I’ve included the links and instructions on how to get the add-ins from Github.
Once you have the add-in files downloaded, you’ll need to head to the Tools tab, followed by the “Scripts and Add-ins Feature”. You can also hit the keyboard shortcut SHIFT + S.
The one I’m using is an Add-in and not a script, so we’ll also need to switch to the add-in tab.
From here, we can select the plus symbol to add it. Simply select the source folder on your local machine, followed by the “Open” button.
The Project-Archiver will then appear in the list. We simply need to select the name and hit the Run button.
Once that add-in is officially running, we’ll be presented with the Project Archiver Tab, up here in the toolbar.
This add-in differs from some of the other export add-ins because it works by the active project in your data panel. The other add-ins that I’ve included on the resource page all try to do every single file regardless of their location in the data panel. I found that often caused Fusion or the computer to lock up, or the add-in runs into an error that stops it from working. The downside is that you then have to figure out what caused the error and run the whole export again.
For this add-in, we simply need to open the data panel and double-click to select one of the projects. Doing it by project means you’ll have to run the add-in a few different times, but if you run into any errors you won’t have to worry about your successful exports. It also makes it easier to figure out which file is causing the error, should you run into any problems.
Once you choose your project, simply select the “Export Active Project” button in the toolbar.
Within the dialog, we can first determine where we want the files to go. This will default to a ProjectArchiver folder. However, we can change this to our desktop or downloads folder.
Second, you’ll find that we can choose which file types to download. Of course, you’re likely looking to get STEP files for their wide acceptance with other CAD programs. I’d also recommend checking STL and the native Fusion 360 file, which are both nice to have as backups. The IPT file is an Autodesk Inventor file should also be considered, as you can always convert inventor files to step files as a last resort.
This add-in also allows us to define the document name from one of three options. We can use the default document name, which is the file name…or we can use the Description, or we can use the Part number. Both of these will be pulled from the Properties dialog of your top-level component.
“Preserve Folder Structures” will export the files in addition to the folders that you have within your project. However, if we leave this unchecked then all the files will be placed in a single folder.
Last but not least, if we check the versions option it will output the latest version number along with your chosen file name.
It’s also important to note that this add-in is going to export the latest version of each file, it will not export every single file version. If for some reason you want specific versions of a file, then you’ll need to manually export them or promote them to the latest version and run the add-in a second time.
We can then click OK and the add-in will automatically open all the associated files within the active project… and it will export each of the selected file types to your chosen location.
This may take several minutes depending on how many files you have within a given project.
As you can see, this exported the files to my Desktop, including the folders, names, and all the file types that I selected.
Lastly, it’s important to note that this is an add-in, so you may run into bugs or cryptic error messages.
I want to share two common things that are likely to cause errors. First, make sure that none of your file names include slashes or unique characters. This likely conflicts with the add-in code, which causes the add-in to stop working.
Second, if you have any empty files or even empty folders within a project, then it’s going to cause an error as it cannot successfully export something that does not exist.
I recommend taking a minute or two to browse your project beforehand, and delete any empty files or folders. Change any file names if you need to, and you’ll have greater success in exporting every file in one pass.
Oh, and one last thing. I know that many of you are upset about the recent license changes. I have my own mixed feelings and opinions, but I want to take a moment to clarify a few things. First, I am not paid by Autodesk, nor will I accept any payment or form of compensation to influence my opinions. The reason I started this channel was to help democratize CAD education to make it more accessible to anyone that wants to learn.
With that in mind, the second thing is that I will still be doing Fusion 360 tutorials. Whether you stay on the Personal Use license, or you upgrade to a Commercial license, Fusion 360 is still a very powerful software package, and to be honest, there really is nothing comparable at the same price point when you compare it with other professional CAD software.
That’s all for now, I’ll have a project-based video for you next week! Be sure to subscribe if you haven’t already and get back to designing – check out that 3D printing playlist in the lower right corner.

Kevin:
Thanks for this new information. I did have an issue with Project Archiver as explained below.
Tried to use Project Archiver, but ran into a problem. Add in crashed after 2 files. Occurred with default STEP file and if STEP, F3D and STL were all selected. Download directory was default. If I re-run the add in, Fusion 360 crashes & closes.
Issue occurred on MacBook Pro 16″ with Catalina 10.15.6 and most current version of Fusion 360 Enterprise, single seat version.
This has been reported to the developer via GitHub.
Will try the others and see what happens
Thanks for all of the effort you put in to spreading good info about Fusion 360.
Hi David,
Thanks for sharing this. I just updated this page with four errors and their reasons. Please check them out and let me know if that helps at all. I’m keeping my eye out and will update the “Troubleshooting” section when others share what they did to overcome an error.
I’ll try to keep an eye on the GitHub page as well.
Cheers,
Kevin
My attempt failed see facebook page for picture of failed dialog box.
Hi Rudy,
Glad to see that you got it working. For everyone else reading this – I’ve updated this page with an important note about the file structure, including a fixed source file download to save you time.
Cheers,
Kevin
It is indeed working and really like it but so far has not been able to export all files as the addon stops working faulting after three folder exports. I looked at the folders and the files I successfully downloaded and compared it ot the fusion 360 browser section. Not sure if this is any indication on which the addon failed. Tried deleting files that might be the problem based on the comparison but to no avail. Now, will go back and see if the folder failure has any empty sub folders or file with no name.
Thank you for sharing.
Hi Rudy,
Glad to hear you got it working! I would recommend checking all file names, for empty files, or for mesh files. Those are the three primary reasons the add-in stops working.
Cheers,
Kevin
Worked fine on Win10 once I figured out where to put them. I had no idea what %appdata% means. I suspect a lot of Win users won’t either. For me:
c:/Users/insert_your_username/Autodesk\Autodesk Fusion 360\API\AddIns
Probably would be a good idea how to define Temporary vs Permanent location. Why should I pick one over the other?
Hi Eric,
Thanks for the feedback! I run solely on Mac, so I pulled the Windows installation from an Autodesk help article. I’ve seen similar comments around the community, so I’ve updated the Windows installation to your suggestion – thanks!
I’ve also added a few notes to explain the temporary vs permanent installation.
Cheers,
Kevin
C:\Users\your_user_name\AppData\Roaming\Autodesk\Autodesk Fusion 360\API\AddIns
This is the correct default link. The above one has forward and backward slashes which is odd if they copy and pasted. For anyone reading this, the %appdata% pretty much is a hidden default folder in windows that you may NOT see if you don’t have certain folders unhidden.
Thank you for this tutorial!!!
Thanks, Joe! I’ve updated the link above. I appreciate you sharing this.
Cheers,
Kevin
/Users/giampa/Desktop/foto.jpg
Hi, I tried to install on mac but it gives me an error and on my fusion it doesn’t work, I have attached a print screen but I don’t know if it shows.
Thank you
Hi Gianpaolo,
After installing the add-in, try restarting your Fusion 360, then run the add-in again. Some have found that restarting Fusion 360 fixed that error.
Cheers,
Kevin
I have tried several times it does not work I get an error screen where I can send it to you so you see?
Thank you
Hi Gianpaolo,
The best place to post it would be on my Facebook Group or Discord Server – that way if others have run into similar issues they can chime in if they found a different solution. Let me know when you post and I’ll check it out too.
Cheers,
Kevin
Hi, I entered the post as requested.
Thank you
Thanks! I’ll take a look.
Thanks for sharing this add-in. It worked perfectly the first time I ran it a month ago. Now when I try to run the Add-In I get the message:
command executed failed: Traceback (most recent call last):
File “C:/Users/joeca/AppData/Roaming/Autodesk/Autodesk Fusion 360/API/AddIns/Project-Archiver\apper\Fusion360CommandBase.py”, line 432, in notify
self.cmd_object_.on_execute(command_, command_inputs, args, input_values)
File “C:/Users/joeca/AppData/Roaming/Autodesk/Autodesk Fusion 360/API/AddIns/Project-Archiver\commands\ExportCommand.py”, line 163, in on_execute
root_folder = ao.app.data.activeProject.rootFolder
File “C:/Users/joeca/AppData/Local/Autodesk/webdeploy/production/1bc48b96e2e48e9445cd9390dcacb966164222c9/Api/Python/packages\adsk\core.py”, line 7206, in _get_activeProject
return _core.Data__get_activeProject(self)
RuntimeError: 2 : InternalValidationError : group
Any ideas on what the issue might be and work arounds?
Thanks again.
It’s been a while since I’ve used it as well. It’s likely that something broke with the latest Fusion 360 updates – a common issue with 3rd party add-ins. I would recommend contacting the author of the add-in to see if they can test/update to the latest version.
Cheers,
Kevin
Is it normal that f3d file type doesn’t export the assemblies ? how can i export that as well in fusion 360 file type ?
Hi Roman,
Do you have any ‘external’ components in your file? If so, then the file will be .f3z instead of .f3d.
Best Regards,
Kevin
Hi David,
In my settings, I made a mistake, but the only way I could find to stop the process was to kill Fusion completely. Is there a way to abort the archiving within Fusion?
Regards,
Rob
Hi Rob,
Are you asking specifically for this 3rd party add-in or Fusion’s built-in ‘archive’ functionality?
If the latter, to unarchive a file in Fusion, follow these steps:
1. Open the Data Panel:
Click on the grid icon in the upper left corner of the Fusion window to open the Data Panel.
2. Navigate to the Archived Project:
Scroll to the bottom of the Data Panel. Click on “Archived” to view a list of all your archived projects.
3. Select the Archived Project:
Find the project you want to unarchive and right-click on it.
From the menu, select “Unarchive”.
4. Restore the Project:
The project will now be restored to the active projects list, and you can access and work on it again like a normal project.