Transcript:
By the end of this video, you’ll know how to use all 3 Polygon commands that are available in Fusion 360.
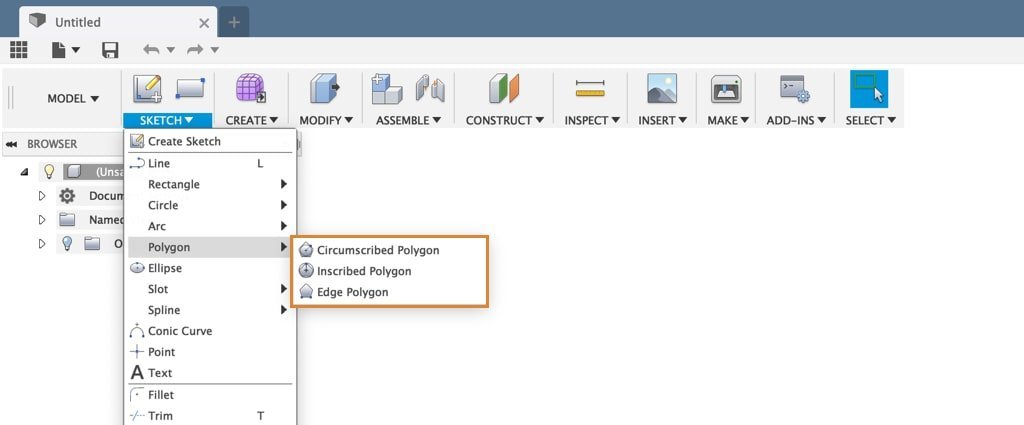
The polygon commands can be accessed in two different locations. You’ll find them in the sketch dropdown menu…located within the polygon flyout folder. Alternatively, you can access them from the right-click menu, the sketch folder, and then the polygon flyout folder.
You’ll notice Fusion 360 offers three different types of polygons. There are circumscribed polygons, inscribed polygons, and edge polygons.
To start off, I’ll activate the circumscribed polygonCreates a polygon using the center point and midpoint of one edge. Select the center point of the polygon. Specify a value for the number of sides. Select the midpoint of an edge or specify a distance and select a point. More by selecting it from the list. This circumscribed polygon helps you create a polygon using the center pointCreates a sketch point. More and the midpoint of one edge.
I’ll selectThe selection mode controls how objects are select when you drag in the canvas. More the XY origin plane, and then I’ll click on the center origin and drag out with my mouse.
There are two input fields that we can define. First, you can set the number of sides of the polygon. The lowest number you can type out here is 3, which creates a triangle, or the smallest possible polygon. You’ll see that I can continue to change this number and the sides will update accordingly.
Next, I can define the radius of the circle or the distance from the center of the polygon to the midpoint of one edge. Like any sketch input boxes, I can type out a dimension… I’ll type out 25mm…and then I’ll hit the tab key to lock the dimension in place, which will keep me from accidentally changing the size of the polygon. Now I can choose where to place the polygon by selecting a point with my mouse… and once I click you’ll see there is an orange background highlight signifying that this is a closed profile shape.
The next polygon is the inscribed polygonCreates a polygon using the center point and a vertex. Select the center point of the polygon. Specify a value for the number of edges. Select a vertex point or specify a distance and select a point. More. I’ll activate the inscribed polygon by selecting it from the sketch dropdown menu. The inscribed polygon works in a similar manner as the circumscribed polygon. I’ll click to set the center point of the inscribed polygon. As I drag out with my mouse you’ll notice the first difference is that the circle is now on the outside of the polygon… in other words, the polygon is inscribed within the circle.
I’ll make this one 6 sides… and I’ll make the dimension 35mm. After I click to set the polygon, you’ll notice the dimension field displays from the midpoint to the vertex of the polygon. One important thing to note with polygons is that you can change the dimensions by double-clicking on them…however, at the time of making this tutorial, Fusion 360 does not currently let you edit the number of sides of the polygon once you set the polygon in place.
If you plan on using any polygons in your sketches, you’ll want to keep this in mind.
The last polygon available is the edge polygonCreates a polygon by defining a single edge and the position of the polygon. Select the start and end points of one edge or select the start point then specify a distance and angle. Specify the number of sides. Select a point to define the orientation of the polygon. More. This polygon is quite a bit different because you’ll need to first define a single edge of the polygon. Then, you’ll need to define the position of the polygon.
I’ll type out the dimension of 45mm and hit the tab key to lock the dimension in place. Next, you’ll see that we can either place the second point where it will snap into place… or, we can define the angle of the position. I’ll type out 3 degrees for the position and then hit the tab key to lock the degrees in place… followed by clicking with my left mouse button to set the first edge of the polygon.
Immediately after, you’ll see that the polygon appears, and you can type out the number of sides…
As I change the number of edges, take note of how the initial edge doesn’t move… but the polygon will appear to grow or change in size based on the number of edges entered.
Lastly, you can click on either side of the initial edge to set the polygon.
In summary, you’ll find each of the three polygon sketch tools to come in handy at some point. The circumscribed polygon is helpful if you know the distance from the centerpoint to the midpoint of an edge. The inscribed polygon works great if you know the distance required from the centerpoint to the vertex of the polygon. Last but not least, the edge polygon works the best if you know the length of an edge.

Leave a Reply