Transcript:
By the end of this video, you’ll know how to use the trim command in Fusion 360.
The trim command can be activated from the sketch dropdown list… or from the right-click sketch menu. You’ll also be able to activate the trim command with the keyboard shortcut letter “T,” as in Tango, as the trim command is used quite often while in the sketch environment.
The trim command lets you trim away sketch geometry to the nearest intersecting sketch geometry.
For this demo, I’ve gone ahead and set up some sketch geometry, which I’ll use to showcase how the trim tool works. If you’d like to follow along – I’ve put a link to the demo file in the video description below.
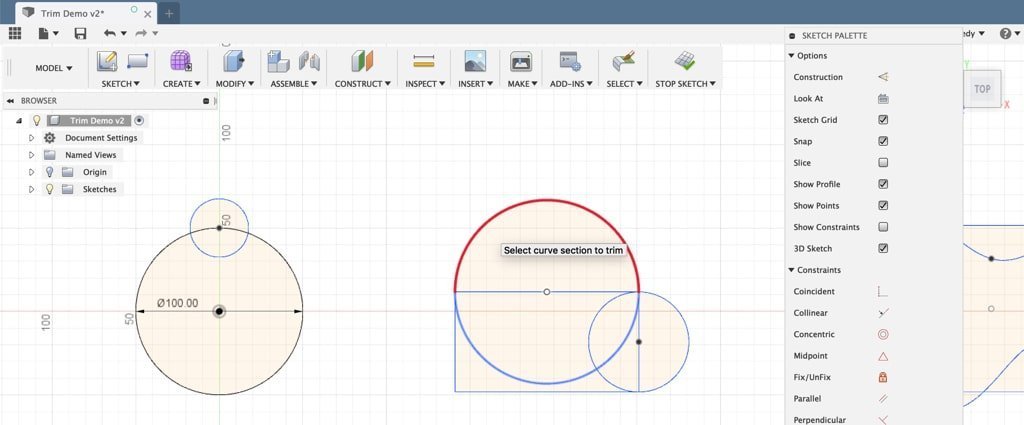
In this first example, you’ll see that I have two circles that overlap. If I click and selectThe selection mode controls how objects are select when you drag in the canvas. More each section, you’ll see that each section turns blue where I have a closed profile shape. So technically, there are 3 different closed profiles here that I could extrudeAdds depth to a closed sketch profile or planar face. Select the profile or planar face then specify the distance to extrude. More. However, all I want is this main profile or the largest one that I have selected. With the trim tool active, you’ll see that as I hover over sketch geometry it will highlight in red which part will be trimmed or cut away.
Again, you’ll notice the part in red shows that it will trim the sketch geometry up until the sketch geometry it intersects.
If the red preview looks correct, then all you have to do is click on the geometry once, and it will be trimmed away. I’ll click once on the top of the smaller circle. After trimming some sketch geometry the trim tool remains active, so you can continue to trim away other parts of the sketch.
Before I trim this other line(keyboard shortcut “L”) Creates lines and arcs. Select a start and endpoint to define a line segment. Click and drag the endpoint of a segment to define an arc. More away, I want you to take notice of the sketch constraints that are present. I’m going to hit the escape key on my keyboard so I can click on the outer circle. You’ll notice there are a few coincident constraints, and if I click on the smaller circle it also has some coincident sketch constraints, all of which were automatically applied when I created this sketch geometry.
I’ll right-click and select “Repeat Trim” from the marking-menu. This time, I’ll click on the top of the large circle, to trim it away. If you look in the lower right-hand corner you’ll notice there’s a warning that some constraints and or dimensions may have been removed.
The reason I pointed out those coincident constraints before using the trim tool was to make you aware of this fact that any time you use the trim tool you’ll have to be cautious of what it does to your constraints and dimensions. If this warning message ever comes up you can always hit the undoReverses the effects or results of the most recent action. More button to take notice what constraints or dimensions you have and then you can hit the forward or redoRe-applies the most recent action that was undone. More button to reapply the trim tool.
For the second demo, you’ll see that I have some sketch geometry that has a number of different lines on the inside. A simple trick with the trim tool that is often overlooked, is the fact that you can drag through multiple lines to quickly trim things away.
For example, if I just wanted the outer perimeter of these three shapes…then with the trim tool active I’ll simply click and while holding down the left mouse button I can drag through all of the different lines that I want to trim away… and I’m doing this a little bit slow on purpose so you can see what I’m doing, but be aware that you can actually drag through sketch geometry pretty fast here.
For this third demo, you’ll notice I have a splineCreates a spline curve through the selected points. Select the first point to start the spline. Select additional points as fit points. More that runs through some other sketch geometry. One common misconception is that the trim tool will trim away the line up until the next spline pointCreates a sketch point. More. Unfortunately, that is not the case. You’ll notice as I hover over the spline that it works like all sketch geometry, where it trims the line at the next intersection of sketch geometry.
The last demo geometry that I’ve set up is created with a number of different pieces of sketch geometry. Now technically there’s nothing wrong with leaving the sketch geometry how it is…but often times you’ll find it’s best to trim away unnecessary sketch geometry, which makes it easier to use the modeling commands, such as the extrude or loftCreates a transitional shape between two or more sketch profiles or planar faces. Select a series of profiles or planar faces to define a shape. Optionally select rails or a centerline to guide the shape. More commands.
With the trim tool active, I’ll click and drag over all the inner geometry that I don’t want. I’ll click and drag over each corner… releasing with my mouse as I move to the next, ensuring that I don’t accidentally trim the geometry I want to keep… and then I’ll trim away the sketch geometry of this inner part.
In summary, the trim tool is used to clean up and refine geometry without having to re-sketch entire sections. Trimming sketch entities is not critical to creating 3-dimensional features, however trimming extra sketch geometry will make the sketch more robust and clearly defined.

Leave a Reply